- Contents
- Index
- R-Drive Image
- Disk Actions
- Advanced File Filtering
- RAIDs, and Various Disk and Volume Managers
- Startup Version
- Scheduled Actions, Command Line Operations, and Scripting
-
Technical Information
- Updates
- Cloud Services
- FTP/FTPS Servers
- Network Drives
- Image Replications
- Logging
- Creating Consistent Point-in-Time Backups
- Support for Various Disk Partitioning Schemes and File Systems
- Supported Virtual Disk and Disk Image Formats
- Disk Wiping Algorithms
- Supported CD and DVD Recorders
- List of Hardware Devices Supported in the Startup Mode
- R-Drive Image OEM kit
© 2025 R-Tools Technology Inc.
All rights reserved.
Disk to Disk Copy
It is recommended that you print out this topic and have the hardcopy on hand while you are performing this action .
Note: This help page describes the operation of the TUI startup version. Go to the Copy a Disk to a Disk help page for the GUI version and to the network drives help If necessary.
If there is a non-IDE disk controller in your system, or you plan to use network disks or external hardware devices , first check the list of supported hardware .
If you plan to use any external device, turn it on before starting the system.
If the motherboard in your computer supports the Serial ATA (SATA) devices, but IDE disks are also present, only the SATA devices should be set to the Enhanced Mode in BIOS.
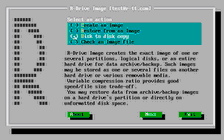
| 2 | Select Disk to disk copy on the Action Selection panel and press the N key |
R-Drive Image will start analyzing the computer disk configuration, the Progress... message showing the progress. Then the R-Drive Image: Select an object you want to archive/backup/copy panel will show the configuration.
|
H |
Hard drive |
|
P |
Primary partition |
|
L |
Logical disk |
|
U |
Unallocated space |
Use the arrow keys to switch between the options.
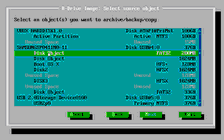
| 3 | Select an object you want to copy on the Select an object you want to archive/backup/copy panel and press the N key |
Use the arrow keys to switch between the objects.
R-Drive Image startup retains disk letters is it's used on the same computer where it's been created.
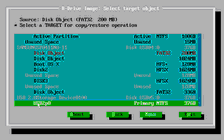
| 4 | Select the destination for the data on the Select a target for copy/restore operation panel and press the N key |
Use the arrow keys to switch between the target objects.
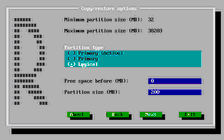
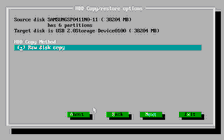
| 5 | Specify restore parameters on the Copy/restore options panel and press the N key |
For restoring/copying one or several partition(s):
|
Restore Options |
|
|
Free space before |
You may specify the size of free space that will be left on the hard drive before the beginning of the partition. |
|
Partition size |
You may specify the size of the partition to be restored. Should be between the minimum and maximum partition size. |
|
Partition type Primary(Active) Primary Logical |
You may specify the type of the partition to be restored. Do not change this setting unless you have serious reasons to do so. |
For restoring/copying an entire hard drive to another hard drive:
|
HDD Copy Method |
|
|
Raw disk copy |
R-Drive Image writes sector-by-sector the data from the original drive or its image to the target one making an exact copy of the original disk regardless of its partitioning method. Can be used if other methods create a non-bootable disk due to incorrect detection of drive's geometry or non-standard loader. Drawback: partition sizes cannot be changed. |
|
Copy all partitions onto original places |
R-Drive Image copies all partitions to their original places. If R-Drive Image detects the drive's geometry correctly, and there is no non-standard loader, it makes the same result as during Raw disk copy . |
|
Realign partitions |
R-Drive Image will copy the partitions on the disk with a 512KB alignment. This is very useful for SSD and advanced- formatted disks. If there are empty (non-used) spaces between partitions, those spaces will be removed taking into account the alignment. |
|
Expand/Shrink partition to whole disk |
If there are empty (not-used) places between the partitions or they occupy less or more space than the target drive, R-Drive Image proportionally expands/shrinks them to occupy the entire target drive. Otherwise it is similar to Copy all partitions onto original places . |
|
Fixed active partition |
R-Drive Image preserves the original offset/size of the active partition (in case the loader has links to it). |
See Support for Various Disk Partition Schemes and File Systems for details.
When you copy a system disk , a disk signature collision may occur. In this case, the Disk Signature Collision panel will appear. You may specify the way to resolve this collision on this panel.
|
Disk Signature Collision Resolving |
|
|
Same signature for both disk |
R-Drive Image will create an identical copy of the source disk with the same signature. To avoid disk signature collision , you'll have to disconnect one of the disks and restart the computer, if necessary. Use this mode if you clone a system disk for another computer or only the target disk will be used in yours. |
|
Different signature on the target disk. |
R-Drive Image will write another disk signature to the target disk. Don’t use this mode if you clone a system disk, Windows won’t start from it. To get access to the target disk after cloning, you’ll have to restart the computer or re-connect it if it’s an external USB disk. |
|
Change the disk signature on the source disk. |
R-Drive Image will change the disk signature on the source disk. Use this mode if you want to start Windows from the target disk, but be warned: the computer won’t start from the source disk anymore. |
| 6 | Verify that the information on the Confirm operations panel is correct and click the N key |
| > | R-Drive Image will start copying the data from the source disk to the selected destination |
The Progress window will show the progress of the current operation and overall process. When the data is copied, the Operation completed successfully message will appear.
The Disk Actions chapter explains basic disk actions.
The Startup Version chapter explains how to perform disk actions using the R-Drive Image Startup Version .
The Technical Information chapter gives technical information on Supported CD and DVD Recorders and List of Hardware Devices Supported in the Startup Mode and another useful technical information.
Follow this link to obtain R-Drive Image Contact Information and Technical Support
- R-Studio Technician: activation using a USB stick
- Data Recovery Guide
- Why R-Studio?
- R-Studio for Forensic and Data Recovery Business
- R-STUDIO Review on TopTenReviews
- File Recovery Specifics for SSD devices
- How to recover data from NVMe devices
- Predicting Success of Common Data Recovery Cases
- Recovery of Overwritten Data
- Emergency File Recovery Using R-Studio Emergency
- RAID Recovery Presentation
- R-Studio: Data recovery from a non-functional computer
- File Recovery from a Computer that Won't Boot
- Clone Disks Before File Recovery
- HD Video Recovery from SD cards
- File Recovery from an Unbootable Mac Computer
- The best way to recover files from a Mac system disk
- Data Recovery from an Encrypted Linux Disk after a System Crash
- Data Recovery from Apple Disk Images (.DMG files)
- File Recovery after Re-installing Windows
- R-Studio: Data Recovery over Network
- How To Use R-Studio Corporate Package
- Data Recovery from a Re-Formatted NTFS Disk
- Data Recovery from an ReFS disk
- Data Recovery from a Re-Formatted exFAT/FAT Disk
- Data Recovery from an Erased HFS Disk
- Data Recovery from an Erased APFS Disk
- Data Recovery from a Re-Formatted Ext2/3/4FS Disk
- Data Recovery from an XFS Disk
- Data Recovery from a Simple NAS
- How to connect virtual RAID and LVM/LDM volumes to the operating system
- Specifics of File Recovery After a Quick Format
- Data Recovery After Partition Manager Crash
- File Recovery vs. File Repair
- Data Recovery from Virtual Machines
- How to Recover Files from a Remote Computer Using R-Studio Standalone License and Its Network Capabilities in Demo Mode
- How to Connect Disks to a Computer
- Emergency Data Recovery over Network
- Data Recovery over the Internet
- Creating a Custom Known File Type for R-Studio
- Finding RAID parameters
- Recovering Partitions on a Damaged Disk
- NAT and Firewall Traversal for Remote Data Recovery
- Data Recovery from an External Disk with a Damaged File System
- File Recovery Basics
- Default Parameters of Software Stripe Sets (RAID 0) in Mac OS X
- Data Recovery from Virtual Hard Disk (VHD/VHDX) Files
- Data Recovery from Various File Container Formats and Encrypted Disks
- Automatic RAID Parameter Detection
- IntelligentScan Data Recovery Technology
- Multi-pass imaging in R-Studio
- Runtime Imaging in R-Studio
- Linear Imaging vs Runtime Imaging vs Multi-Pass Imaging
- USB Stabilizer Tech for unstable USB devices
- Joint work of R-Studio and PC-3000 UDMA hardware
- Joint work of R-Studio and HDDSuperClone
- R-Studio T80+ - A Professional Data Recovery and Forensic Solution for Small Business and Individuals Just for 1 USD/day
- Backup Articles
- R-Drive Image Standalone and Corporate license transferring
- Fixing Windows update error 0x80070643 with R-Drive Image
- Backup with Confidence
- R-Drive Image as a free powerful partition manager
- Computer Recovery and System Restore
- Disk Cloning and Mass System Deployment
- Accessing Individual Files or Folders on a Backed Up Disk Image
- R-Drive Image startup / bootable version
- File Backup for Personal Computers and Laptops of Home and Self-Employed Users
- Creating a Data Consistent, Space Efficient Data Backup Plan for a Small Business Server
- How to Move the Already Installed Windows from an Old HDD to a New SSD Device and Create a Hybrid Data Storage System
- How to Move an Installed Windows to a Larger Disk
- How to Move a BitLocker-Encrypted System Disk to a New Storage Device
- How to backup and restore disks on Linux and Mac computers using R-Drive Image
- Undelete Articles
- Get Deleted Files Back
- Free Recovery from SD and Memory cards
- R-Undelete: Video Recovery
- Recovery from an External Device with a Damaged File System
- File recovery from a non-functional computer
- Free File Recovery from an Android Phone Memory Card
- Free Photo and Video File Recovery Tutorial
- Easy file recovery in three steps

