- PRODUCTSFREEWAREFOR COMMERCIAL USEFOR PERSONAL AND BUSINESS USEBackup and System Restore:PC Privacy and Security:
- BUY ONLINE
- DISTRIBUTION
-
File Backup for Personal Computers and Laptops of Home and Self-Employed Users


All computers and file storage devices eventually fail. This often leads to losing files, which may be more valuable than the computer itself. Recovering these files can be expensive and time-consuming, especially if the hardware is damaged. Sometimes, the files can't be recovered at all.
You might also need to restore your entire operating system. This is usually a lengthy process if you have to start from scratch, especially if you need to reinstall a bunch of programs and reapply settings.
This is especially important for home users who don't have many resources for full system recovery and have to do it themselves instead of calling expensive IT professionals. Their files are important and often irreplaceable, like family photos and videos, unique artwork, and similar stuff.
IT professionals say a backup a day keeps data recovery away. It's much easier and cheaper to invest in file backup software and storage than to deal with emergency data recovery. This article will give you detailed suggestions on how to create a data backup plan for your personal computer and implement it using our disk imaging and data backup software R-Drive Image.
We've published some articles in our Knowledge Base that describe creating data backup plans for small business servers (for example Creating a Data Consistent, Space Efficient Data Backup Plan for a Small Business Server), but they might be too complicated for home users.
Another difference between business servers and personal computers is what kind of data needs to be backed up. Business servers usually contain complex data structures like databases, so backing up the entire hard drive is often the best option. Personal computers, on the other hand, generally have separate files, so regularly backing up only those files would be better.
There are also some restrictions on where to store backup files. They're limited to external USB storage devices and maybe a NAS (Network Attached Storage) device. You can also use various cloud services. They're reliable, well-protected, and available from almost anywhere, plus they might be free for a limited amount of storage space (15 GB for Google Drive, for example).
When we say "a personal use computer" we mean two very different types of computers, and therefore they need different backup plans.
Click the plan you think most suitable to you. You may adapt these plans to your specific needs.
- A backup plan for a laptop
- A backup plan for a desktop PC s
A backup plan for a laptop
Laptops like these are used irregularly, so it's pretty hard to come up with a specific pattern for automatic data backups that would work for most home users. That's why backup tasks will be started manually.
We'll use an external USB drive as the main place to store backup files. It will also protect against various ransomware. Since it's good to have several backups in different locations, we'll use a cloud service for replications. Cloud services are reliable, well-protected, and available from almost anywhere, plus they might be free for a limited amount of storage space (15 GB for Google Drive, for example).
Taking all above into consideration we can now start creating our exemplary backup plan.
- Our system: a laptop with a 128GB SSD, BitLocker protection is on, Windows 10 as its OS.
- Backup tasks: Personal files backup: every time you're done using the computer. The entire disk: Once a week and before and after major Windows updates.
- Places to store backup files: Personal files: a detachable external USB drive and Google Drive as a replication. The system disk: the detachable external USB drive. Google Drive can also be used if your account has enough storage space (not suitable for free accounts).
- Backup software: R-Drive Image Standalone. It has all the features we need and more, and it's inexpensive. You can try it for free for a month, with all its features intact.
Task 1: User files backup
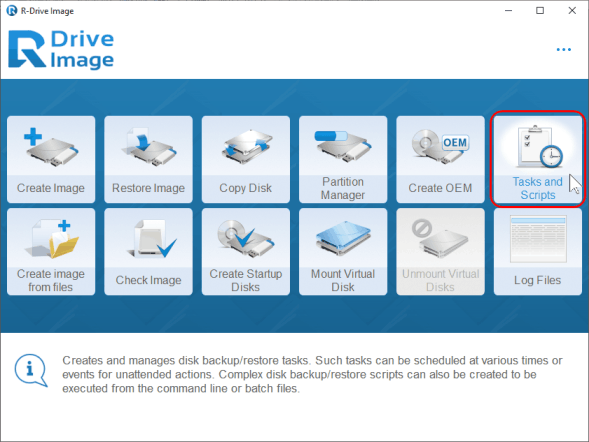
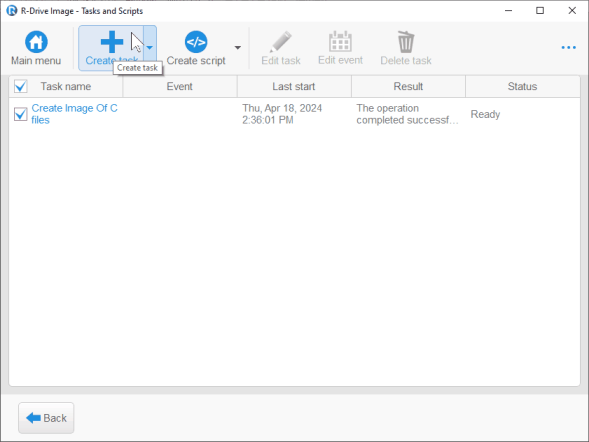
1. Click the Task and Scripts button.
Click image to enlarge
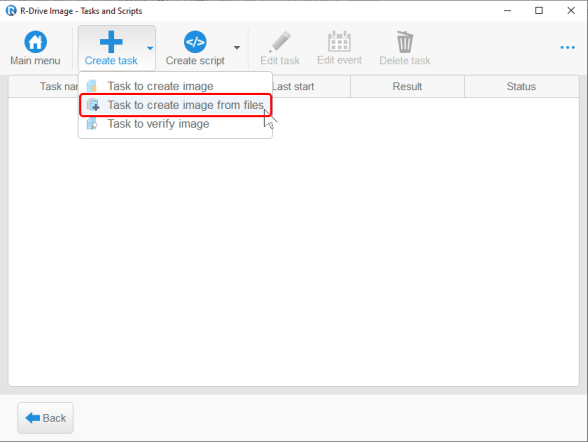
2. Select Task to create image from files.
Click image to enlarge
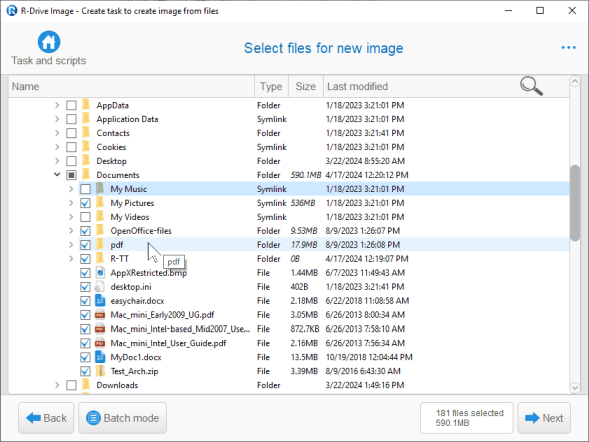
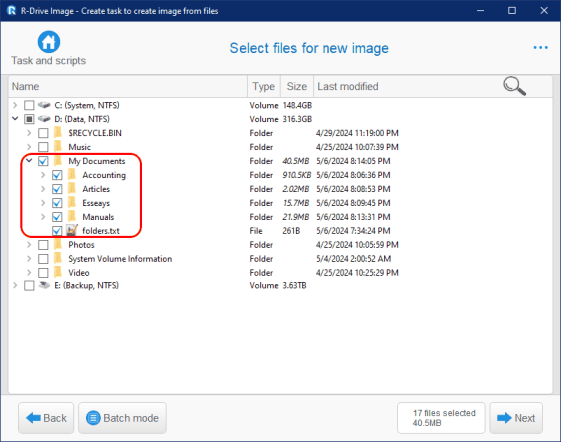
3. Select the folders and subfolders/files you want to back up.
Click image to enlarge
You only need to do this once; you won't have to do it again each time you run this task.
Then click the Next button.
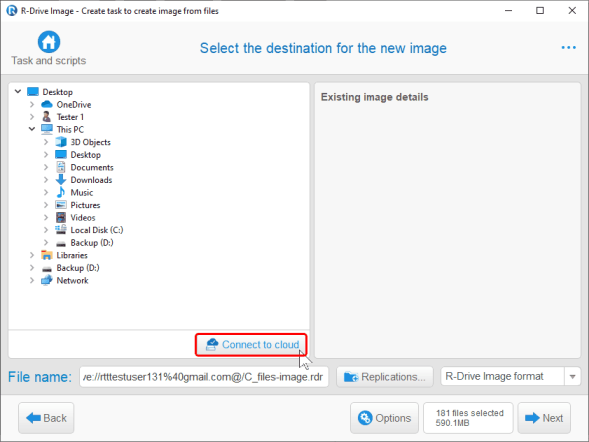
4. Click the Connect to cloud button to establish a connection with Google Drive.
Click image to enlarge
5. Click Google Drive on the Connect to cloud dialog box.
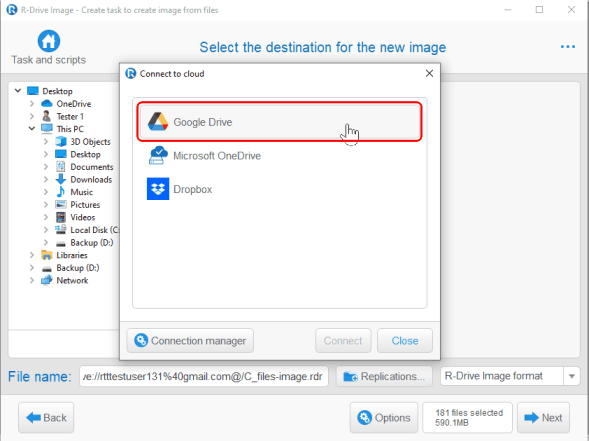
Click image to enlarge
Your default browser will open and connect to the Google site.
6. Select your Google account
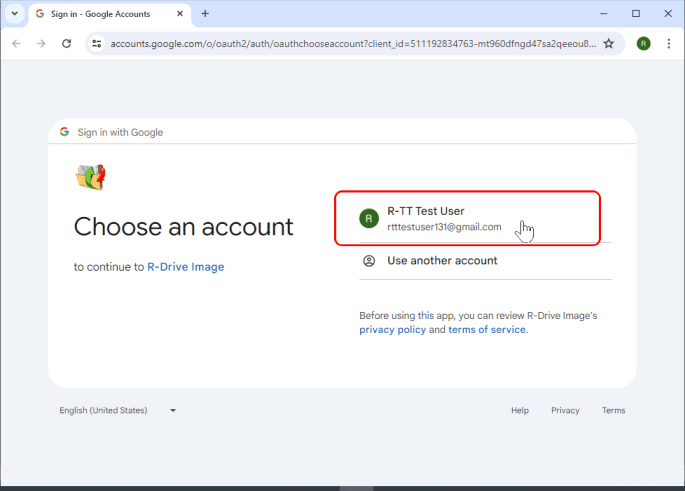
Click image to enlarge
and log in.
7. Look through the permissions you will grant to R-Drive Image
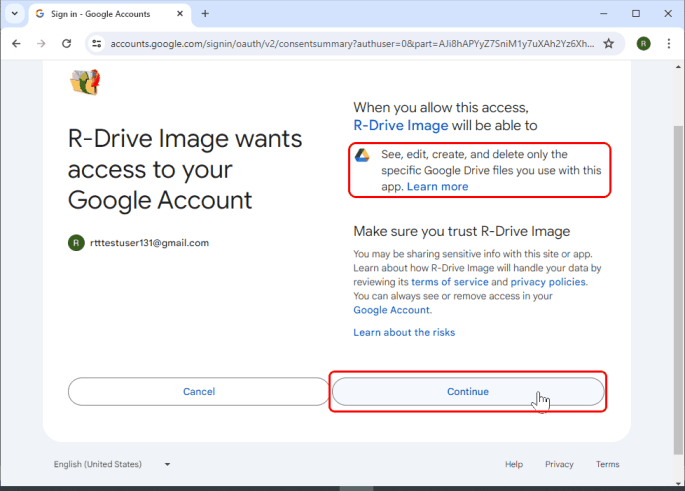
Click image to enlarge
and click the Continue button.
8. Verify that R-Drive Image is successfully authorized

Click image to enlarge
and close the browser.
9. Make sure the connection to Google Drive is active.
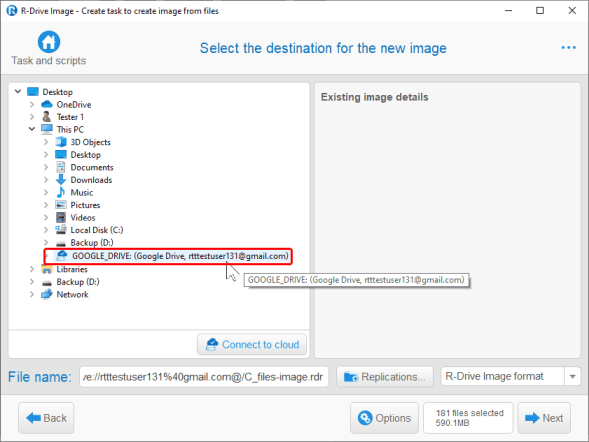
Click image to enlarge
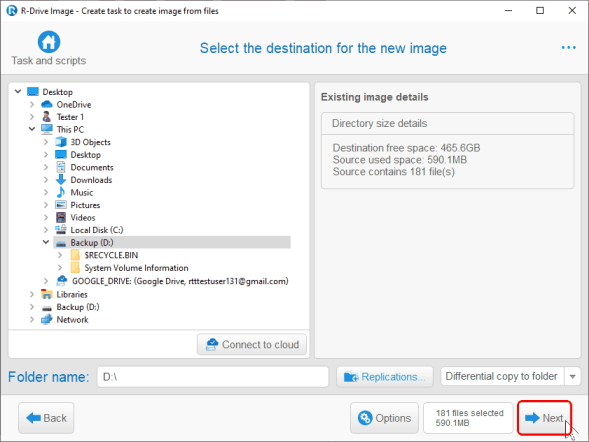
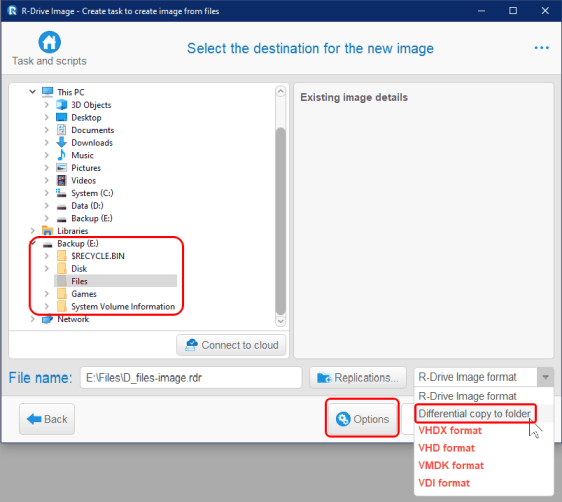
10. Select the external USB disk (D: Backup) for the Main copy folder, and choose the backup type for files.
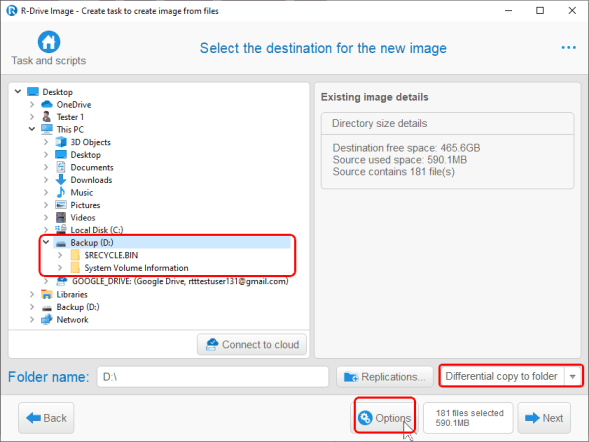
Click image to enlarge
You can select two backup types: an rdi image file and Differential files copy.
The rdi image file can be encrypted and mounted to your system as a read-only logical disk to extract only necessary files, but only R-Drive Image can work with it. Differential files copy doesn't require R-Drive Image to access files, but it's less secure as files are stored as they are. We believe that modern external disks and Google Drive have strong enough security measures for ordinary user files.
Then click the Options button.
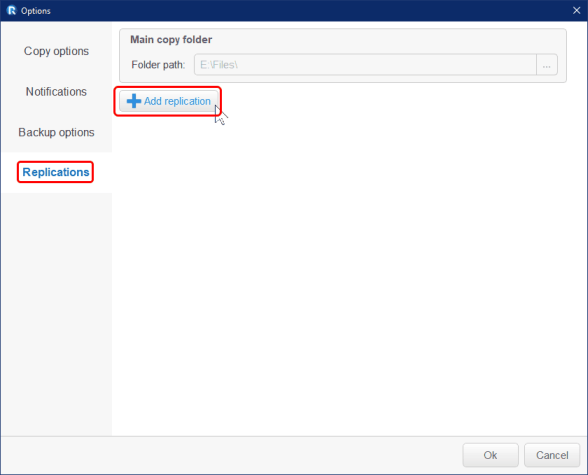
11. Switch to the Replications tab on the Options dialog box,
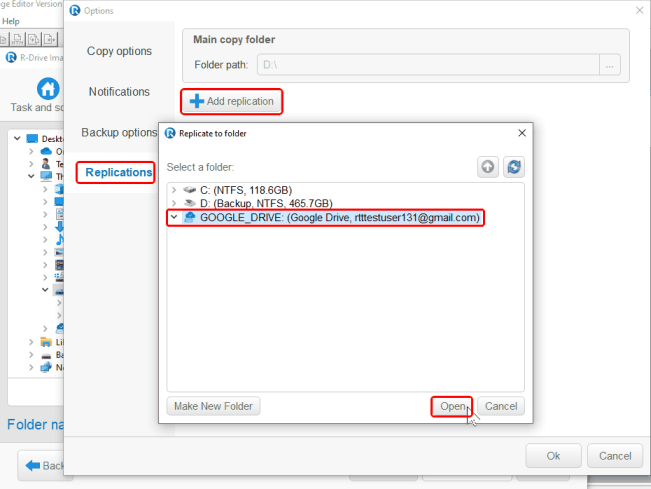
Click image to enlarge
then click the Add replications button, select Google_Drive, and click the Open button.
12. Check that the replication path has appeared on the Replication tab.
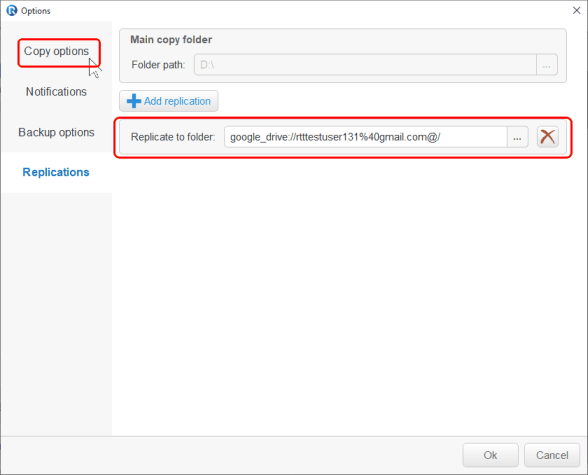
Click image to enlarge
Then you can go to the Copy options tab and specify any necessary parameters.
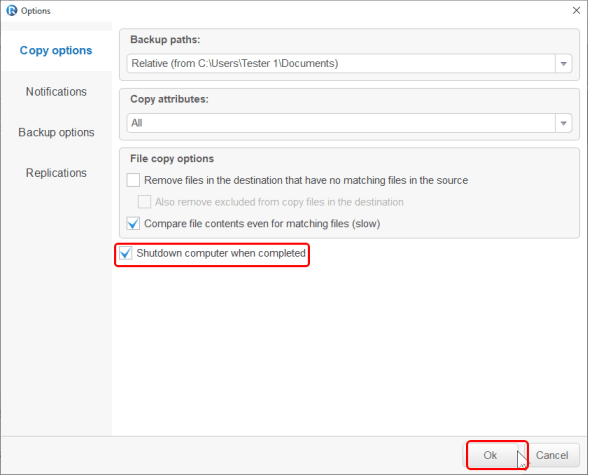
Click image to enlarge
Select Shutdown computer when completed if you want to turn your computer off when the task is finished.
You can read more about the other options in R-Drive Image help: Copy Files to a Folder.
Then click the OK button to return to the Select the destination for the new image panel.
Click the OK button on this panel.
Click image to enlarge
14. Select Manually in the Perform this task option on the Task execution schedule panel,
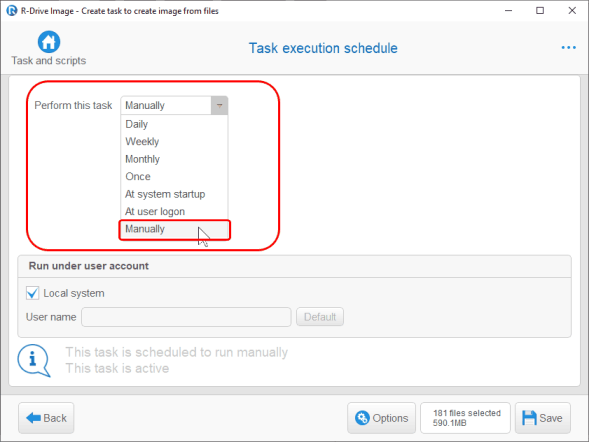
Click image to enlarge
then click the Save button.
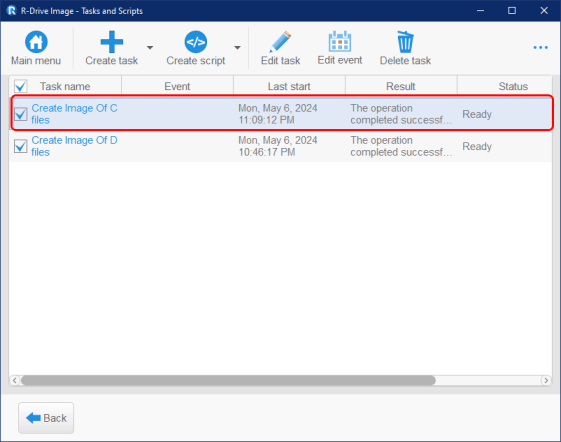
A new task will appear on the Tasks and Scripts panel.
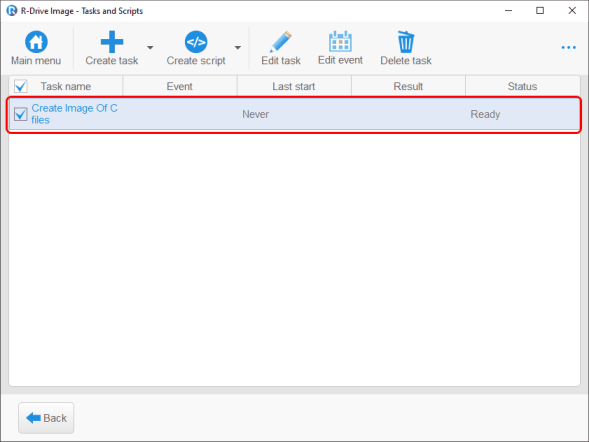
Click image to enlarge
Now you can start the task manually.
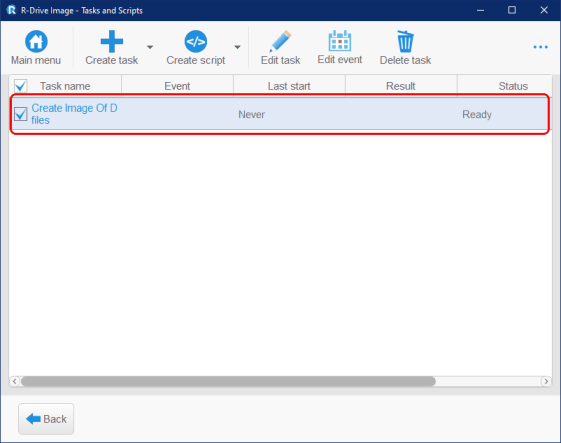
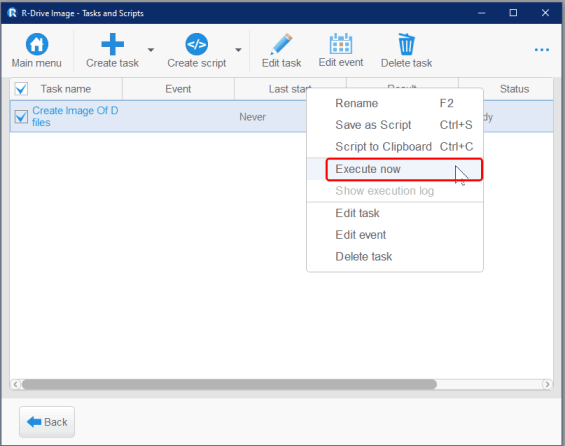
1. Right-click the task and select Execute now.
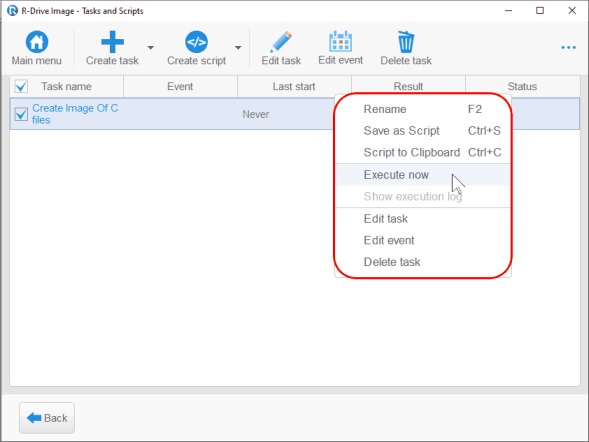
Click image to enlarge
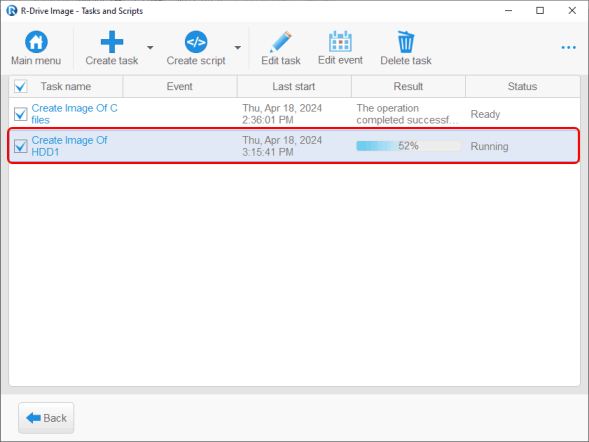
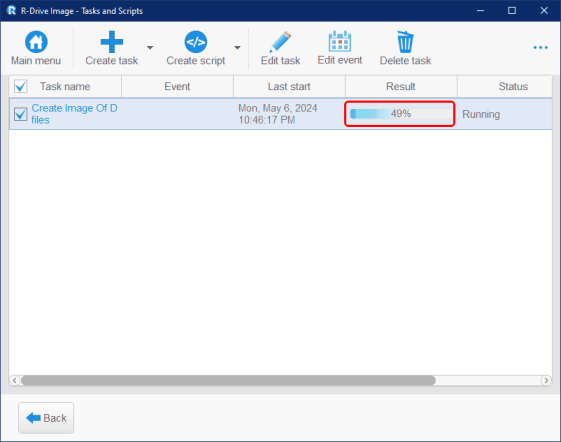
R-Drive Image will start executing this task, showing its progress.
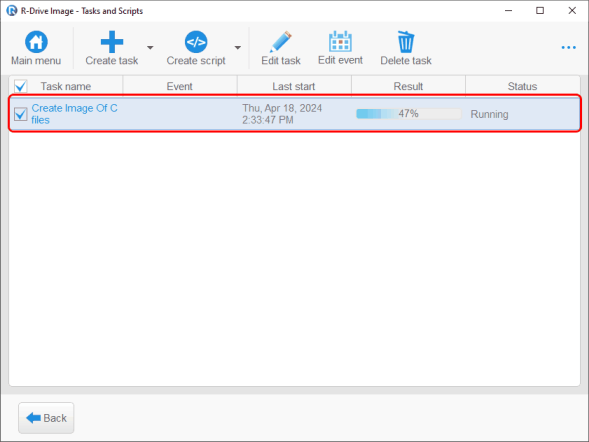
Click image to enlarge
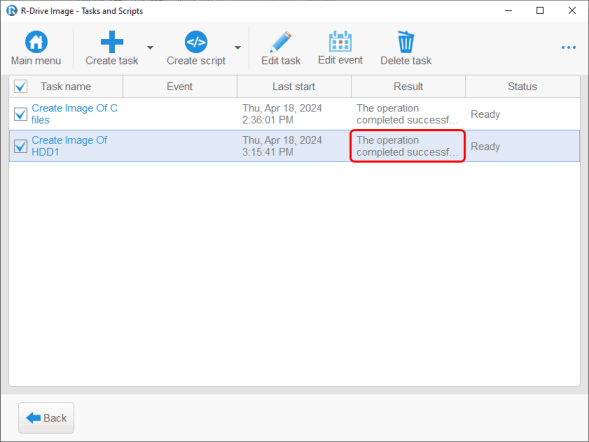
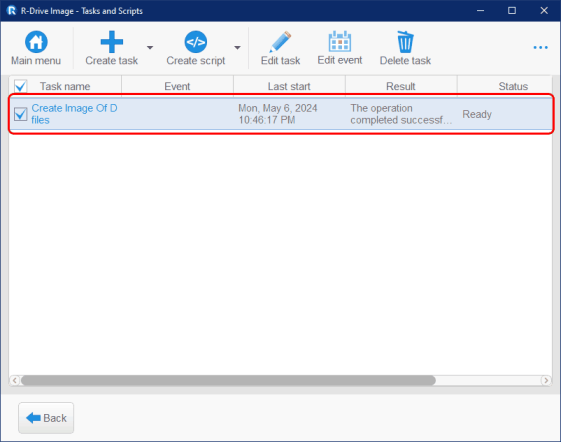
R-Drive Image will show the result when the task is completed.
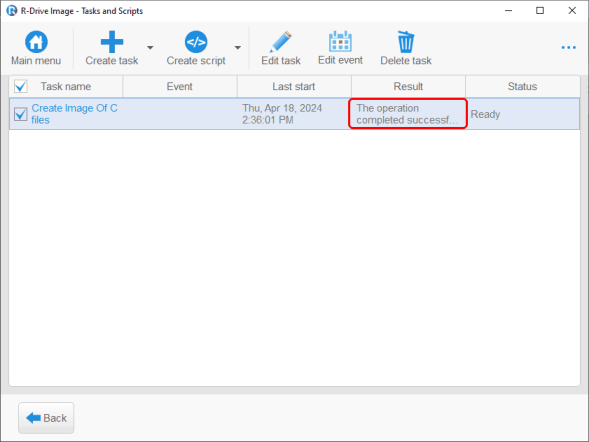
Click image to enlarge
Please note that uploading data to Google Drive may take a while if your internet is not fast enough.
Your computer will turn off automatically if you selected the Shutdown computer when completed option.
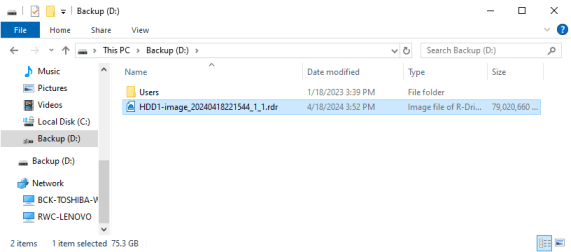
Files on the disk when the task is successfully completed.
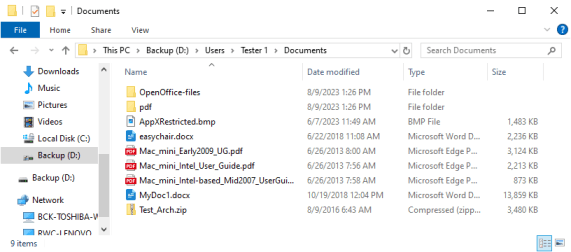
Click image to enlarge
And on Google Drive
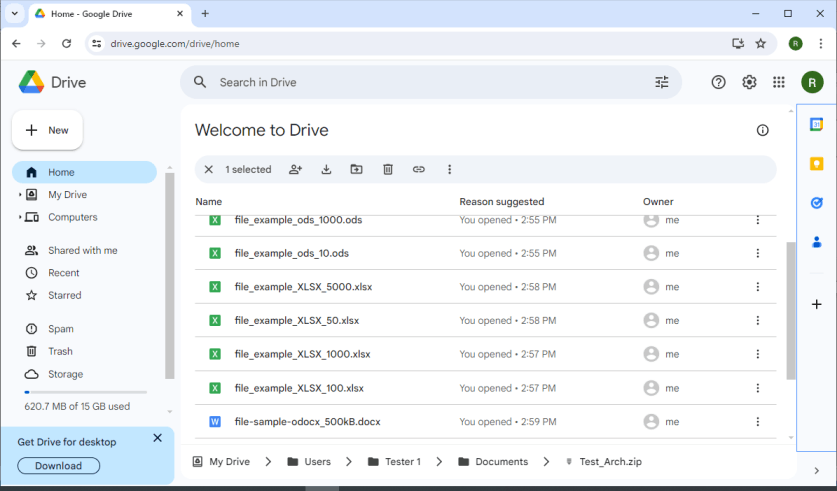
Click image to enlarge
Note that there are no folders on Google Drive.
When you start the task next time, restore the connection to Google Drive by going to Restore Image, then Tasks and Scripts, and execute the task when the connection has been restored.
Task 2: Backup of the entire system disk
1. Click the Tasks and Scripts button on the Main panel, then click Create task on the Tasks and Scripts panel.
Click image to enlarge
2. Select the entire hard disk on the Select disk(s) to create image from panel.
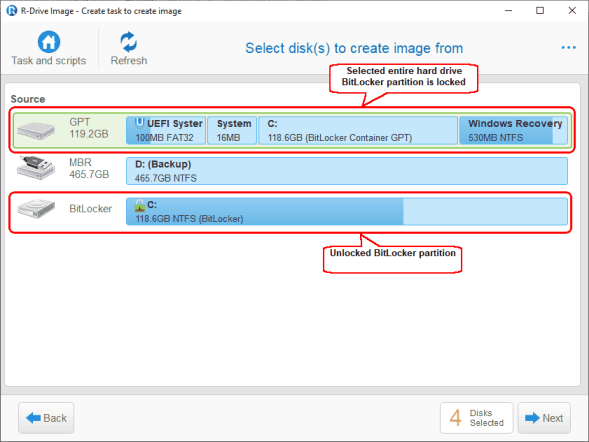
Click image to enlarge
You need to back up the entire hard drive because it contains the System partition locked by BitLocker.
3. Select the destination for the new image, backup type (R-Drive Image format - default),
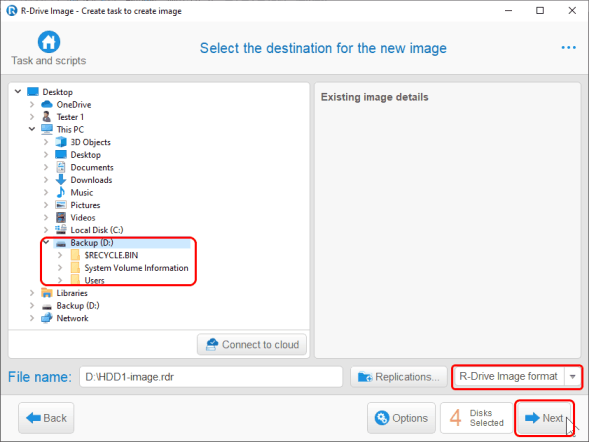
Click image to enlarge
and click the Next button.
4. Select the Rotations options on its panel.
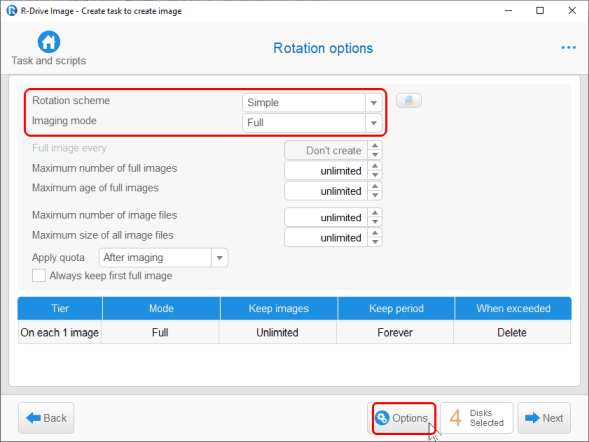
Click image to enlarge
A new full image will be created and the old one deleted every time this task is started. You can change this setting if you want to keep several old images on the disk. See R-Drive Image online help for more details: Simple Rotation Schemes.
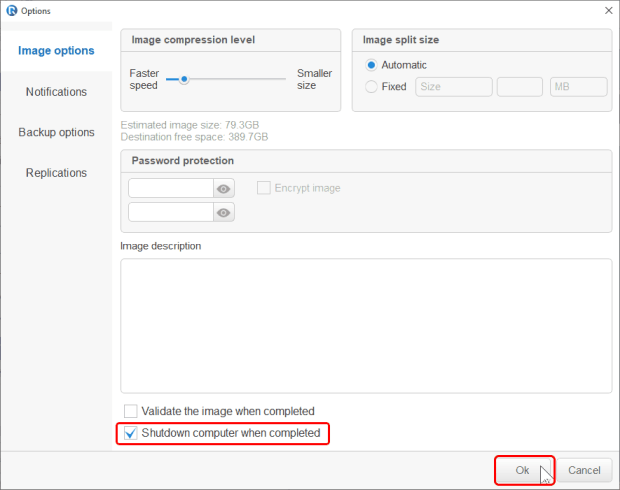
5. Go to the Image options tab and specify any necessary parameters.
Click image to enlarge
Select Shutdown computer when completed if you want to turn your computer off when the task is finished. You can read more about the other options in R-Drive Image help: Create an Image.
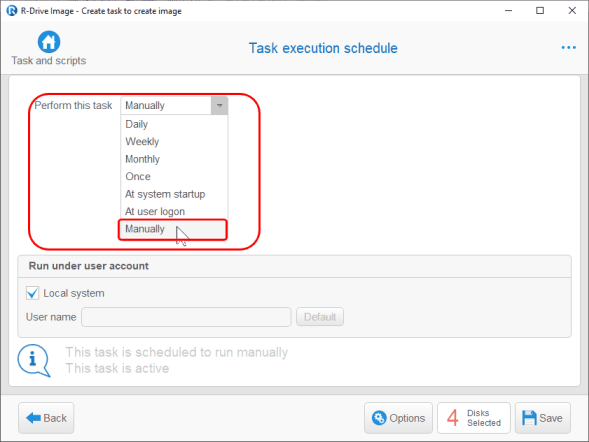
6. Select Manually in the Perform this task option on the Task execution schedule tab,
Click image to enlarge
then click the Save button.
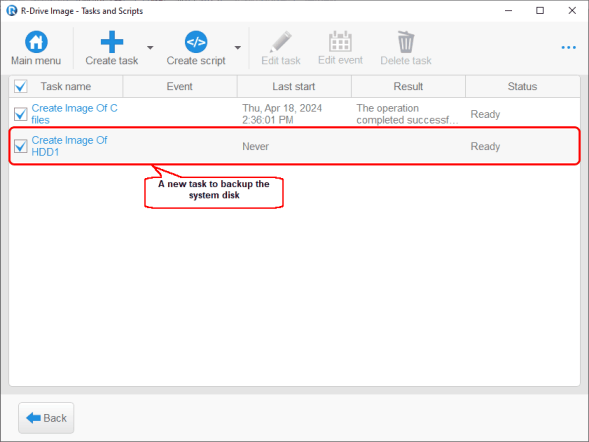
A new task will appear on the Task and Scripts panel.
Click image to enlarge
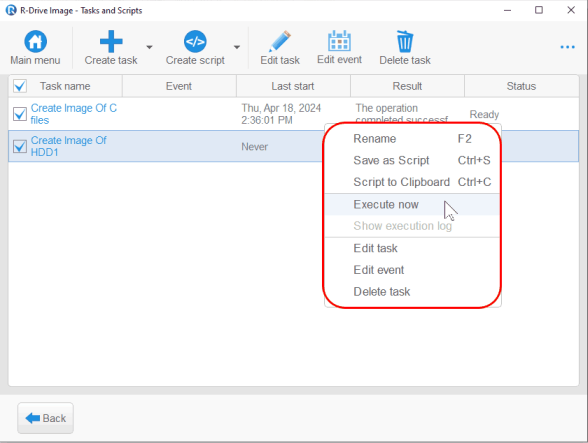
Now it's time to start the task manually.
1. Right-click the task and select Execute now.
Click image to enlarge
R-Drive Image will start executing this task, showing its progress.
Click image to enlarge
R-Drive Image will show the result when the task is completed.
Click image to enlarge
Your computer will turn off automatically if you selected the Shutdown computer when completed option.
Files on the disk when the task is successfully completed.
Click image to enlarge
Note that you'll need R-Drive Startup version to restore the system disk. Read more in the R-Drive Image help page: R-Drive Startup version
A backup plan for a desktop PC
This computer is usually part of a home network, maybe with a NAS device. We'll use the NAS as the place for backup copies. The computer is always on and sleeps when idle, so we can set up automatic backups for some tasks.
- Our system: a desktop PC with a 512 GB SSD divided into two parts (Disk C:, System, 148 GB and D:, Data, 316 GB), plus 2 system reserved partitions. User files are stored on Disk D:, and it runs Windows 10.
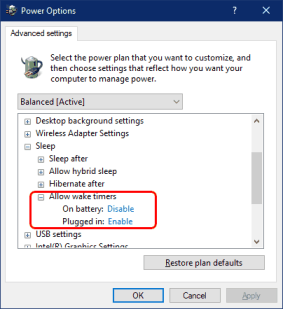
Important: You'll need to change some settings in Windows so it can wake up and start a scheduled task. Go to Control Panel -> Hardware and Sound -> Power Options -> Change Plan Settings -> Change Advanced Power Settings -> Sleep -> Allow Wake Timers and select Enable.
Click image to enlarge - Backup tasks: Work files backup: manually every time you're done working. Game files backup: manually every time you finish playing a game. System disk: automatically every day at 4 AM, a full image every Sunday, differential images on other days.
- Places to store backup files: An external USB DAS (Direct-Access Storage) device as the main backup, with a copy on the NAS device.
Work and game files aren't usually very large, so we'll use differential backups to save space. - Backup software: R-Drive Image Standalone. It has all the features we need and more, and it's inexpensive. You can try it for free for a month, with all its features intact.
With all this in mind, we can now create our example backup plan.
Task 1: Work files backup
1. Click the Task and Scripts button.
Click image to enlarge
2. Select Task to create an image from files.

Click image to enlarge
Then click the Next button.
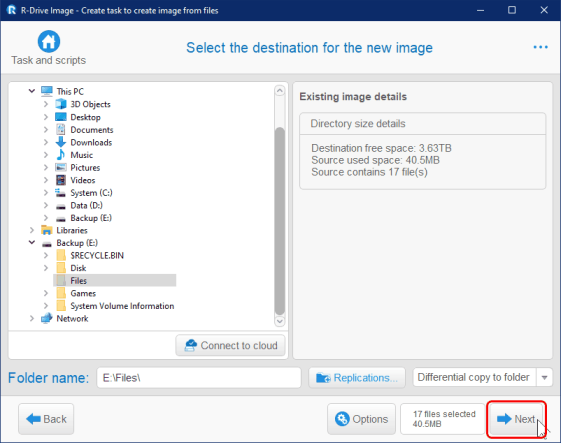
3. Select the folders, subfolders, and/or files you want to back up.
Click image to enlarge
You only need to do this once. Then click the Next button.
4. Select the external USB DAS device (E: Backup) for the Main copy folder, and choose the backup type for files.
Click image to enlarge
Then click the Options button.
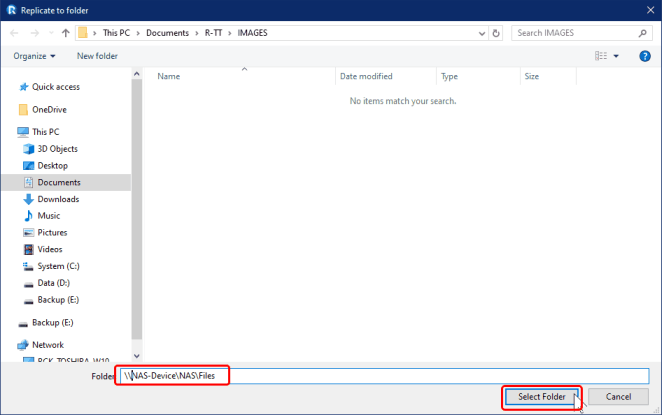
5. Go to the Replications tab and click Add replication.
Click image to enlarge
6. Enter the location for the backup copy (\NAS-Device\NAS\Files) and click the Select Folder button.
Click image to enlarge
7. Verify that the replication address is correct
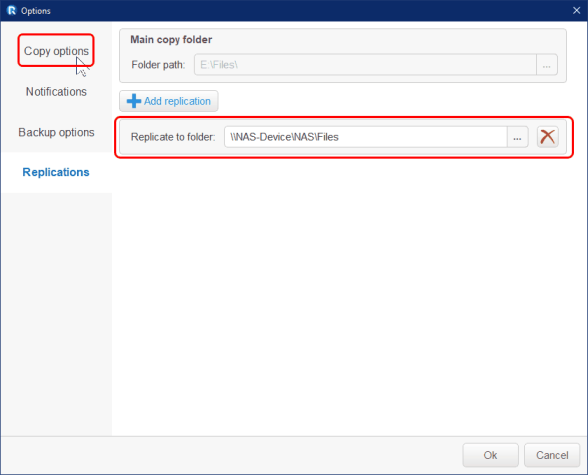
Click image to enlarge
and go to the Copy options tab.
8. Make sure the Shutdown when completed option is not selected
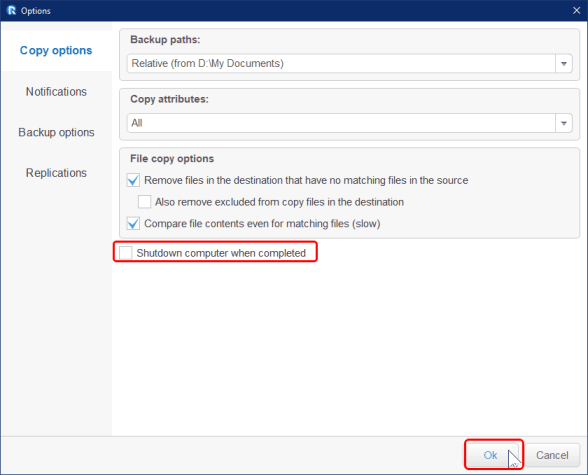
Click image to enlarge
and click OK to return to the Select the destination for the new image panel.
9. Click the Next button.
Click image to enlarge
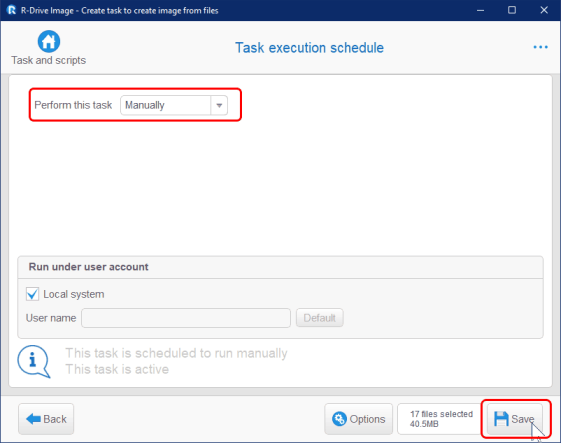
10. Select Perform this task Manually and click the Save button.
Click image to enlarge
A new task will appear.
Click image to enlarge
11. Right-click the task and select Execute now.
Click image to enlarge
R-Drive Image will start the task and show its progress.
Click image to enlarge
You can leave your computer; the task will finish, and then the computer will go to sleep.
When you wake up your computer and open R-Drive Image, it will show the task results.
Click image to enlarge
You can see the backed-up files on the DAS and NAS devices.
DAS device
Click image to enlarge
NAS device
Click image to enlarge
Task 2: Game file backup
Next, you can create another task to back up your game files and do it the same way you did for your work files.
Click image to enlarge
Task 3: System disk backup
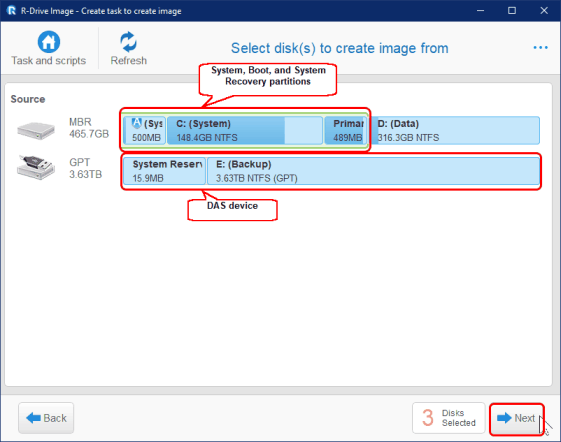
1. Create a new task and select the System, Boot, and System Recovery partitions.
Click image to enlarge
Then click the Next button.
2. Select the external USB DAS device (E: Backup) for the Main image file,
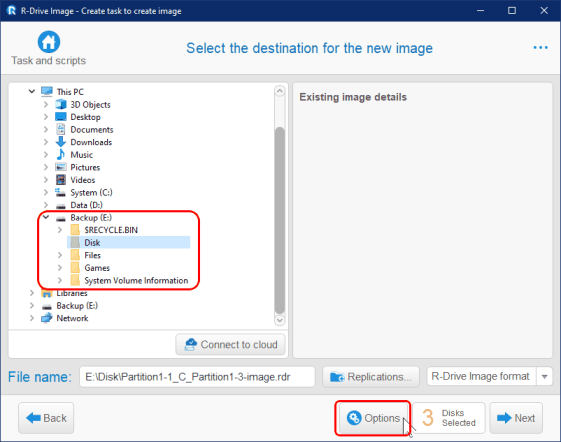
Click image to enlarge
and click the Options button.
3. Make sure the Shutdown when completed option is not selected,
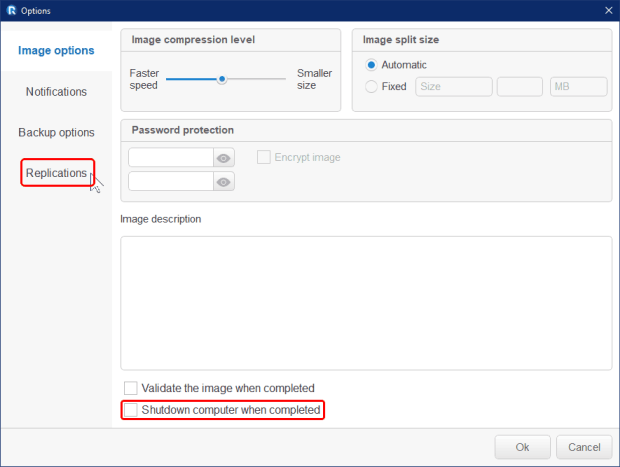
Click image to enlarge
and switch to the Replications tab.
4. Specify the place for replications

Click image to enlarge
and click OK.
5. Specify the Rotation options.
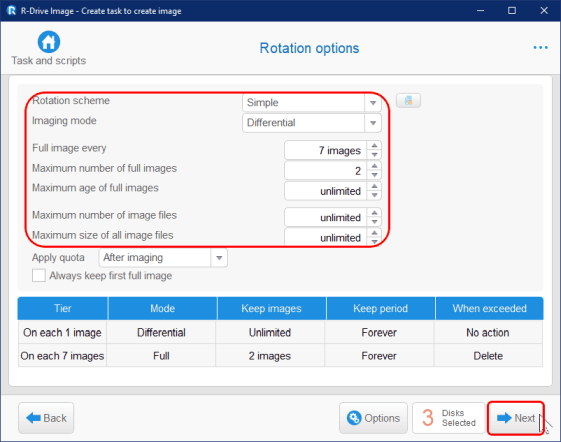
Click image to enlarge
R-Drive Image will create 1 full image once a week and 1 differential image every other day. It will always keep 1 previous full image. Then click the Next button.
6. Select the options you want on the Task execution schedule panel.
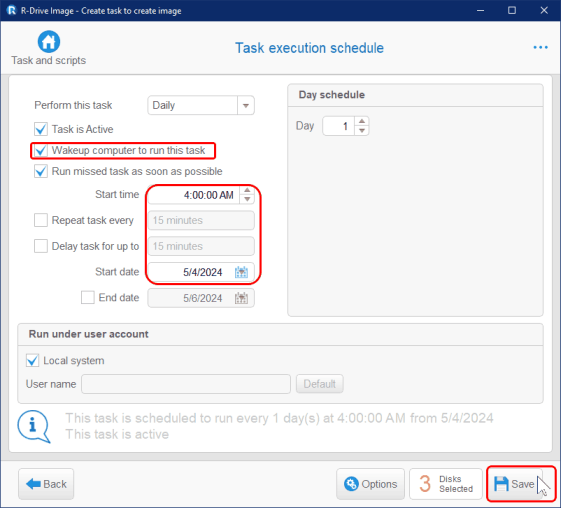
Click image to enlarge
Make sure the Wake up computer to run this task option is selected. Then click the Save button.
This task will appear on the Tasks and Scripts panel.
Click image to enlarge
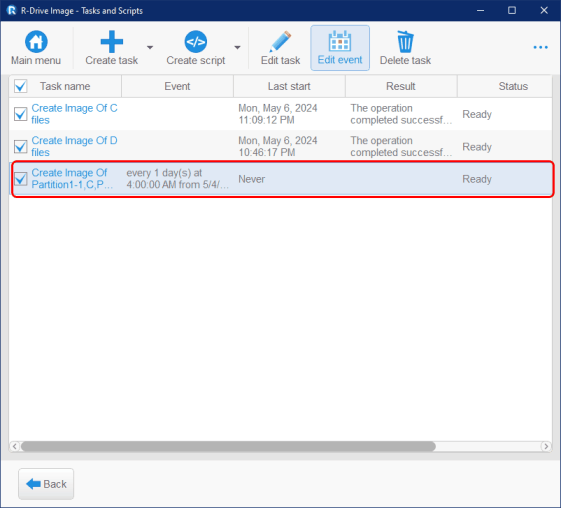
The task will start automatically every day at 4 AM.
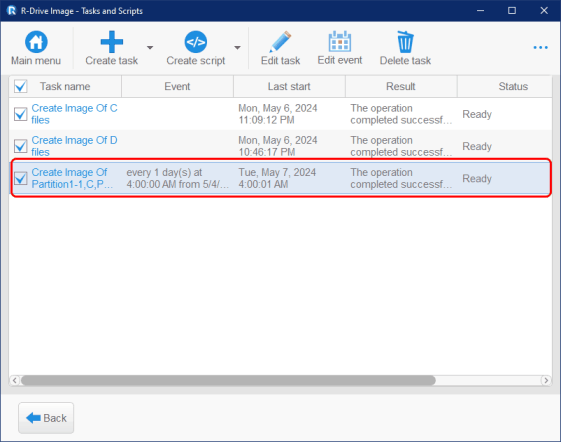
Click image to enlarge
When you wake up your computer and open R-Drive Image again, it will show you the results of the task.
Note that you'll need R-Drive Startup version to restore the system disk. Read more in the R-Drive Image help page: R-Drive Startup version
- R-Studio Technician: activation using a USB stick
- Data Recovery Guide
- Why R-Studio?
- R-Studio for Forensic and Data Recovery Business
- R-STUDIO Review on TopTenReviews
- File Recovery Specifics for SSD devices
- How to recover data from NVMe devices
- Predicting Success of Common Data Recovery Cases
- Recovery of Overwritten Data
- Emergency File Recovery Using R-Studio Emergency
- RAID Recovery Presentation
- R-Studio: Data recovery from a non-functional computer
- File Recovery from a Computer that Won't Boot
- Clone Disks Before File Recovery
- HD Video Recovery from SD cards
- File Recovery from an Unbootable Mac Computer
- The best way to recover files from a Mac system disk
- Data Recovery from an Encrypted Linux Disk after a System Crash
- Data Recovery from Apple Disk Images (.DMG files)
- File Recovery after Re-installing Windows
- R-Studio: Data Recovery over Network
- How To Use R-Studio Corporate Package
- Data Recovery from a Re-Formatted NTFS Disk
- Data Recovery from an ReFS disk
- Data Recovery from a Re-Formatted exFAT/FAT Disk
- Data Recovery from an Erased HFS Disk
- Data Recovery from an Erased APFS Disk
- Data Recovery from a Re-Formatted Ext2/3/4FS Disk
- Data Recovery from an XFS Disk
- Data Recovery from a Simple NAS
- How to connect virtual RAID and LVM/LDM volumes to the operating system
- Specifics of File Recovery After a Quick Format
- Data Recovery After Partition Manager Crash
- File Recovery vs. File Repair
- Data Recovery from Virtual Machines
- How to Recover Files from a Remote Computer Using R-Studio Standalone License and Its Network Capabilities in Demo Mode
- How to Connect Disks to a Computer
- Emergency Data Recovery over Network
- Data Recovery over the Internet
- Creating a Custom Known File Type for R-Studio
- Finding RAID parameters
- Recovering Partitions on a Damaged Disk
- NAT and Firewall Traversal for Remote Data Recovery
- Data Recovery from an External Disk with a Damaged File System
- File Recovery Basics
- Default Parameters of Software Stripe Sets (RAID 0) in Mac OS X
- Data Recovery from Virtual Hard Disk (VHD/VHDX) Files
- Data Recovery from Various File Container Formats and Encrypted Disks
- Automatic RAID Parameter Detection
- IntelligentScan Data Recovery Technology
- Multi-pass imaging in R-Studio
- Runtime Imaging in R-Studio
- Linear Imaging vs Runtime Imaging vs Multi-Pass Imaging
- USB Stabilizer Tech for unstable USB devices
- Joint work of R-Studio and PC-3000 UDMA hardware
- Joint work of R-Studio and HDDSuperClone
- R-Studio T80+ - A Professional Data Recovery and Forensic Solution for Small Business and Individuals Just for 1 USD/day
- Backup Articles
- R-Drive Image Standalone and Corporate license transferring
- Fixing Windows update error 0x80070643 with R-Drive Image
- Backup with Confidence
- R-Drive Image as a free powerful partition manager
- Computer Recovery and System Restore
- Disk Cloning and Mass System Deployment
- Accessing Individual Files or Folders on a Backed Up Disk Image
- R-Drive Image startup / bootable version
- File Backup for Personal Computers and Laptops of Home and Self-Employed Users
- Creating a Data Consistent, Space Efficient Data Backup Plan for a Small Business Server
- How to Move the Already Installed Windows from an Old HDD to a New SSD Device and Create a Hybrid Data Storage System
- How to Move an Installed Windows to a Larger Disk
- How to Move a BitLocker-Encrypted System Disk to a New Storage Device
- How to backup and restore disks on Linux and Mac computers using R-Drive Image
- R-Drive Image and Virtual Machines
- Undelete Articles
- Get Deleted Files Back
- Free Recovery from SD and Memory cards
- R-Undelete: Video Recovery
- Recovery from an External Device with a Damaged File System
- File recovery from a non-functional computer
- Free File Recovery from an Android Phone Memory Card
- Free Photo and Video File Recovery Tutorial
- Easy file recovery in three steps
Rating: 4.6 / 5
However, what I wanted to suggest is that you create a Home version of your software that may have slightly ...
https://www.drive-image.com/DriveImage_Help/restorefromanimage.htm
For example, there is no ` Restore from an Image` on the GUI. Instead there is `Restore Image`. And there is no `Image File Selection` on the GUI. Instead there is `Select image file`. And so on... My suggestion is to open the app, go through a file restore, write down the steps exactly as done, and then ...