-
R-Drive Image as a free powerful partition manager
Starting from Version 7, R-Drive Image offers its customers another set of very useful disk utilities: a partition manager. It allows its user to create, resize, delete, and perform other manipulations with partitions (logical disks in Windows) in a clear and convenient way. Moreover, such disk manipulations can be combined with other common disk actions, for example: while an entire hard drive is being copied to another drive, its partitions can be extended and moved to another place on the drive, as it will be shown below in this article.
Moreover, the startup version of R-Drive Image has almost the same features as its Windows counterpart. The only exception is the lack of the built-in scheduler, tasks, scripts, and connecting images as virtual disks, although copying individual files from opened images is a good substitution for the latter. The other features useful for non-Windows computers like support for various Apple and Linux volume managers are fully intact.
There's another great feature of this partition manager: being a part of R-Drive Image software, it works in its trial version without the usual restrictions typically imposed on demo/trial versions. The free trial period for R-Drive Image is one month.
Below, we'll discuss three examples of the work of the partition manager in R-Drive Image to show how easy it is to use the manager to perform the most common partition tasks. First, as a simple task, we'll create a partition on a completely blank hard drive, which even has not been initialized in Windows. Second, as a more complex task, we'll create another partition on the same drive, move it to the end of the drive, and extend the first partition. Finally, as the most critical task, we'll copy an entire hard drive with a working Windows installation to another and larger drive in a way that the new installation will occupy the entire new had drive. We'll perform this in a virtual machine environment to demonstrate that R-Drive Image startup version can work in virtual machines.
Simple task: creating a partition on a blank uninitialized hard drive
Test setup: a physical hard drive is connected to a real Windows machine where R-Drive Image is installed. The hard drive is purely blank and uninitialized.
To create a new partition on such hard drive, after R-Drive Image has been started, do the following:
1. Click Partition Manager on the Action Selection panel of R-Drive Image.
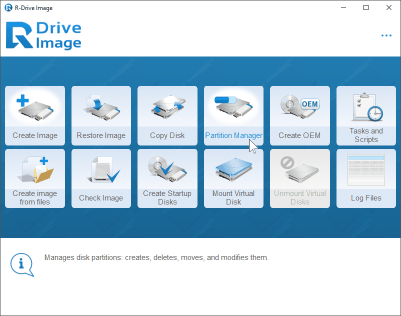
Click image to enlarge
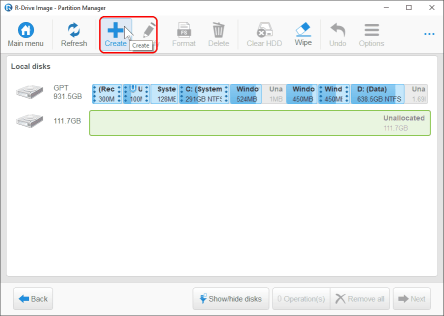
R-Drive Image will show the hard drive and partition configuration on the computer.
Click image to enlarge
2. Select the necessary hard drive and click the Create button.
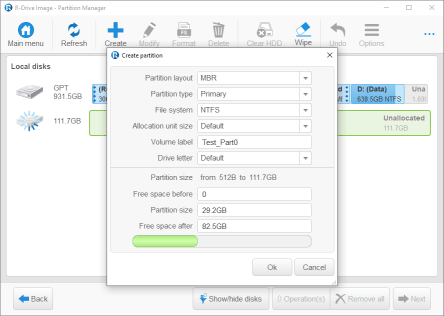
3. Specify the necessary parameters of the newly created partition.
Click image to enlarge
You may read more about these parameters in "R-Drive Image online help".
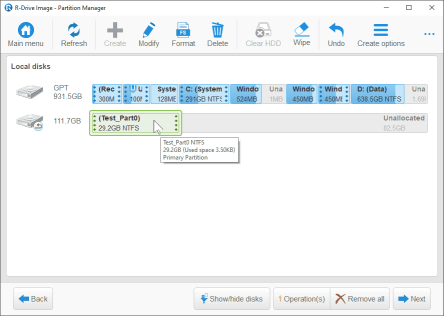
A new partition appears in the disk configuration in R-Drive Image. (Not on the hard drive yet - R-Drive Image never alters anything on a hard drive until it's specifically commanded to do so.)
Click image to enlarge
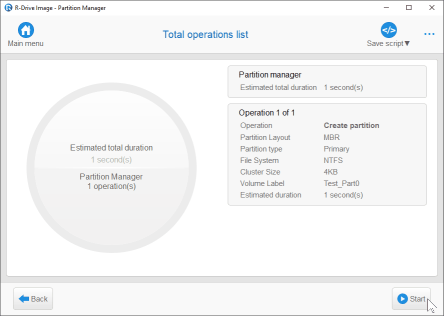
4. Click the Next button, and the Total operations list panel will appear.
Click image to enlarge
You may make a final review of the operations to be performed and change anything if necessary.
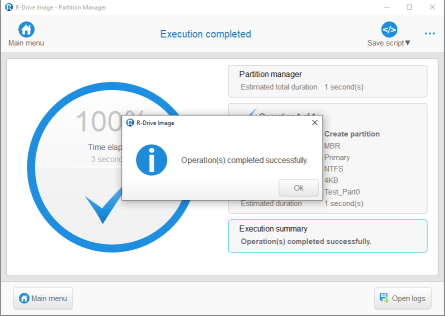
5. Click the Start button and wait for R-Drive Image to complete the operation.
Click image to enlarge
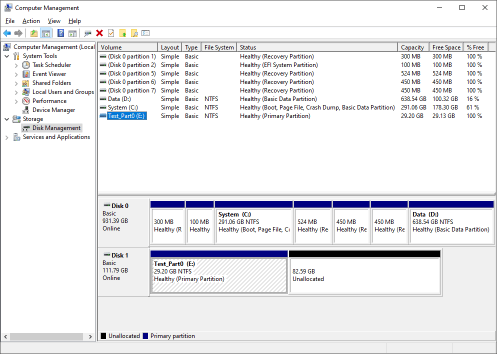
The task is over and a new partition appears on the disk. You may see it on the Computer Management panel.
Click image to enlarge
Complex task consisting of several partition operations: creating partitions, moving partitions, extending partitions
In this action, we'll create a new partition on the same hard drive, move it to the end of the drive, and extend the old partition, and we'll do it through one and single disk action.
To do so:
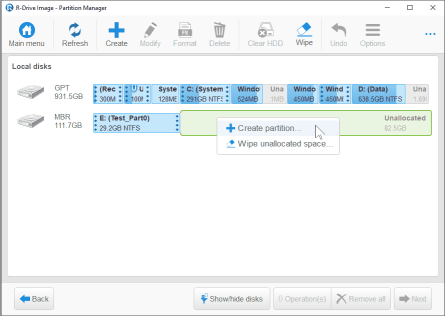
1. Right-click the empty space on the drive and select Create partition on the shortcut menu.
Click image to enlarge
2. Specify the necessary parameters of the newly created partition.
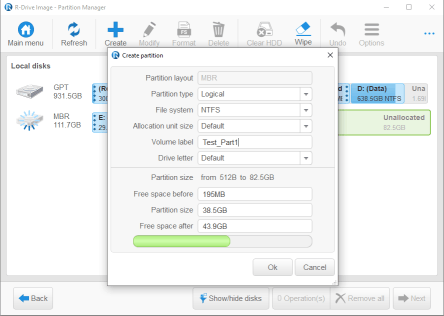
Click image to enlarge
You may read more about these parameters in "R-Drive Image online help".
A new partition (Test_Part1) appears in the disk configuration in R-Drive Image, but not on the hard drive.
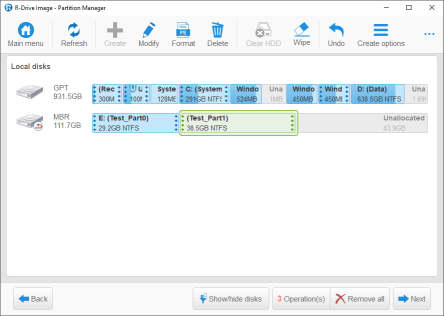
Click image to enlarge
3. Click and hold the new partition (Test_Part1) and move it to the rightmost place on the hard drive layout.
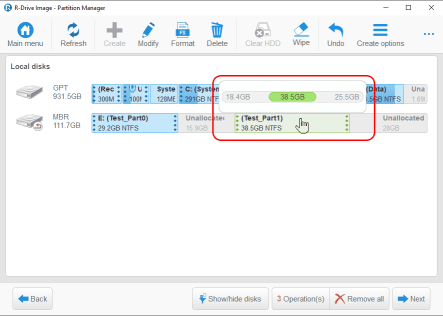
Click image to enlarge
4. Release the partition and it will stay on the right site on the drive diagram.
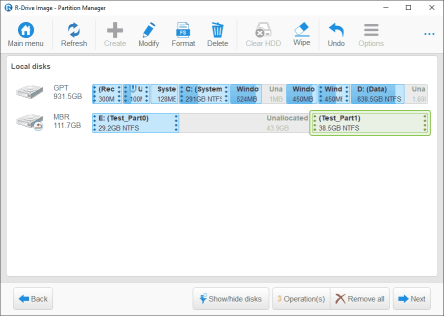
Click image to enlarge
5. Click and hold the right side of Partition Test_Part0 and extend it to the rightmost position until it is adjacent to Partition Test_Part1.
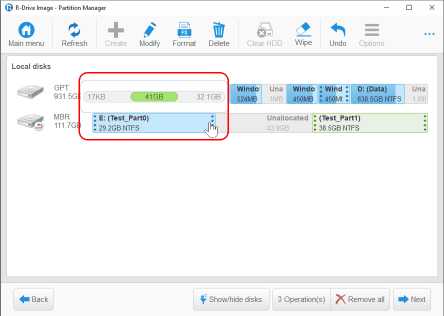
Click image to enlarge
6. Release Partition Test_Part0 and the final partition layout will remain in the drive configuration in R-Drive Image. (Not on the hard drive just yet!)
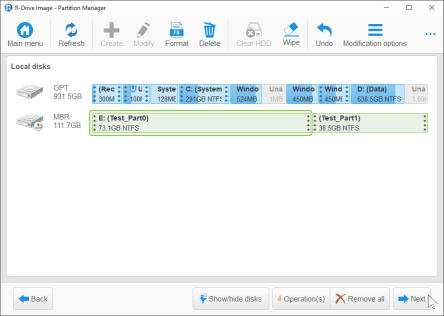
Click image to enlarge
7. Click the Next button, and the Total operations list panel will appear.
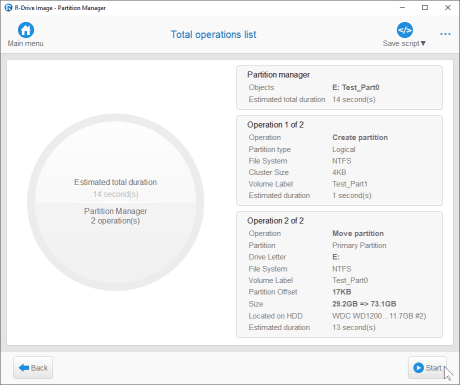
Click image to enlarge
You may make final review of the operations to be performed and change anything if necessary.
8. Click the Start button and wait for R-Drive Image to complete this set of operations.
When they're through, you may see the new partition layout on the Computer Management panel.
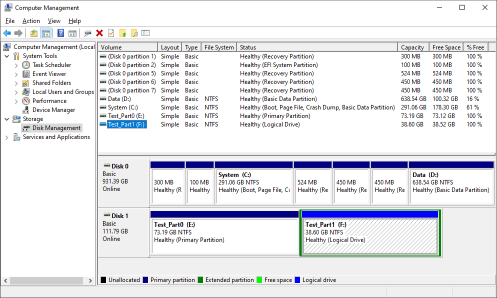
Click image to enlarge
Most critical task: copying a system hard drive to another drive with larger capacity and extending its system partition.
In this task, we'll copy a working Windows installation to another, and larger, hard drive. In addition to copying all data to the new drive, we'll need to move a specific partition (Recovery) to the end of the drive and extend the main (System) partition in a way such that it'll occupy all the free space of the drive.
This task will also show how to perform these partition manipulations while performing other hard drive actions.
The safest way of performing such manipulations with system partitions is to use the startup version of R-Drive Image. R-Drive Image can create a fully working startup disk even in its Demo mode.
In addition, we'll do that in a virtual machine environment (Oracle's(™) VMBox) to test the operation of R-Drive Image startup version under such conditions.
"R-Drive Image on-line help" explains how to create a startup version of R-Drive Image and how to start a computer with it. You may also consult Oracle's(™) VMBox to learn how to work with its software.
To perform this task:
1. Start the startup version and select Copy Disk on the on the Action Selection panel.
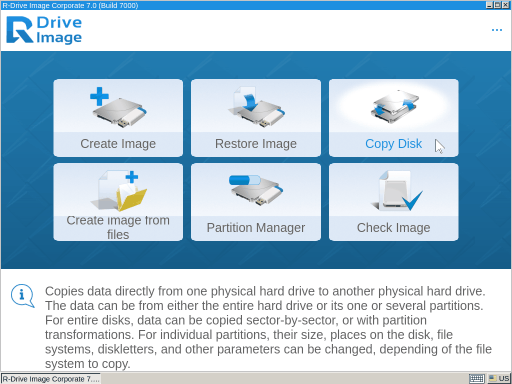
Click image to enlarge
R-Drive Image will show you the drive configuration of the virtual computer.
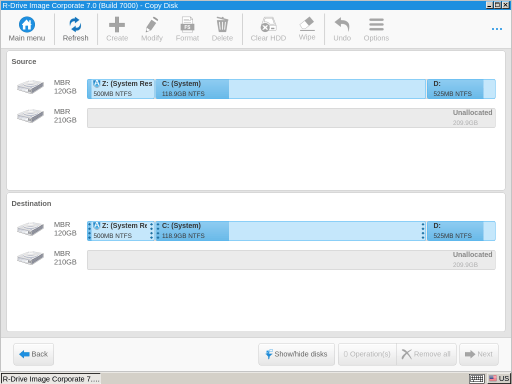
Click image to enlarge
As the disk configuration shows, we need to move the Recovery partition (D:) to the end of the hard drive to able to extend the system disk.
2. Drag the old hard drive with the Windows system to the new drive.
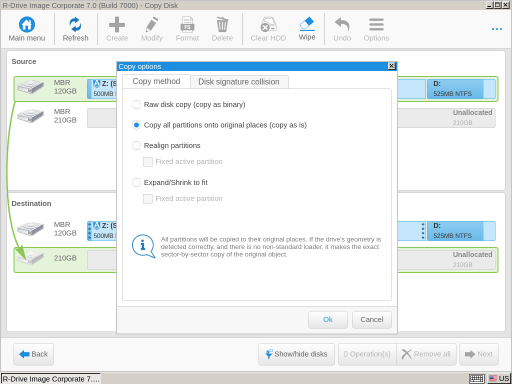
Click image to enlarge
Copy options dialog message will appear. Select the Copy all partitions onto original places option and click the OK button.
You may read more about these options in "R-Drive Image on-line help".
The new partition configuration will appear in R-Drive Image (not on the new hard drive just yet!).
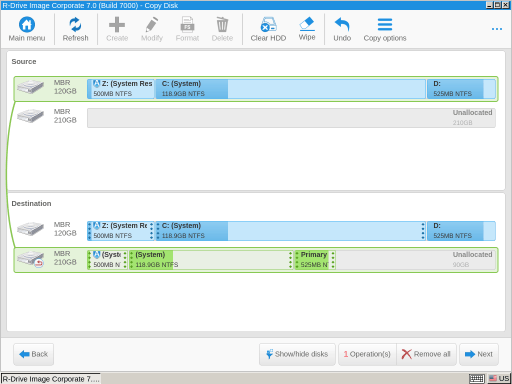
Click image to enlarge
3. Drag the Recovery partition and move it to the rightmost place on the hard drive diagram.
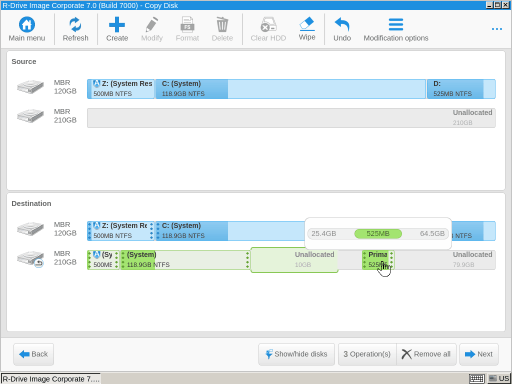
Click image to enlarge
The next new partition configuration will appear in R-Drive Image.
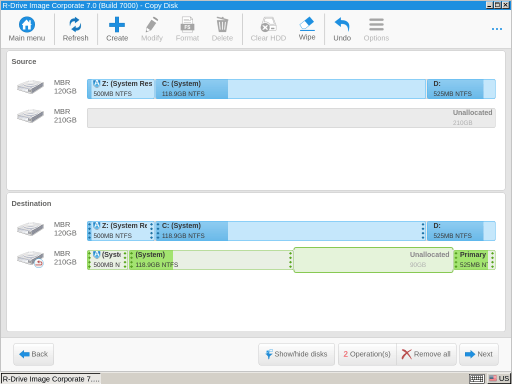
Click image to enlarge
4. Click and drag the right side of the System partition to the rightmost position until it is adjacent to the Recovery partition.
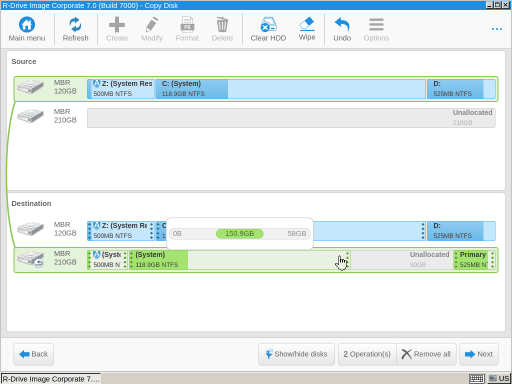
Click image to enlarge
5. Release the system partition and the final partition layout will remain in the disk configuration in R-Drive Image. (Not on the hard drive just yet!)
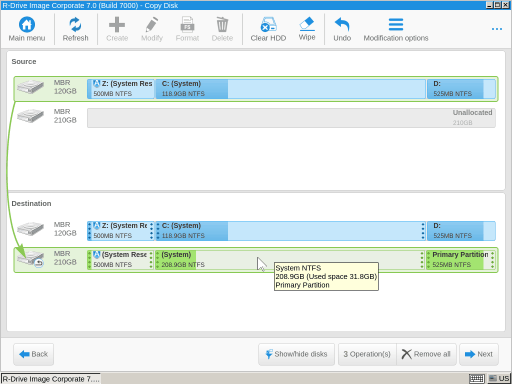
Click image to enlarge
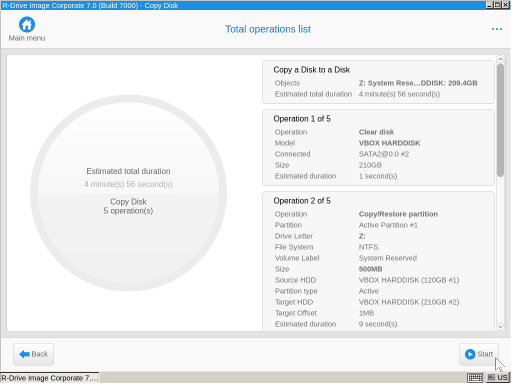
6. Click the Next button, and the Total operations list panel will appear.
Click image to enlarge
You may make final review of the operations to be performed and change anything if necessary.
7. Click the Start button and wait for R-Drive Image to complete this set of operations.
8. Disconnect the old hard drive and start the computer.
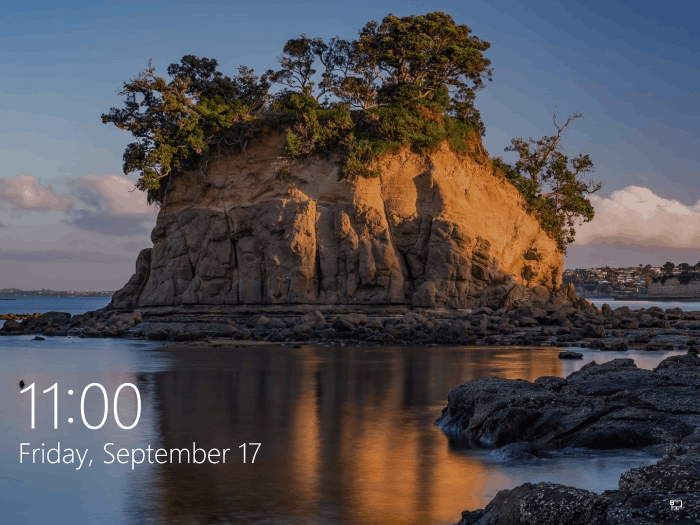
After some internal work for app.3 min Windows starts:
Click image to enlarge
The task is completed successfully!
Conclusions As shown in the above article, the partition manager in R-Drive Image can perform quite complex partition manipulation tasks, even in the virtual machine environment. Its comprehensible graphic interface makes it easy for even inexperienced users, and it's free during R-Drive Image trial period.
- R-Studio Technician: activation using a USB stick
- Data Recovery Guide
- Why R-Studio?
- R-Studio for Forensic and Data Recovery Business
- R-STUDIO Review on TopTenReviews
- File Recovery Specifics for SSD devices
- How to recover data from NVMe devices
- Predicting Success of Common Data Recovery Cases
- Recovery of Overwritten Data
- Emergency File Recovery Using R-Studio Emergency
- RAID Recovery Presentation
- R-Studio: Data recovery from a non-functional computer
- File Recovery from a Computer that Won't Boot
- Clone Disks Before File Recovery
- HD Video Recovery from SD cards
- File Recovery from an Unbootable Mac Computer
- The best way to recover files from a Mac system disk
- Data Recovery from an Encrypted Linux Disk after a System Crash
- Data Recovery from Apple Disk Images (.DMG files)
- File Recovery after Re-installing Windows
- R-Studio: Data Recovery over Network
- How To Use R-Studio Corporate Package
- Data Recovery from a Re-Formatted NTFS Disk
- Data Recovery from an ReFS disk
- Data Recovery from a Re-Formatted exFAT/FAT Disk
- Data Recovery from an Erased HFS Disk
- Data Recovery from an Erased APFS Disk
- Data Recovery from a Re-Formatted Ext2/3/4FS Disk
- Data Recovery from an XFS Disk
- Data Recovery from a Simple NAS
- How to connect virtual RAID and LVM/LDM volumes to the operating system
- Specifics of File Recovery After a Quick Format
- Data Recovery After Partition Manager Crash
- File Recovery vs. File Repair
- Data Recovery from Virtual Machines
- How to Recover Files from a Remote Computer Using R-Studio Standalone License and Its Network Capabilities in Demo Mode
- How to Connect Disks to a Computer
- Emergency Data Recovery over Network
- Data Recovery over the Internet
- Creating a Custom Known File Type for R-Studio
- Finding RAID parameters
- Recovering Partitions on a Damaged Disk
- NAT and Firewall Traversal for Remote Data Recovery
- Data Recovery from an External Disk with a Damaged File System
- File Recovery Basics
- Default Parameters of Software Stripe Sets (RAID 0) in Mac OS X
- Data Recovery from Virtual Hard Disk (VHD/VHDX) Files
- Data Recovery from Various File Container Formats and Encrypted Disks
- Automatic RAID Parameter Detection
- IntelligentScan Data Recovery Technology
- Multi-pass imaging in R-Studio
- Runtime Imaging in R-Studio
- Linear Imaging vs Runtime Imaging vs Multi-Pass Imaging
- USB Stabilizer Tech for unstable USB devices
- Joint work of R-Studio and PC-3000 UDMA hardware
- Joint work of R-Studio and HDDSuperClone
- R-Studio T80+ - A Professional Data Recovery and Forensic Solution for Small Business and Individuals Just for 1 USD/day
- Backup Articles
- R-Drive Image Standalone and Corporate license transferring
- Fixing Windows update error 0x80070643 with R-Drive Image
- Backup with Confidence
- R-Drive Image as a free powerful partition manager
- Computer Recovery and System Restore
- Disk Cloning and Mass System Deployment
- Accessing Individual Files or Folders on a Backed Up Disk Image
- R-Drive Image startup / bootable version
- File Backup for Personal Computers and Laptops of Home and Self-Employed Users
- Creating a Data Consistent, Space Efficient Data Backup Plan for a Small Business Server
- How to Move the Already Installed Windows from an Old HDD to a New SSD Device and Create a Hybrid Data Storage System
- How to Move an Installed Windows to a Larger Disk
- How to Move a BitLocker-Encrypted System Disk to a New Storage Device
- How to backup and restore disks on Linux and Mac computers using R-Drive Image
- R-Drive Image and Virtual Machines
- Undelete Articles
- Get Deleted Files Back
- Free Recovery from SD and Memory cards
- R-Undelete: Video Recovery
- Recovery from an External Device with a Damaged File System
- File recovery from a non-functional computer
- Free File Recovery from an Android Phone Memory Card
- Free Photo and Video File Recovery Tutorial
- Easy file recovery in three steps
Rating: 4.6 / 5
However, what I wanted to suggest is that you create a Home version of your software that may have slightly ...
https://www.drive-image.com/DriveImage_Help/restorefromanimage.htm
For example, there is no ` Restore from an Image` on the GUI. Instead there is `Restore Image`. And there is no `Image File Selection` on the GUI. Instead there is `Select image file`. And so on... My suggestion is to open the app, go through a file restore, write down the steps exactly as done, and then ...


