-
R-Drive Image startup / bootable version
Not all disk operations can be performed within a Windows system. Sometimes a computer cannot start because its Windows OS is damaged, and that requires an emergency disk restoration. Running Windows itself prevents other software from making major changes to its system or other locked disks. And there are non-Windows computers that need to be served but where R-Drive Image cannot be installed and run. R-Drive Image provides a solution for these cases - its startup version. It's available in all R-Drive Image versions: Standalone, Corporate, Technician, and Commercial.
This article provides you with information on how to create and operate the Startup version of R-Drive Image.
The First Glance:
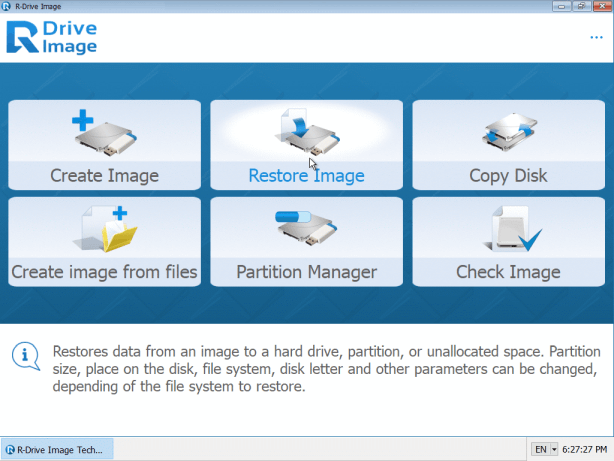
The Startup version is available in the same convenient and familiar graphic user interface as its Windows version.
Click image to enlarge
The most important tasks are supported: Create Image, Restore Image, Copy Disk, Create image from files, Partition Manager, and Check Image.
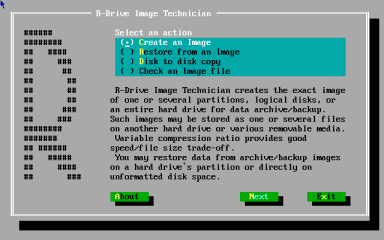
There's also a Text User (pseudographic) variant of the program for problematic, non-standard, and unsupported graphic cards.
Click image to enlarge
With the Pseudographic startup version, you can: Create an Image, Restore from an Image, Disk to disk copy, Check an Image file. A mouse and/or keyboard are supported.
Types of R-Drive Image startup versions
There are two types of R-Drive Image Startup version: Linux-based and Windows PE-based. They have different lists of supported devices and their own advantages and drawbacks.
The Linux-based version: it's smaller in size, doesn't require any additional Windows components to be installed, and a little bit faster. The Text User interface is based on the Linux version, too. On the other hand, it requires Secure Boot disabled and cannot work with BitLocker-encrypted disks.
The Windows PE-based version: it's much larger and requires that some additional Windows components be installed prior to creating a startup device. But it works with enabled Secure Boot and BitLocker-encrypted disks (provided that the necessary key files, passwords, and other credentials are available).
Note: R-Drive Image supports creating Windows PE startup disks starting from Windows 8.1. It's possible to create such disk from R-Drive Image on earlier Windows versions if you yourself correctly install a workable copy of WindowsPE Assessment and Deployment Kit (Windows ADK). Microsoft recommends Windows ADK from Windows 10 version 2004 (20H1) for versions prior to Windows 10.
Creating a startup device/file of R-Drive Image
The Linux-based version
This operation is straightforward and performed directly from the R-Drive Image Main panel.
1. Select a device for the startup media. It can be an internal or external USB CD/DVD burner with a blank CD/DVD disc or a connected FAT32-formatted USB pen drive. Note that all data on these media will be deleted while creating the startup media.
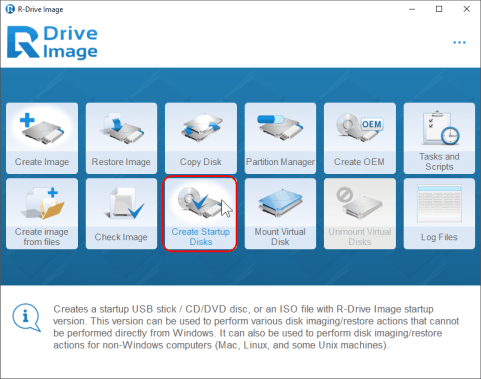
2. Run R-Drive Image and select Create Startup Disks on the Main panel.
Click image to enlarge
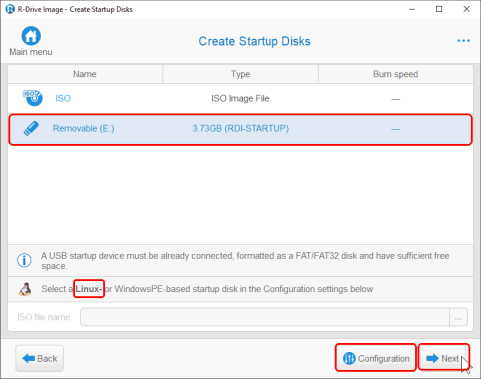
The Linux-base version will be selected by default.
3. Select the device you want to create the startup media on and click the Next button.
Click image to enlarge
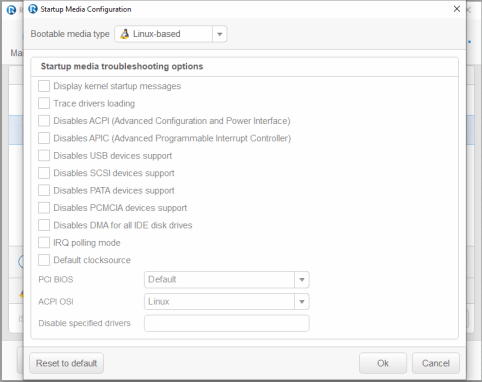
4. Click the Configuration button and adjust the troubleshooting options if necessary.
Click image to enlarge
You may read more about them in our online R-Drive Image help: Create Startup Disk.
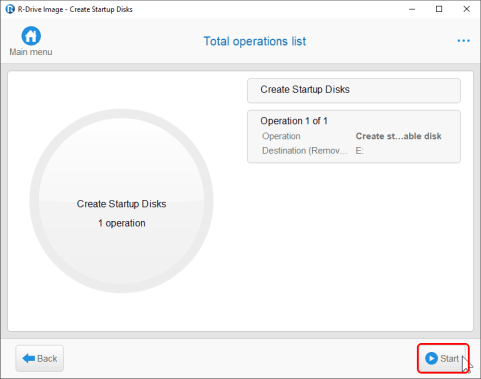
5. Verify that all parameters are OK on the "Total operations list" panel and click the Start button.
Click image to enlarge
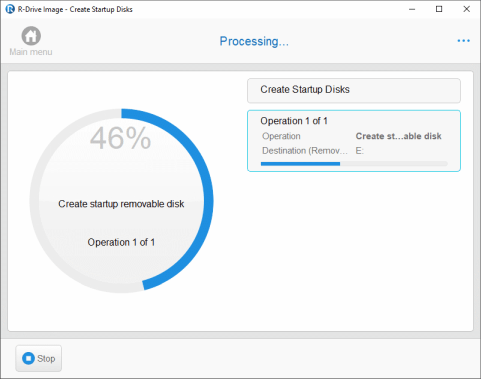
> R-Drive Image will start creation of the USB startup device, showing its progress.
Click image to enlarge
It shouldn't take long.
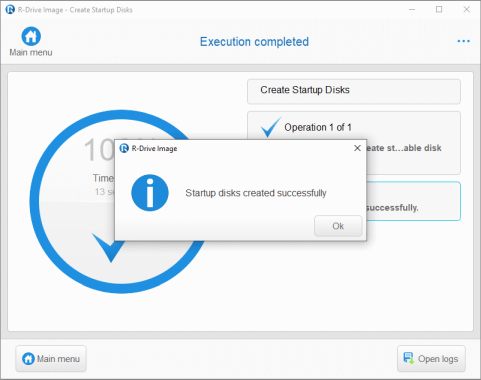
R-Drive Image will show the Startup disks created successfully message when it finishes creation of the startup device.
Click image to enlarge
This device can now be used to boot your computer.
The Windows PE-based version
Creating a startup device based on Windows PE is trickier, as it almost always requires installing some additional Windows components, and thus a working Internet connection is required.
1. Click the Configuration button on the Create Startup Disks panel
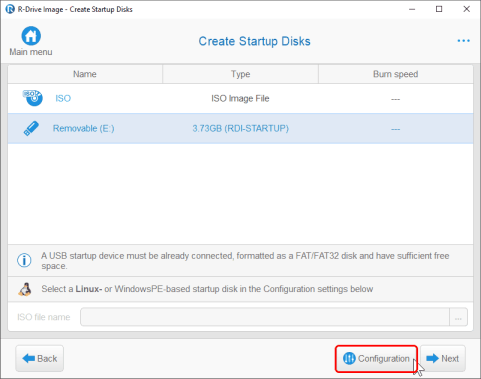
Click image to enlarge
2. Select WindowPE-based on the Bootable media type field.
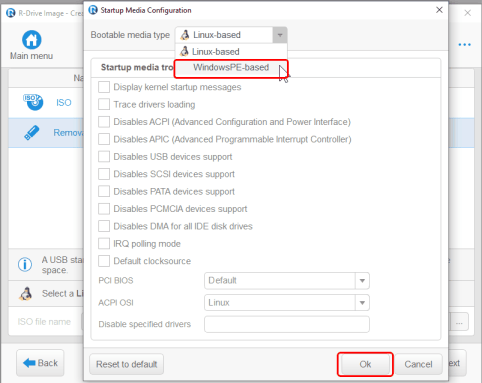
Click image to enlarge
and click the OK button.
3. Click the Download button to start downloading the necessary Windows components.
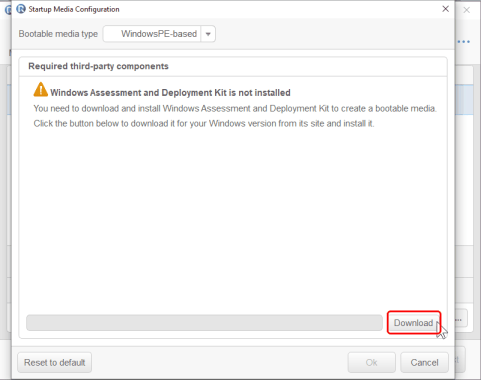
Click image to enlarge
4. Wait for Windows to finish downloading
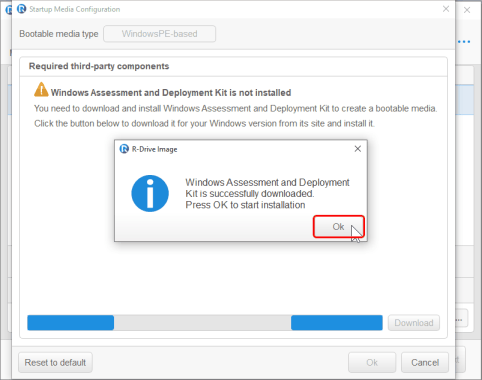
Click image to enlarge
and click the OK button.
> Windows will start installing the necessary Windows PE components.
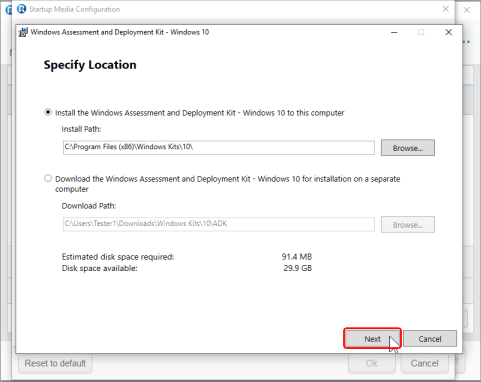
Click image to enlarge
Don't forget about your privacy!
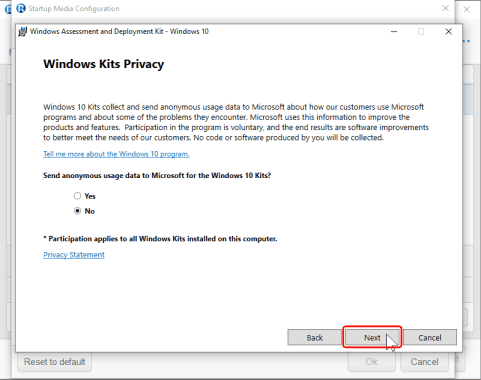
Click image to enlarge
Accept Microsoft Software License Terms
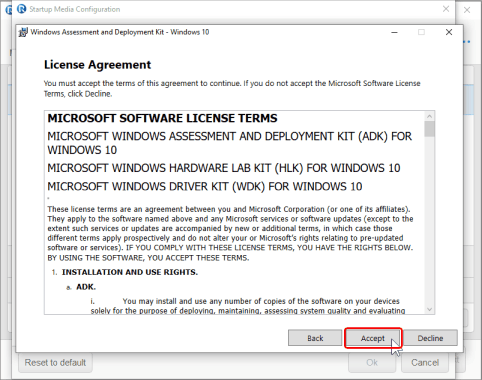
Click image to enlarge
Check that only necessary features are selected
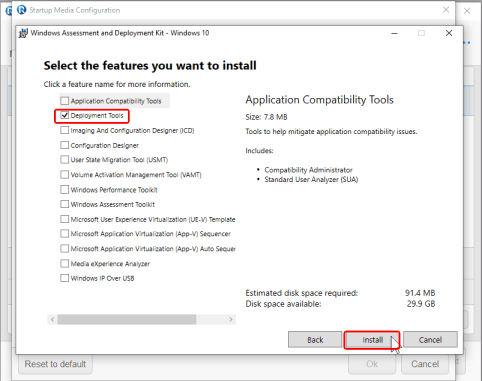
Click image to enlarge
and click the Install button.
Windows will start installing the selected Windows components.
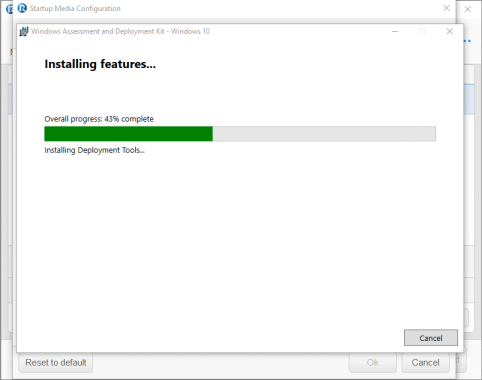
Click image to enlarge
Click the Close button when the installation is over.
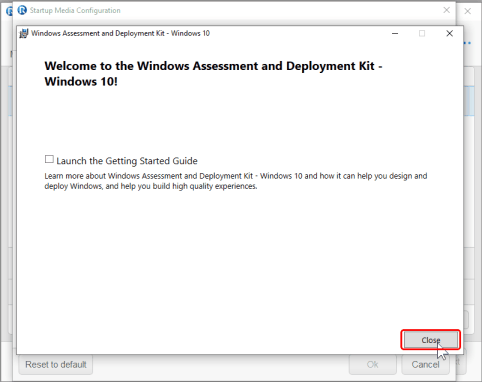
Click image to enlarge
Now click the OK button.
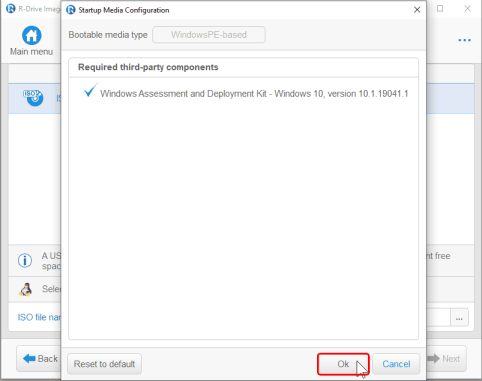
Click image to enlarge
Windows may require downloading and installing some other of its components. The process for that is the same.
Then return to the Create Startup Disks panel.
5. Click the Next button
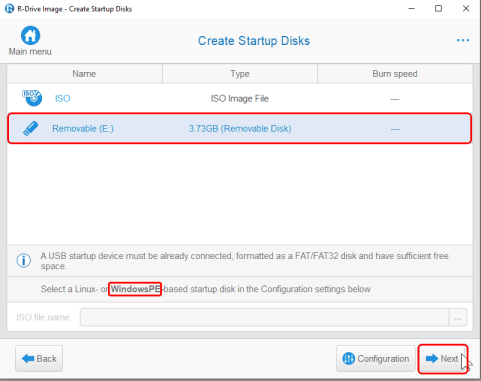
Click image to enlarge
and continue creation of the startup media in the same way as for the Linux-based version.
Licensing and activation
Every licensed R-Drive Image copy requires registration and activation to continue its operation upon its trial period expiration (1 month). You may read more about this process in our online help: R-Drive Image Registration.
The same activation procedure is applicable to the Startup version of R-Drive Image with one exception: no activation is required if the program starts on the same computer where the startup media is created, provided that the license hasn't been transferred to another computer.
As for other computers, each start of the Startup version on another computer needs the license to be transferred to that computer.
Such license transfers are subject to license terms and restrictions. In short:
Standalone and Corporate versions: The license can be transferred only forward. This means that the license activated on Computer A can be transferred to, and activated on, Computer B, but it cannot be transferred back from Computer B to Computer A.
Technician and Commercial versions: The license can be transferred forward and backward, that is from Computer A to Computer B and back to Computer A from Computer B.
You may read more about license transferring and activation in our article R-Drive Image Standalone and Corporate license transferring.
R-Drive Image Startup
The Linux-based variant:
1. Make sure that the first startup device in the system BIOS is the required drive. Disable Secure boot in the system BIOS if your computer is certified to run Windows 8 and later.
2. Connect the USB disk or insert the CD disc and start your computer.
> A startup screen will appear:
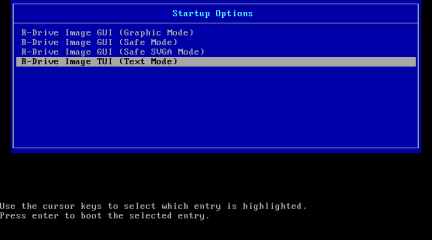
Click image to enlarge
3. Select the necessary option and press Enter.
Windows PE variant:
1. Make sure that the first startup device in the system BIOS is the required drive. You don't have to disable Secure boot in the system BIOS if you use this variant.
2. Connect the USB disk or insert the CD disc and start your computer.
Don't forget to hit any key on the keyboard to make your system start from the Startup version media.
A standard Windows startup screen will appear.
Using the Startup version of R-Drive Image
If you're starting another computer (not that where the Startup media was created), the Activation window will appear.
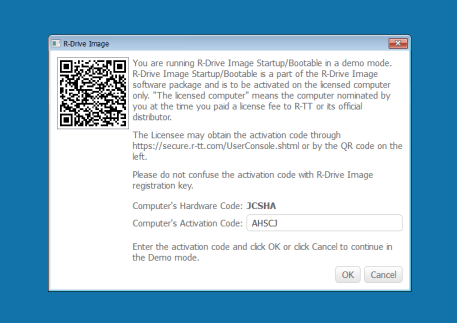
Click image to enlarge
Obtain the Activation Code and enter it.
We will discuss two most often and important cases for the Startup version: restoring data to a system disk and using Partition Manager for the system disk. The third case, serving a non-Windows computer, is discussed in our article: How to backup and restore disks on Linux and Mac computers using R-Drive Image.
You may also consult our online help for R-Drive Image if need be.
Restore data to a system disk
For some reason, the hard drive turns into a raw disk without any partitions. It's necessary to recover data to the system disk from an existing image of this disk. The Startup version was created on this computer. We'll use the Linux-based variant.
1. Start your computer with the Startup media.
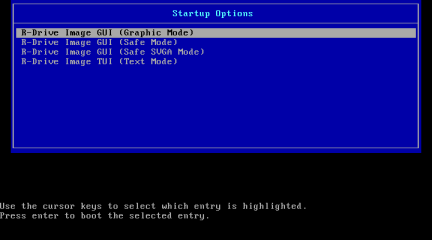
Click image to enlarge
and select R-Drive Image GUI (Graphic Mode). Wait for R-Drive Image to start running.
2. Select Restore Image on the Main panel
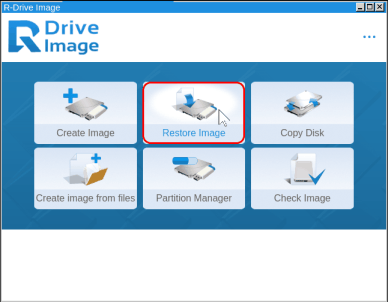
Click image to enlarge
3. Select the necessary image file and
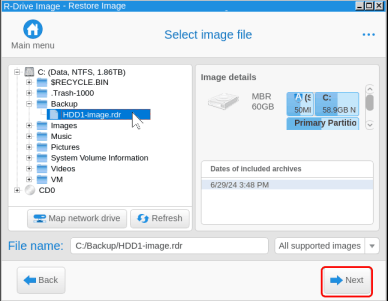
Click image to enlarge
click the Next button.
4. Drag the image to the empty disk.
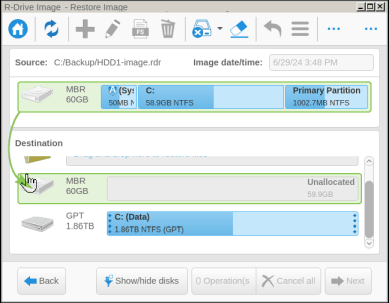
Click image to enlarge
5. Verify that the Copy all partitions onto original places (copy as is) option is selected and
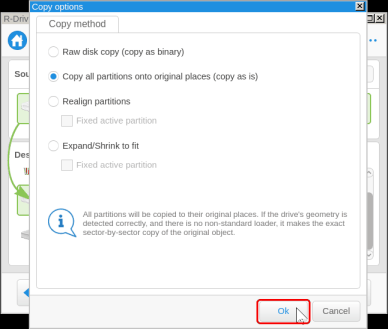
Click image to enlarge
click the OK button.
6. Verify that all disk partitions are in their correct places and
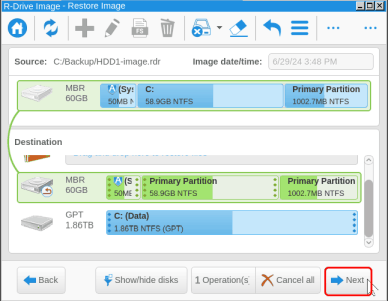
Click image to enlarge
click the Next button.
7. Verify that all operations are listed on the Total operations list panel and
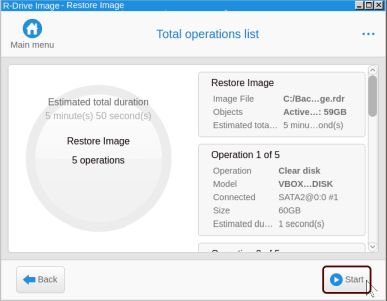
Click image to enlarge
click the Start button.
> R-Drive Image will start restoring the image, showing its progress.
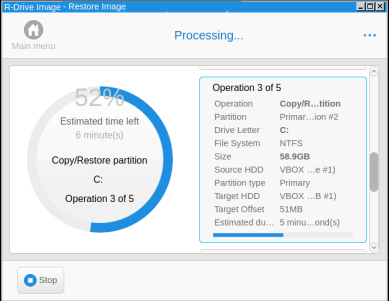
Click image to enlarge
R-Drive Image will show the Disk image restored successfully message when the image restoring is over.
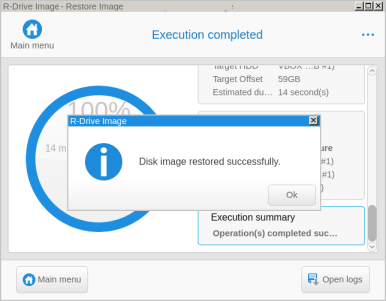
Click image to enlarge
Using Partition Manager
Due to a failure of a certain disk management software, the system partition (Disk C:) appeared somewhere in a strange place on the disk.
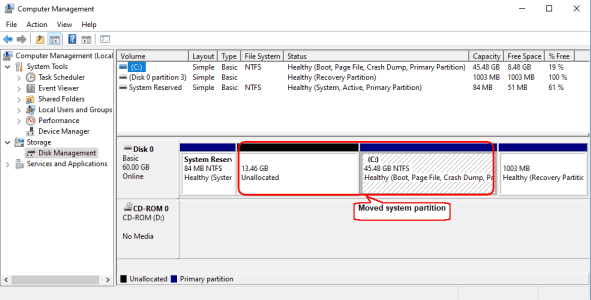
Click image to enlarge
The Disk Management utility cannot move or resize this partition. We'll use the Windows PE-based variant created on another computer.
It's a very good practice to back up all important files before any serious disk operations.
1. Start your computer with the Startup media.
The Activation window will appear because the Startup media was created on another computer.
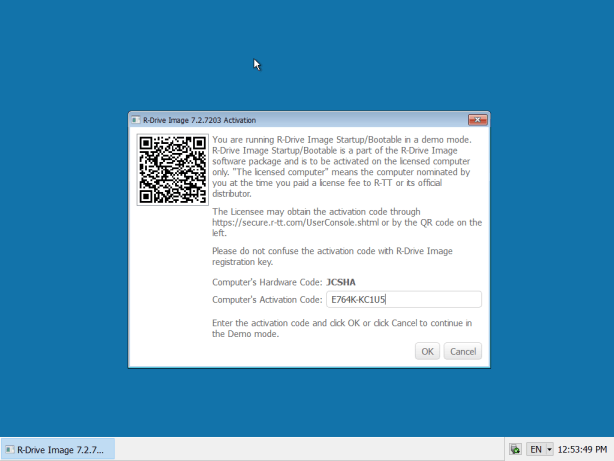
Click image to enlarge
Obtain the Activation Code and enter it.
The Activation successful message will appear.
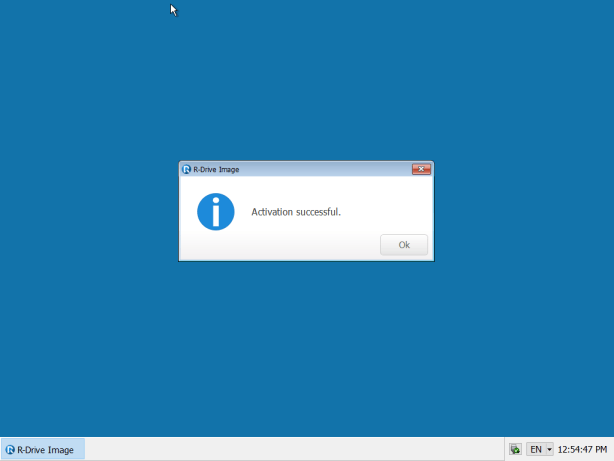
Click image to enlarge
The R-Drive Image Main panel will appear.
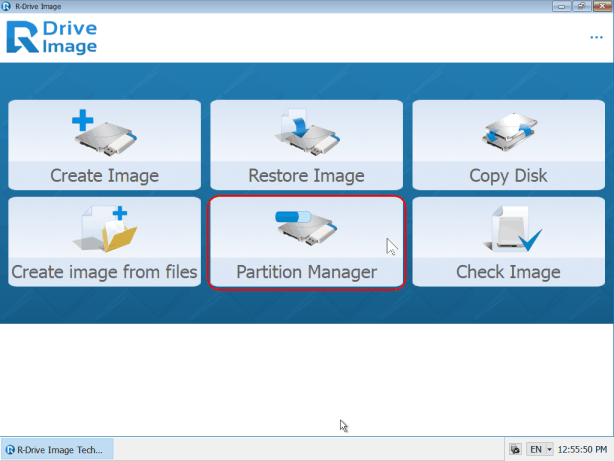
Click image to enlarge
2. Select Partition Manager on the Main panel.
3. Hold and drag the left edge of the system disk to the leftmost possible position.
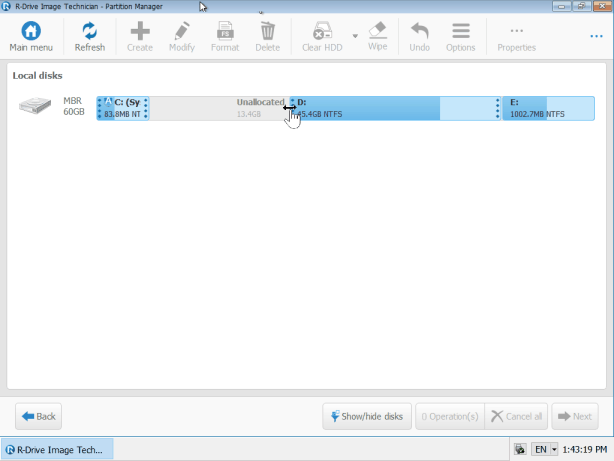
Click image to enlarge
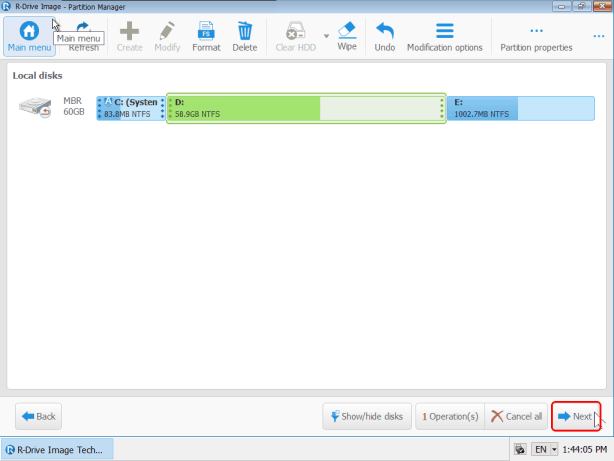
4. Verify that the system partition occupies all the available space and
Click image to enlarge
click the Next button.
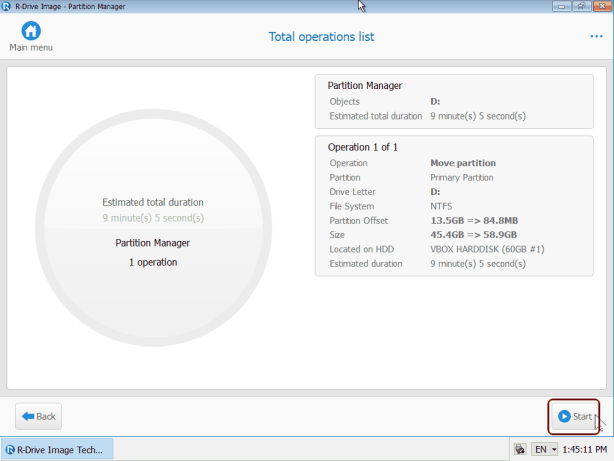
5. Verify that all operations are listed on the Total operations list panel and
Click image to enlarge
click the Start button.
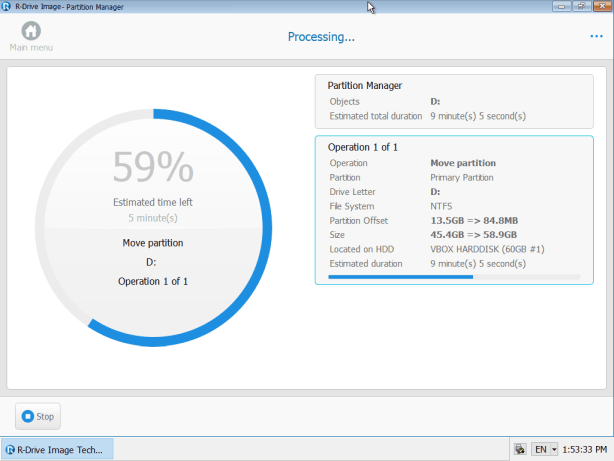
> R-Drive Image will start moving and resizing the system partition, showing its progress.
Click image to enlarge
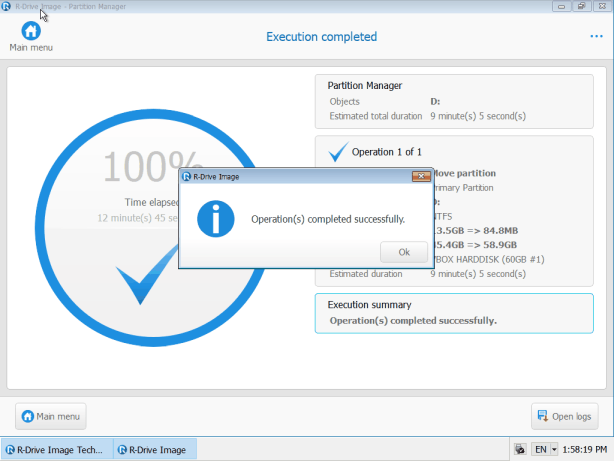
R-Drive Image will show the Operation(s) completed successfully message when partition resizing is over.
Click image to enlarge
Windows will do some restoration work when starting your computer,
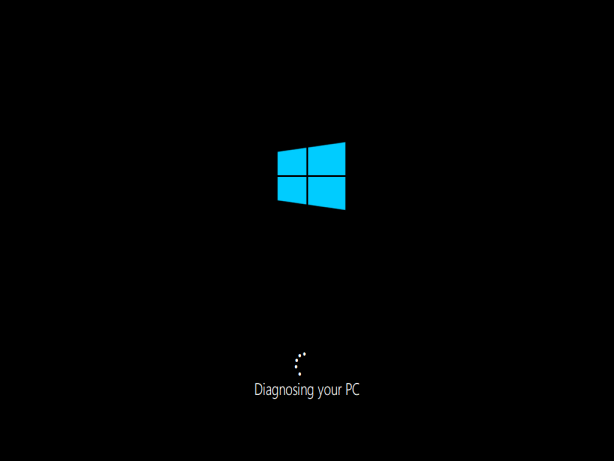
Click image to enlarge
and then successfully complete the startup process.
Go to the Disk Management utility to verify that the system partition is returned to its original place.
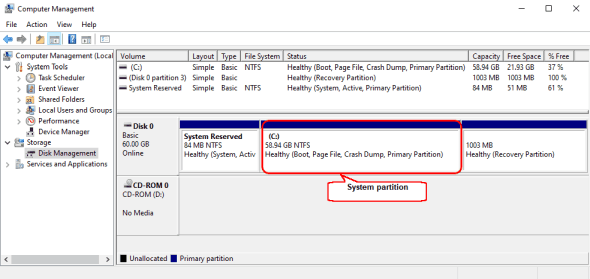
Click image to enlarge
- R-Studio Technician: activation using a USB stick
- Data Recovery Guide
- Why R-Studio?
- R-Studio for Forensic and Data Recovery Business
- R-STUDIO Review on TopTenReviews
- File Recovery Specifics for SSD devices
- How to recover data from NVMe devices
- Predicting Success of Common Data Recovery Cases
- Recovery of Overwritten Data
- Emergency File Recovery Using R-Studio Emergency
- RAID Recovery Presentation
- R-Studio: Data recovery from a non-functional computer
- File Recovery from a Computer that Won't Boot
- Clone Disks Before File Recovery
- HD Video Recovery from SD cards
- File Recovery from an Unbootable Mac Computer
- The best way to recover files from a Mac system disk
- Data Recovery from an Encrypted Linux Disk after a System Crash
- Data Recovery from Apple Disk Images (.DMG files)
- File Recovery after Re-installing Windows
- R-Studio: Data Recovery over Network
- How To Use R-Studio Corporate Package
- Data Recovery from a Re-Formatted NTFS Disk
- Data Recovery from an ReFS disk
- Data Recovery from a Re-Formatted exFAT/FAT Disk
- Data Recovery from an Erased HFS Disk
- Data Recovery from an Erased APFS Disk
- Data Recovery from a Re-Formatted Ext2/3/4FS Disk
- Data Recovery from an XFS Disk
- Data Recovery from a Simple NAS
- How to connect virtual RAID and LVM/LDM volumes to the operating system
- Specifics of File Recovery After a Quick Format
- Data Recovery After Partition Manager Crash
- File Recovery vs. File Repair
- Data Recovery from Virtual Machines
- How to Recover Files from a Remote Computer Using R-Studio Standalone License and Its Network Capabilities in Demo Mode
- How to Connect Disks to a Computer
- Emergency Data Recovery over Network
- Data Recovery over the Internet
- Creating a Custom Known File Type for R-Studio
- Finding RAID parameters
- Recovering Partitions on a Damaged Disk
- NAT and Firewall Traversal for Remote Data Recovery
- Data Recovery from an External Disk with a Damaged File System
- File Recovery Basics
- Default Parameters of Software Stripe Sets (RAID 0) in Mac OS X
- Data Recovery from Virtual Hard Disk (VHD/VHDX) Files
- Data Recovery from Various File Container Formats and Encrypted Disks
- Automatic RAID Parameter Detection
- IntelligentScan Data Recovery Technology
- Multi-pass imaging in R-Studio
- Runtime Imaging in R-Studio
- Linear Imaging vs Runtime Imaging vs Multi-Pass Imaging
- USB Stabilizer Tech for unstable USB devices
- Joint work of R-Studio and PC-3000 UDMA hardware
- Joint work of R-Studio and HDDSuperClone
- R-Studio T80+ - A Professional Data Recovery and Forensic Solution for Small Business and Individuals Just for 1 USD/day
- Backup Articles
- R-Drive Image Standalone and Corporate license transferring
- Fixing Windows update error 0x80070643 with R-Drive Image
- Backup with Confidence
- R-Drive Image as a free powerful partition manager
- Computer Recovery and System Restore
- Disk Cloning and Mass System Deployment
- Accessing Individual Files or Folders on a Backed Up Disk Image
- R-Drive Image startup / bootable version
- File Backup for Personal Computers and Laptops of Home and Self-Employed Users
- Creating a Data Consistent, Space Efficient Data Backup Plan for a Small Business Server
- How to Move the Already Installed Windows from an Old HDD to a New SSD Device and Create a Hybrid Data Storage System
- How to Move an Installed Windows to a Larger Disk
- How to Move a BitLocker-Encrypted System Disk to a New Storage Device
- How to backup and restore disks on Linux and Mac computers using R-Drive Image
- R-Drive Image and Virtual Machines
- Undelete Articles
- Get Deleted Files Back
- Free Recovery from SD and Memory cards
- R-Undelete: Video Recovery
- Recovery from an External Device with a Damaged File System
- File recovery from a non-functional computer
- Free File Recovery from an Android Phone Memory Card
- Free Photo and Video File Recovery Tutorial
- Easy file recovery in three steps
Rating: 4.6 / 5
However, what I wanted to suggest is that you create a Home version of your software that may have slightly ...
https://www.drive-image.com/DriveImage_Help/restorefromanimage.htm
For example, there is no ` Restore from an Image` on the GUI. Instead there is `Restore Image`. And there is no `Image File Selection` on the GUI. Instead there is `Select image file`. And so on... My suggestion is to open the app, go through a file restore, write down the steps exactly as done, and then ...


