- PRODUCTSFREEWAREFOR COMMERCIAL USEFOR PERSONAL AND BUSINESS USEBackup and System Restore:PC Privacy and Security:
- BUY ONLINE
- DISTRIBUTION
-
How to Move a BitLocker-Encrypted System Disk to a New Storage Device


The general information and considerations about moving Windows from one SSD to another are given in our article "How to Move an Installed Windows to a Larger Disk.".
R-Drive Image implements two methods to move a BitLocker-encrypted system disk to another storage device:
* It copies data from the encrypted system partition unlocked by the system. The resulting partition will be plain (no BitLocker encryption), but then it can be encrypted by the system. The main advantage of this method is that the data residing on the disk remains unchanged, and if something goes wrong, the original data remains intact. In addition, if anything has been changed on the source disk during the copy, these changes will be included in the result.
* It copies the encrypted partition to the new disk without decryption. It can be done using thestartup version.
This article will give you step-by-step instructions on how to move a BitLocker-encrypted system partition using these methods.
Copying the system drive from within the system This will produce an unencrypted system partition on the new target drive.
We'll move Windows 10 from the old 256GB SSD device to the new 512GB target drive.
Don't forget to backup all your important files first!
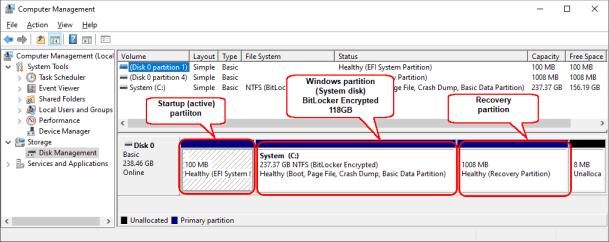
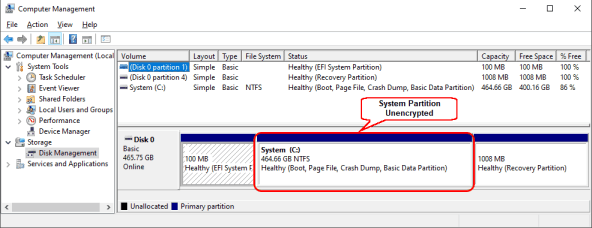
Generally, the disk layout on your computer is the same as for a non-encrypted system partition, except that the system partition is encrypted with BitLocker.
A typical Windows disk layout consists of three partitions:
Click image to enlarge
To create a new working Windows installation, we need to copy the startup partition to the same place on the new SSD device, move the recovery partition to the very end of the device, extend the Windows partition to occupy the rest of the device, and then encrypt the partition if necessary.
1. Connect the new SSD device to your computer. Depending on the interface of the new SSD device, you may do that through a SATA/M.2 port or a USB adapter.
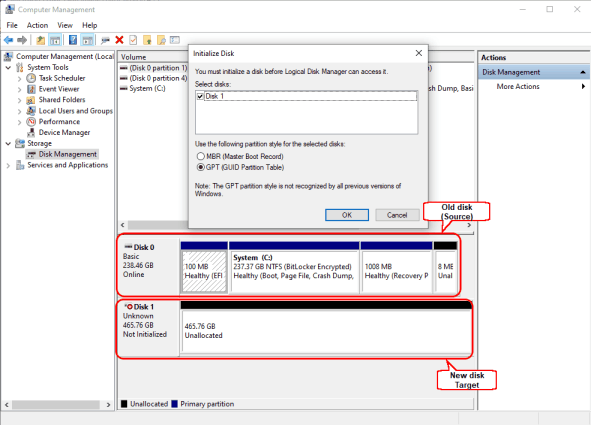
You may want to go to Disk Management to verify that the new SSD device is visible to your system. From now on, we'll refer to the SSD devices as "disks", because Windows and R-Drive Image don't make the distinction between SSDs and HDDs at this level.
Click image to enlarge
A pop-up window may appear asking you to initialize the new disk. You don't need to do that. Instead, just click the Cancel button.
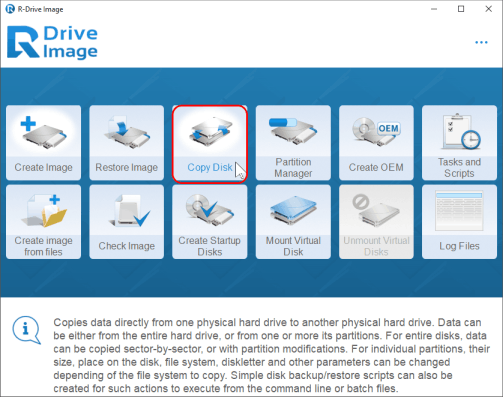
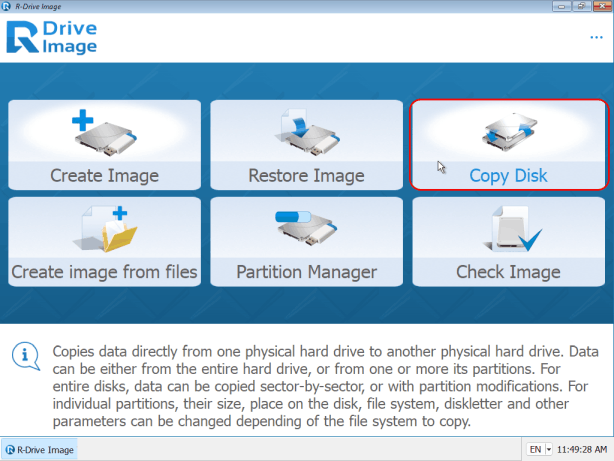
2. Close Computer Management, start R-Drive Image, and click Copy Disk.
Click image to enlarge
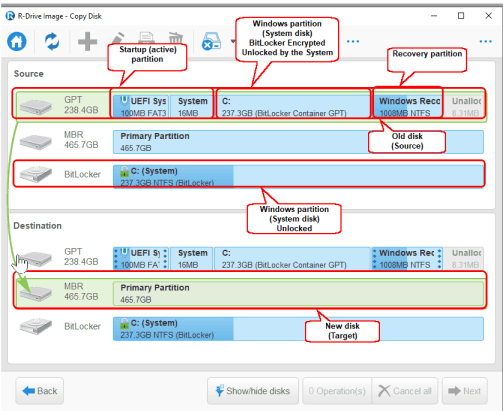
3. Inspect the layout of the old disk. It should contain the startup partition, the Windows partition (the system disk), and the recovery partition. We'll copy the entire source disk to the destination disk, and move the recovery partition to the end of the disk. The Windows partition will be extended later.
4. Drag the old disk (Source) to the new disk (Destination).
Click image to enlarge
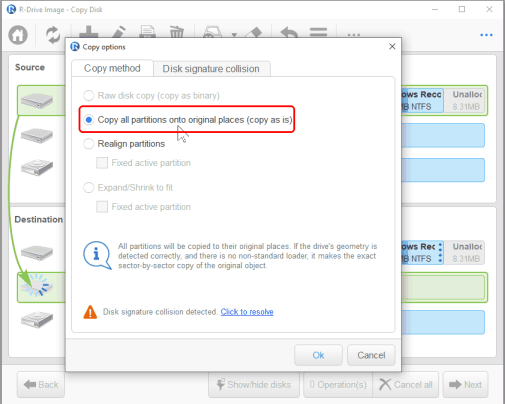
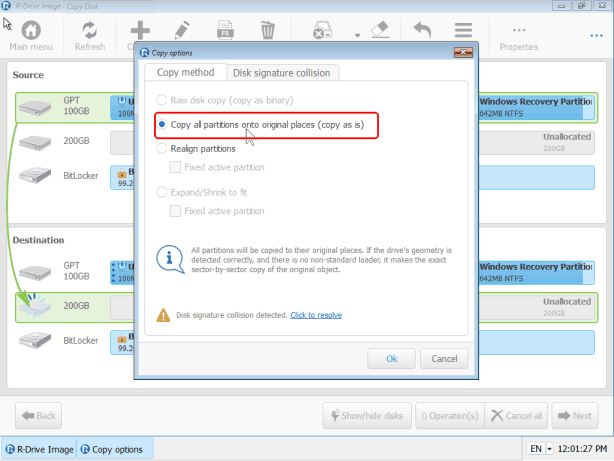
5. The "Copy options" window will appear.
Click image to enlarge
Select "Copy all partitions onto original places (copy as is)" on the "Copy method" tab.
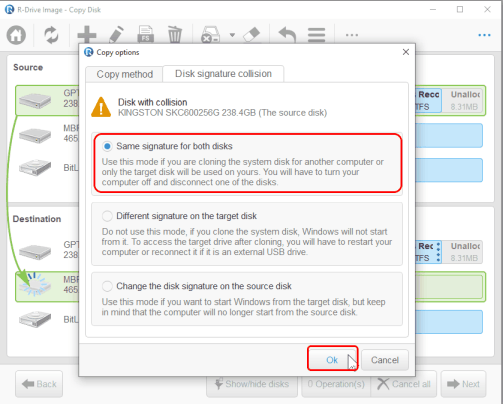
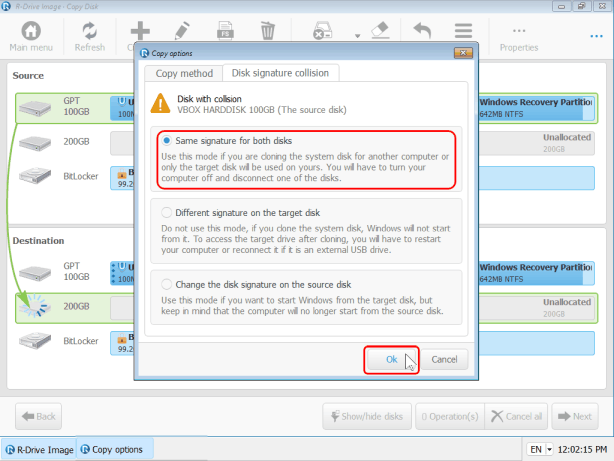
6. Verify that the "Same signature for both disk options" is selected on the "Disk signature collision" tab and click the OK button.
Click image to enlarge
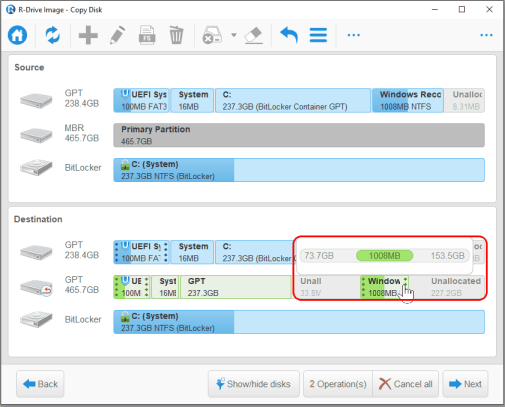
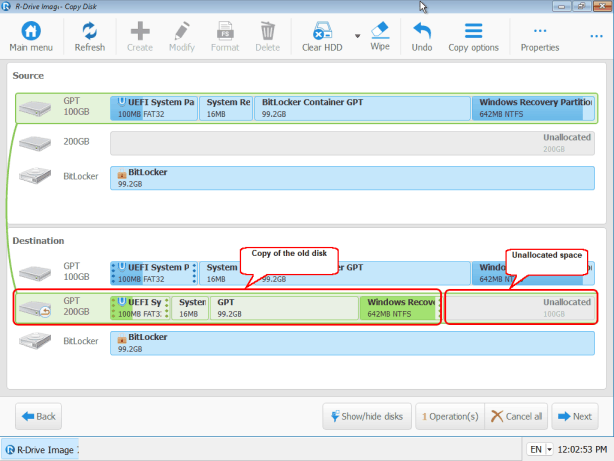
7. You'll see the following layout.

Click image to enlarge
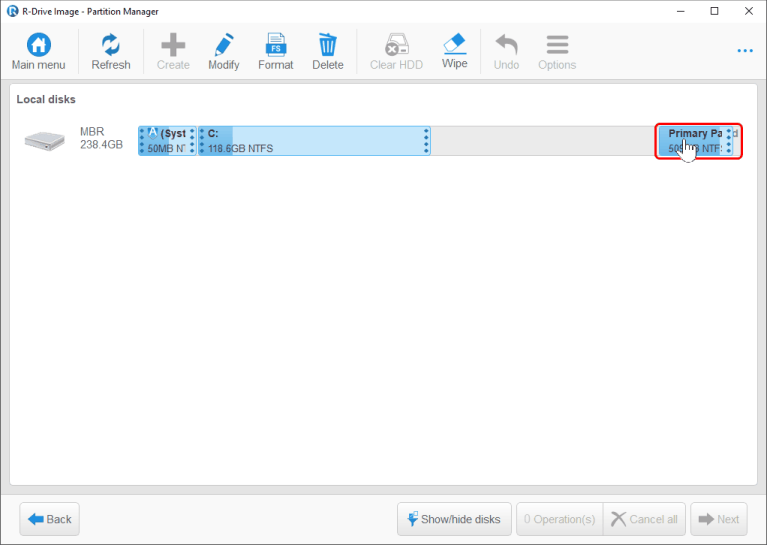
8. Drag the Windows Recovery partition to the end of the disk.
Click image to enlarge
It's impossible to extend the BitLocker-encrypted system partition at this time.
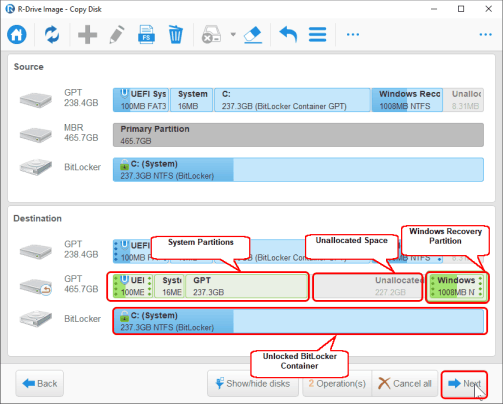
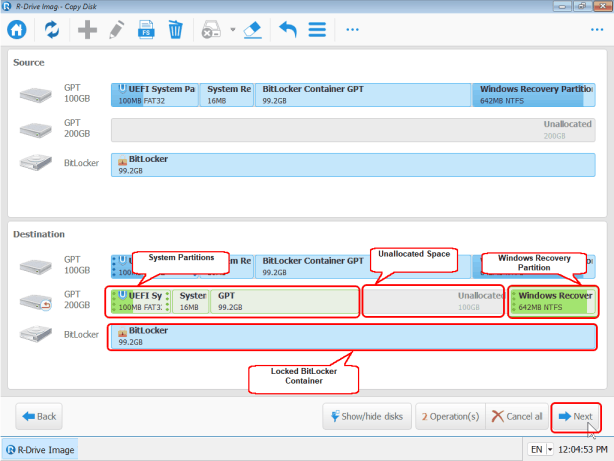
9. Verify that the final layout is correct and click the Next button.
Click image to enlarge
10. A warning message will appear.
Click image to enlarge
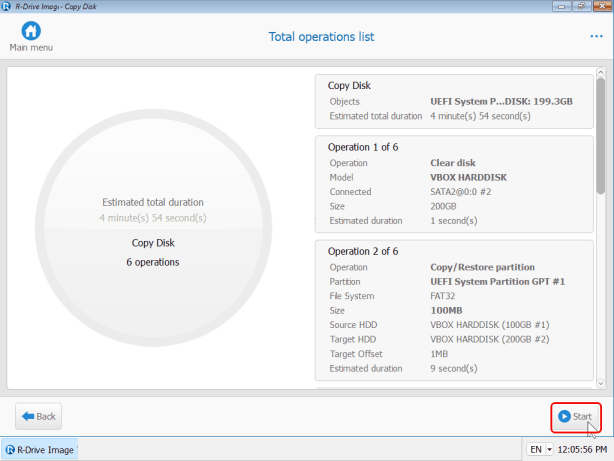
11. Verify that all information on the Total operation list panel is correct and click the Start button.

Click image to enlarge
* R-Drive Image will start copying the data from the old disk to the new one while showing the progress along the way.
Click image to enlarge
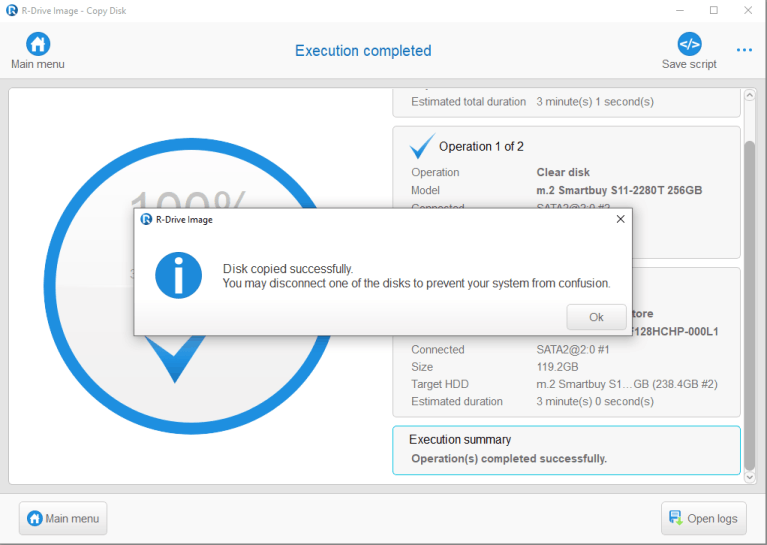
* When this process is over, R-Drive Image will show the "Disk copied successfully" message.
Click image to enlarge
12. Turn off your computer and replace the old disk with the new one. Then turn your computer on and wait for Windows to start.
13. Start R-Drive Image, and click Partition Manager..
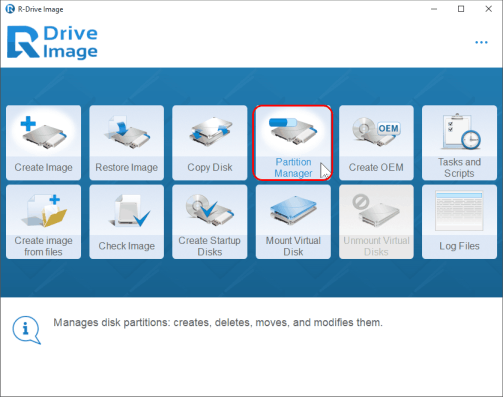
Click image to enlarge
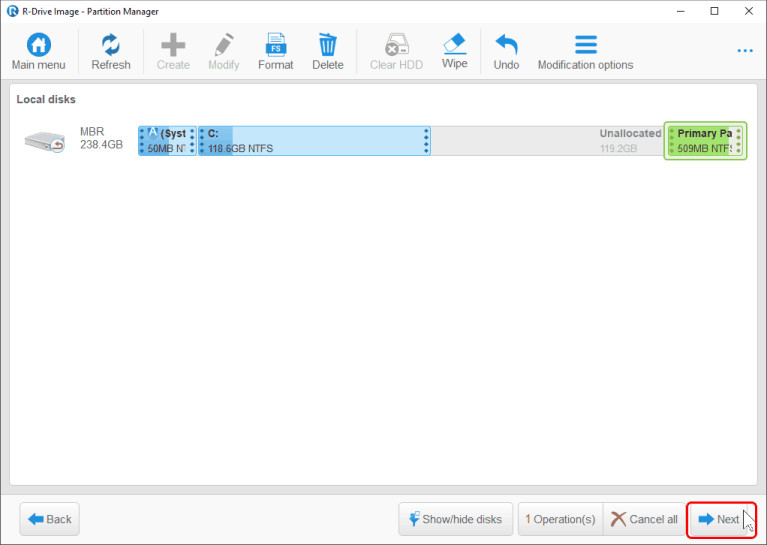
14. Extend the system partition to occupy all unallocated space.
Click image to enlarge
15. Verify that the final layout is correct and click the Next button.
Click image to enlarge
16. Verify that all information on the "Total operation list" panel is correct and click the Start button.
Click image to enlarge
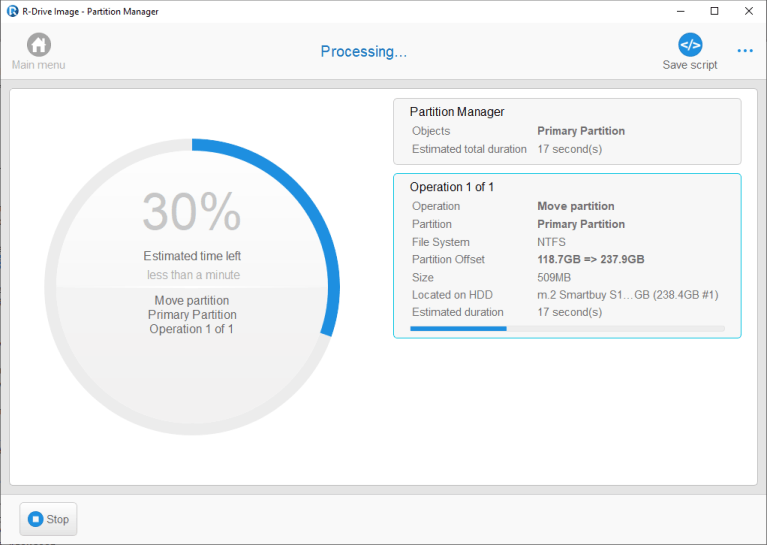
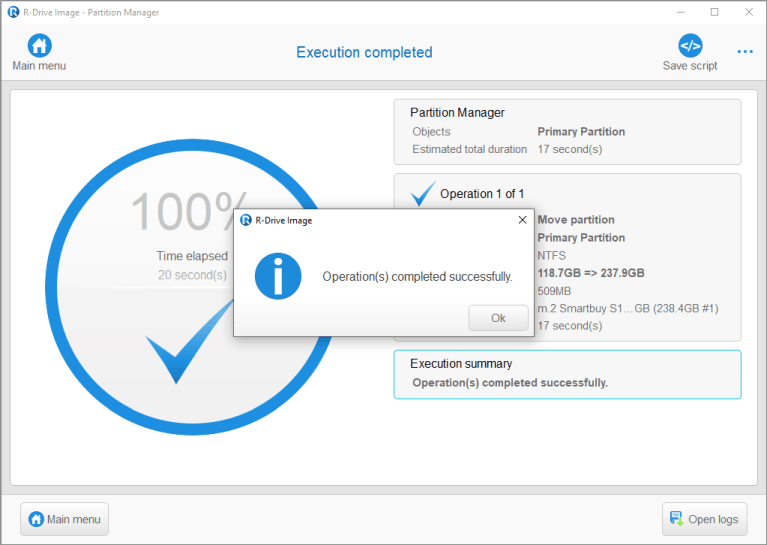
* R-Drive Image will start copying the data from the old disk to the new one while displaying the progress.
* When this process is over, R-Drive Image will show the ""Operation(s) completed successfully"" message.
Click image to enlarge
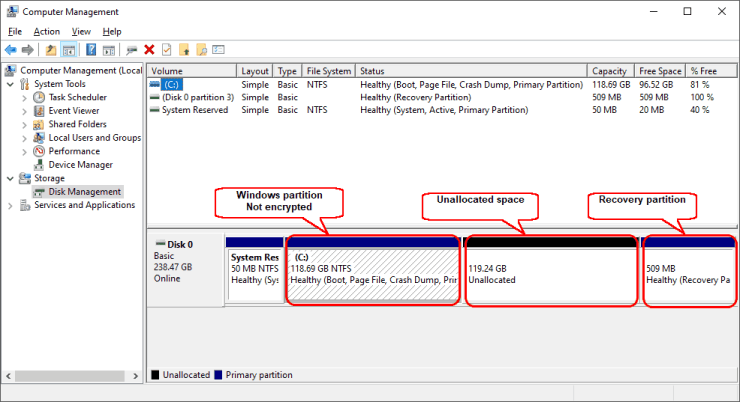
17. Inspect the new disk layout to verify that the Windows partition occupies all available disk space.
Click image to enlarge
Note that the system partition is unencrypted.
We recommend that you restart your computer after this operation, although it's not specifically required.
Now you may encrypt the new Windows partition if you like.
Click image to enlarge
Copying the system drive using the R-Drive Image startup version
We'll move Windows 11 from the old 100GB SSD device to the new 200GB target drive.
This will produce an encrypted system partition on the new target drive.
Don't forget to back up all your important files first!
Then you need to create the startup version. This process is described in our article R-Drive Image startup / bootable version. We recommend you create a WinPE version as it will support Secure Boot and can even open a locked BitLocker partition if needed.
R-Drive Image creates startup sticks already activated for the system where it is installed, so it won't be necessary to activate it again if the startup version is used on the same computer.
As in the first part of the article, we need to copy the startup partition to the same place on the new SSD device, move the recovery partition to the very end of the device, and extend the Windows partition to occupy the rest of the device.
1. Connect the new SSD device to your computer. Depending on the interface of the new SSD device, you may do that through a SATA/M.2 port or a USB adapter.
2. Start your computer using the startup version. You may have to make some adjustments in your system's BIOS to do so. Refer to your system documentation if necessary.
3. Click Copy Disk.
Click image to enlarge
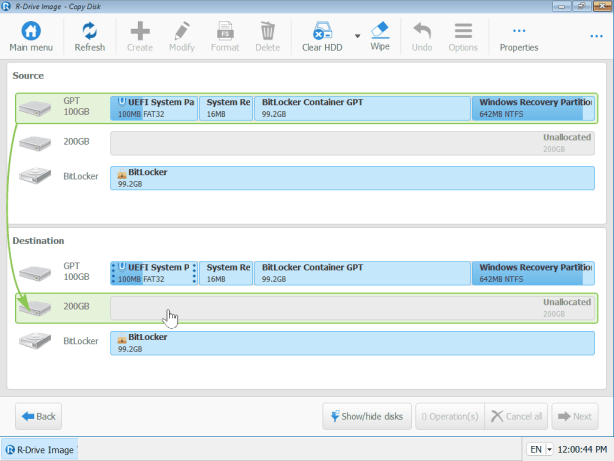
4. Inspect the layout of the old disk. It should contain the startup partition, the Windows partition (the system disk), and the recovery partition. We'll copy the entire source disk to the destination disk, and move the recovery partition to the end of the disk. The Windows partition will be extended later.

Click image to enlarge
5. Drag the old disk (Source) to the new disk (Destination).
Click image to enlarge
6. The "Copy options" window will appear.
Click image to enlarge
Select "Copy all partitions onto original places (copy as is)" on the "Copy method" tab.
7. Verify that the "Same signature for both disk options" is selected on the "Disk signature collision" tab and click the OK button.
Click image to enlarge
8. You'll see the following layout.
Click image to enlarge
9. Drag the Windows Recovery partition to the end of the disk.

Click image to enlarge
10. Verify that the final layout is correct and click the Next button.
Click image to enlarge
It's impossible to extend the BitLocker-encrypted system partition at this time.
11. A warning message will appear. Click the OK button to proceed.
12. Verify that all information on the Total operation list panel is correct and click the Start button.
Click image to enlarge
* R-Drive Image will start copying the data from the old disk to the new one while showing the progress along the way.
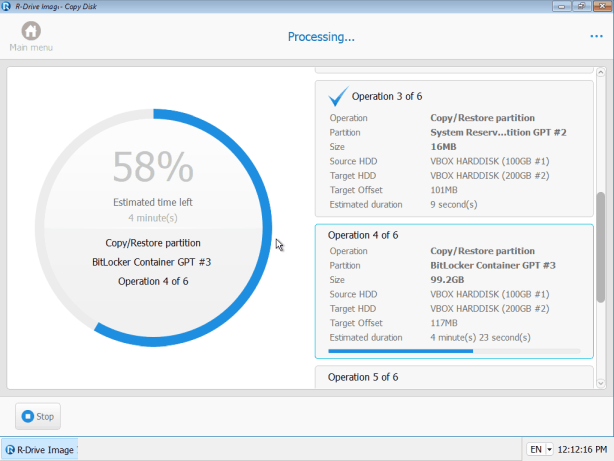
Click image to enlarge
* When this process is over, R-Drive Image will show the "Disk copied successfully" message.
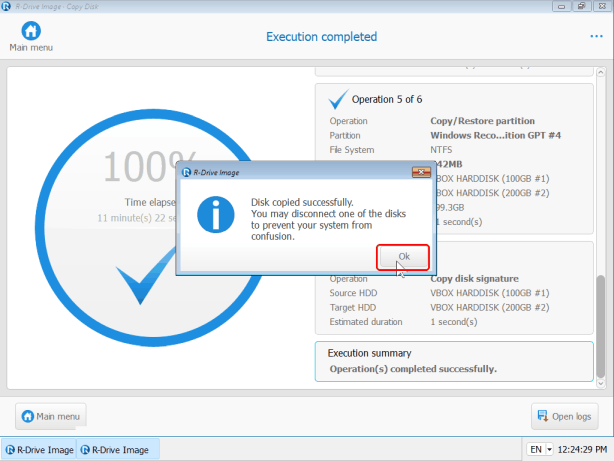
Click image to enlarge
13. Click the OK button and wait for another message from R-Drive Image.
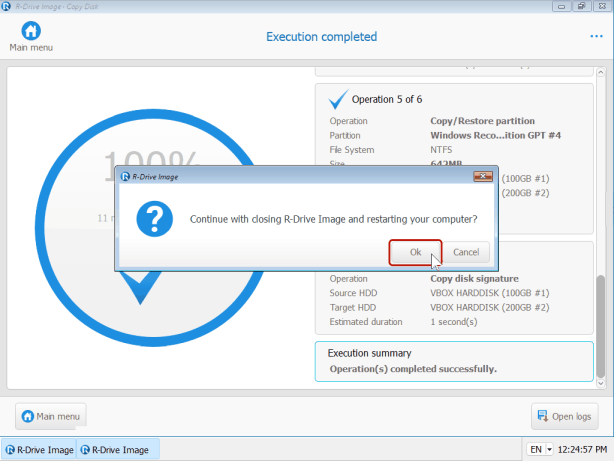
Click image to enlarge
14. Turn off your computer manually and replace the old disk with the new one. Then turn your computer on and wait for Windows to start.
15. Go to Disk Management and inspect the resulting partition scheme.
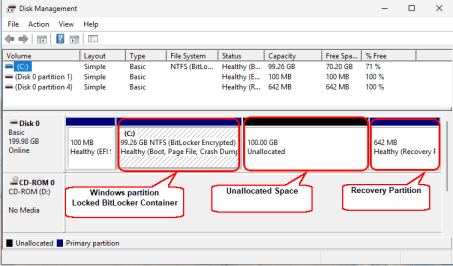
Click image to enlarge
Now it's time to extend the Windows partition.
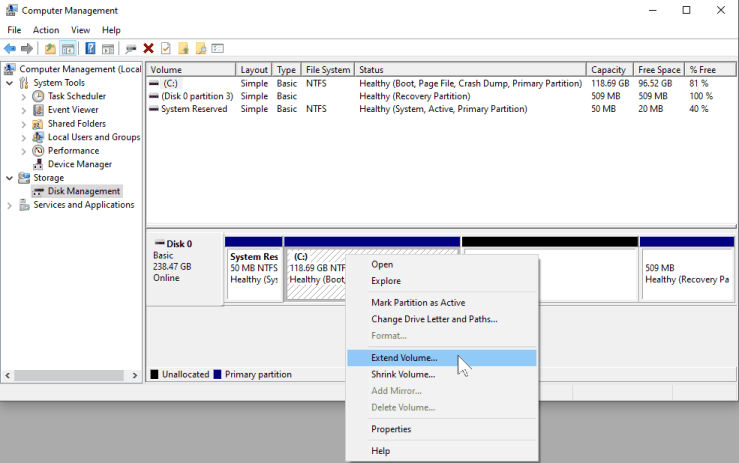
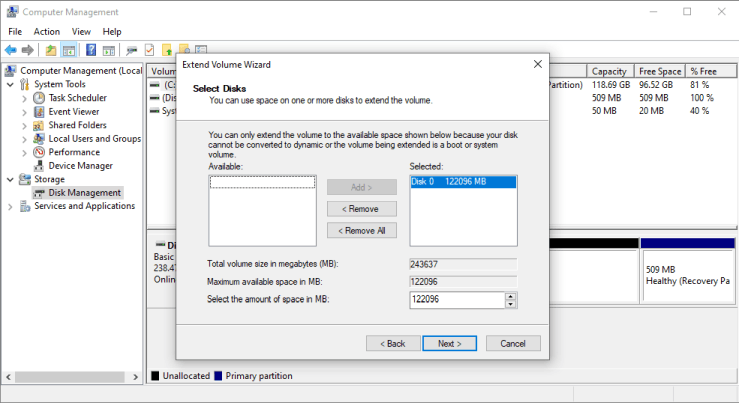
16. Right-click the Windows partition and select Extend Volume in the shortcut menu.
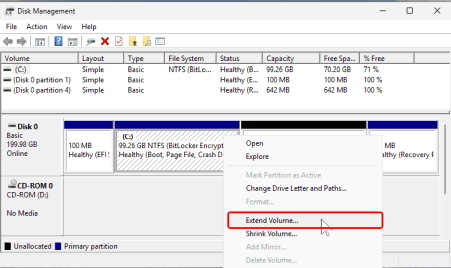
Click image to enlarge
* The Welcome to the Extend Volume Wizard window will appear.
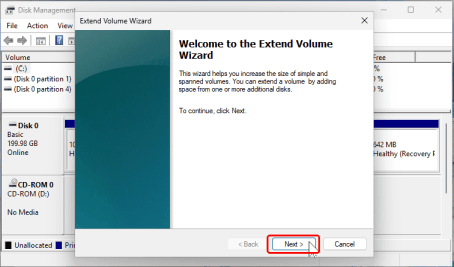
Click image to enlarge
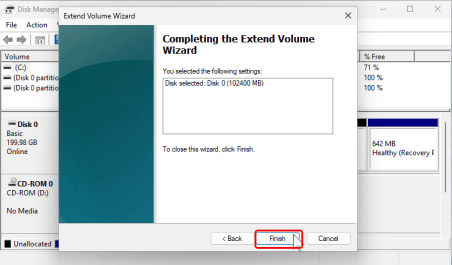
17. Click the Next button and specify the amount of space to extend the Windows partition.
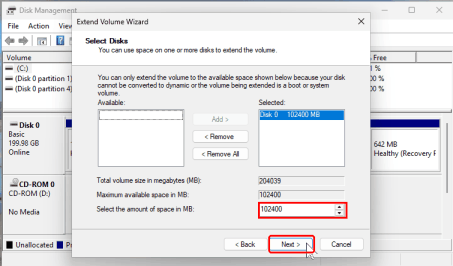
Click image to enlarge
By default, the Wizard suggests the entire unallocated space on the disk, so nothing usually has to be altered.
18. Click the Finish button to complete extending the Windows partition.
Click image to enlarge
and wait for Windows to finish this operation.
19. Inspect the new disk layout to verify that the Windows partition occupies all available disk space.

Click image to enlarge
We recommend that you restart your computer after this operation, although it's not specifically required.
- R-Studio Technician: activation using a USB stick
- Data Recovery Guide
- Why R-Studio?
- R-Studio for Forensic and Data Recovery Business
- R-STUDIO Review on TopTenReviews
- File Recovery Specifics for SSD devices
- How to recover data from NVMe devices
- Predicting Success of Common Data Recovery Cases
- Recovery of Overwritten Data
- Emergency File Recovery Using R-Studio Emergency
- RAID Recovery Presentation
- R-Studio: Data recovery from a non-functional computer
- File Recovery from a Computer that Won't Boot
- Clone Disks Before File Recovery
- HD Video Recovery from SD cards
- File Recovery from an Unbootable Mac Computer
- The best way to recover files from a Mac system disk
- Data Recovery from an Encrypted Linux Disk after a System Crash
- Data Recovery from Apple Disk Images (.DMG files)
- File Recovery after Re-installing Windows
- R-Studio: Data Recovery over Network
- How To Use R-Studio Corporate Package
- Data Recovery from a Re-Formatted NTFS Disk
- Data Recovery from an ReFS disk
- Data Recovery from a Re-Formatted exFAT/FAT Disk
- Data Recovery from an Erased HFS Disk
- Data Recovery from an Erased APFS Disk
- Data Recovery from a Re-Formatted Ext2/3/4FS Disk
- Data Recovery from an XFS Disk
- Data Recovery from a Simple NAS
- How to connect virtual RAID and LVM/LDM volumes to the operating system
- Specifics of File Recovery After a Quick Format
- Data Recovery After Partition Manager Crash
- File Recovery vs. File Repair
- Data Recovery from Virtual Machines
- How to Recover Files from a Remote Computer Using R-Studio Standalone License and Its Network Capabilities in Demo Mode
- How to Connect Disks to a Computer
- Emergency Data Recovery over Network
- Data Recovery over the Internet
- Creating a Custom Known File Type for R-Studio
- Finding RAID parameters
- Recovering Partitions on a Damaged Disk
- NAT and Firewall Traversal for Remote Data Recovery
- Data Recovery from an External Disk with a Damaged File System
- File Recovery Basics
- Default Parameters of Software Stripe Sets (RAID 0) in Mac OS X
- Data Recovery from Virtual Hard Disk (VHD/VHDX) Files
- Data Recovery from Various File Container Formats and Encrypted Disks
- Automatic RAID Parameter Detection
- IntelligentScan Data Recovery Technology
- Multi-pass imaging in R-Studio
- Runtime Imaging in R-Studio
- Linear Imaging vs Runtime Imaging vs Multi-Pass Imaging
- USB Stabilizer Tech for unstable USB devices
- Joint work of R-Studio and PC-3000 UDMA hardware
- Joint work of R-Studio and HDDSuperClone
- R-Studio T80+ - A Professional Data Recovery and Forensic Solution for Small Business and Individuals Just for 1 USD/day
- Backup Articles
- R-Drive Image Standalone and Corporate license transferring
- Fixing Windows update error 0x80070643 with R-Drive Image
- Backup with Confidence
- R-Drive Image as a free powerful partition manager
- Computer Recovery and System Restore
- Disk Cloning and Mass System Deployment
- Accessing Individual Files or Folders on a Backed Up Disk Image
- R-Drive Image startup / bootable version
- File Backup for Personal Computers and Laptops of Home and Self-Employed Users
- Creating a Data Consistent, Space Efficient Data Backup Plan for a Small Business Server
- How to Move the Already Installed Windows from an Old HDD to a New SSD Device and Create a Hybrid Data Storage System
- How to Move an Installed Windows to a Larger Disk
- How to Move a BitLocker-Encrypted System Disk to a New Storage Device
- How to backup and restore disks on Linux and Mac computers using R-Drive Image
- R-Drive Image and Virtual Machines
- Undelete Articles
- Get Deleted Files Back
- Free Recovery from SD and Memory cards
- R-Undelete: Video Recovery
- Recovery from an External Device with a Damaged File System
- File recovery from a non-functional computer
- Free File Recovery from an Android Phone Memory Card
- Free Photo and Video File Recovery Tutorial
- Easy file recovery in three steps
Rating: 4.6 / 5
However, what I wanted to suggest is that you create a Home version of your software that may have slightly ...
https://www.drive-image.com/DriveImage_Help/restorefromanimage.htm
For example, there is no ` Restore from an Image` on the GUI. Instead there is `Restore Image`. And there is no `Image File Selection` on the GUI. Instead there is `Select image file`. And so on... My suggestion is to open the app, go through a file restore, write down the steps exactly as done, and then ...