- PRODUCTSFREEWAREFOR COMMERCIAL USEFOR PERSONAL AND BUSINESS USEBackup and System Restore:PC Privacy and Security:
- BUY ONLINE
- DISTRIBUTION
-
How to Move an Installed Windows to a Larger Disk


Note: This procedure is applicable to HDDs, too, but if you want to move Windows from an HDD (which is usually larger) to an SSD (which is usually smaller), read our article "How to Move the Already Installed Windows from an Old HDD to a New SSD Device and Create a Hybrid Data Storage System".
When SSD devices were becoming the go-to system storage devices, they featured relatively smaller capacity and higher prices when compared with traditional, mechanical hard drives. Now, however, larger SSD devices are becoming more and more affordable. As such, more and more computer users are starting to think about swapping their current SSD devices out for larger ones.
But there's one problem that may keep many users from doing so - a new SSD device requires Windows and the other programs installed to make the new system functional. Windows may be installed from scratch, as well as the programs, but this may be a very long procedure. However, there's another way - to move your already installed and working system to a new SSD device; which may be more preferable for many cases. This article will explain how to do that using our disk cloning, data backup, and partition managing program, R-Drive Image.
By the way, you don't need to buy this program immediately. It has a one-month trial period, during which it performs all its tasks without requiring registration.
In this article, we assume that you've already downloaded and installed R-Drive Image on your system.
Some information and advice before we begin:
Changing SSD devices requires some skill in working with computer hardware, primarily for disks with the modern m2 interface. Consult corresponding manuals for safety guidelines if in doubt.
We also strongly recommend you to backup all your personal files in case something does go wrong. Regular data backup is always a good practice, and our R-Drive Image is exactly intended for that.
As an example, we'll move Windows 10 from an old 128GB SSD device to a new 256GB one.
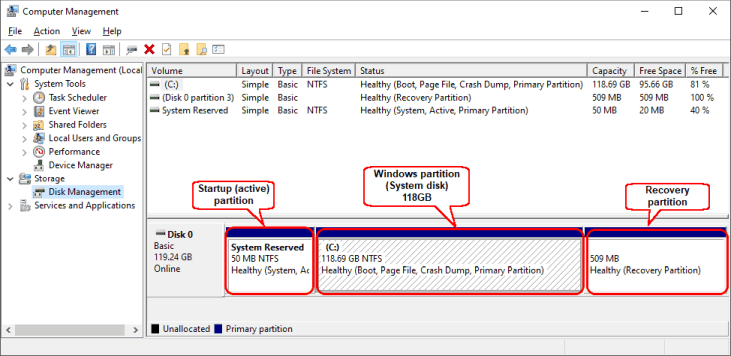
A disk layout for a typical Windows installation
To see the disk layout on your computer, click on "Computer Management" and head to "Disk Management."
A typical Windows disk layout consists of three partitions:
Click image to enlarge
- Startup partition - your system starts by reading data and executing commands from this partition. It should remain exactly on the same place, otherwise Windows will not start.
- Next is the Windows partition - where Windows system files, your programs, and data reside.
- The last partition is the Recovery partition. Windows will try to recover itself when it gets corrupted.
Moving Windows to the new SSD device
This procedure is for system partitions without BitLocker encryption. See our article, "How to Move a BitLocker-Encrypted System Disk to a New Storage Device" if your system partition is encrypted.
1. Connect the new SSD device to your computer. Depending on the interface of the new SSD device, you can do that through a SATA/m2 port, or a USB adapter.
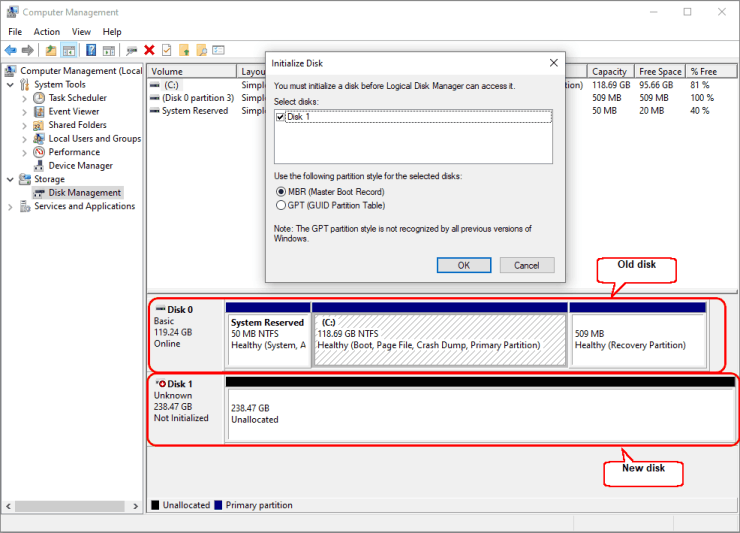
You may want to go to Disk Management to see that the new SSD device is visible to your system. From now on, we'll refer to the SSD devices as "disks", because Windows and R-Drive Image don't make the distinction between SSDs and HDDs at this level.
Click image to enlarge
A pop-up window may appear asking you to initialize the new disk. You don't need to do that. Instead, just click the Cancel button.
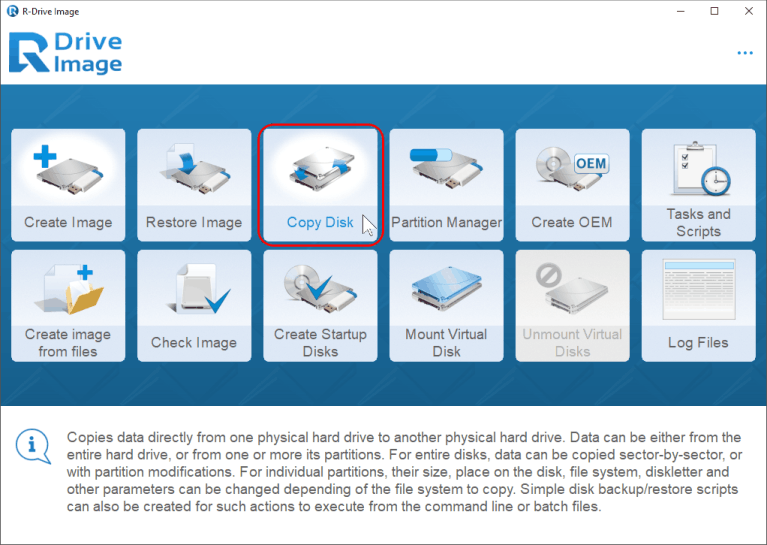
2. Close Computer Management, start R-Drive Image, and click Copy Disk.
Click image to enlarge
Inspect the layout of the old disk. It should contain the startup partition, the Windows partition (the system disk), and the recovery partition. The startup partition should remain at the very beginning of the disk with the recovery partition at the very end of the disk. As such, we will need to extend the Windows partition to cover all the remaining place of the new disk.
3. Drag the old disk (Source) to the new disk (Destination).

Click image to enlarge
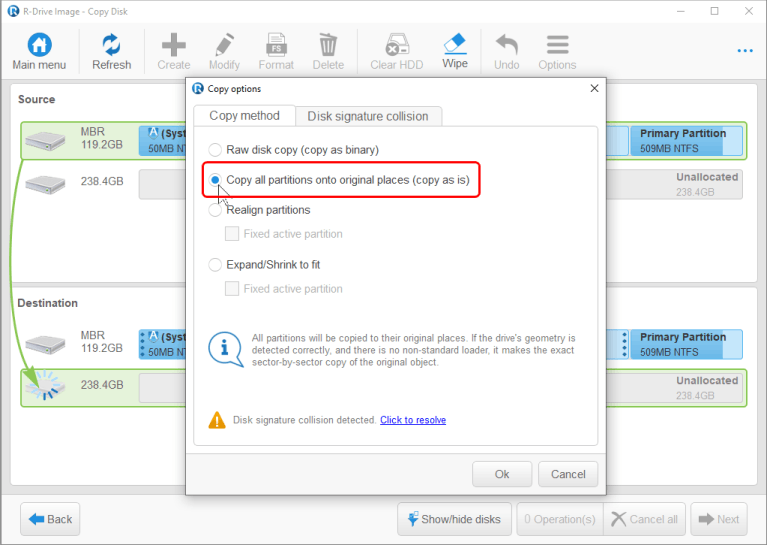
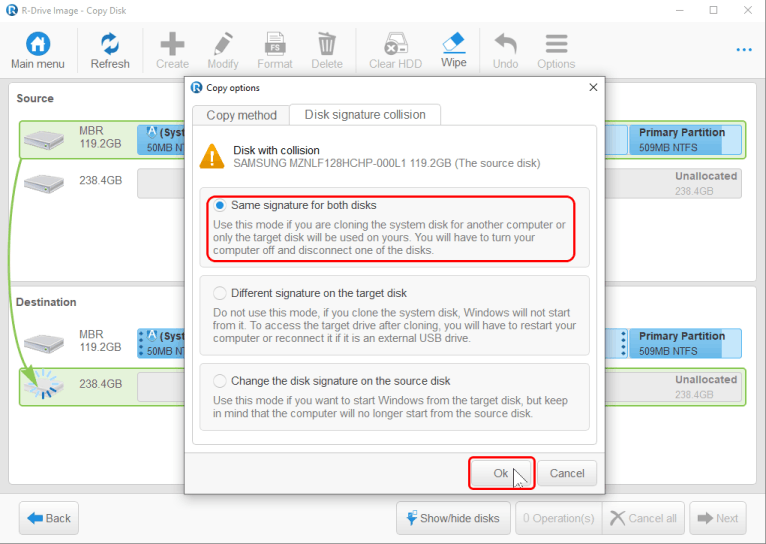
4. The "Copy options" window will appear.
Click image to enlarge
Select "Copy all partitions onto original places (copy as is)" on the "Copy method" tab.
5. Verify that the "Same signature for both disk options" is selected on the "Disk signature collision" tab and click the OK button.
Click image to enlarge
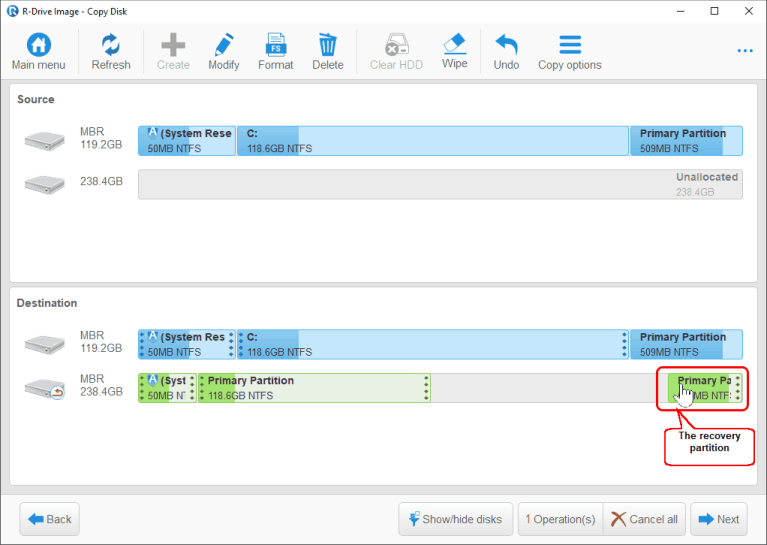
6. Drag the recovery partition to the rightmost place on the diagram.
Click image to enlarge
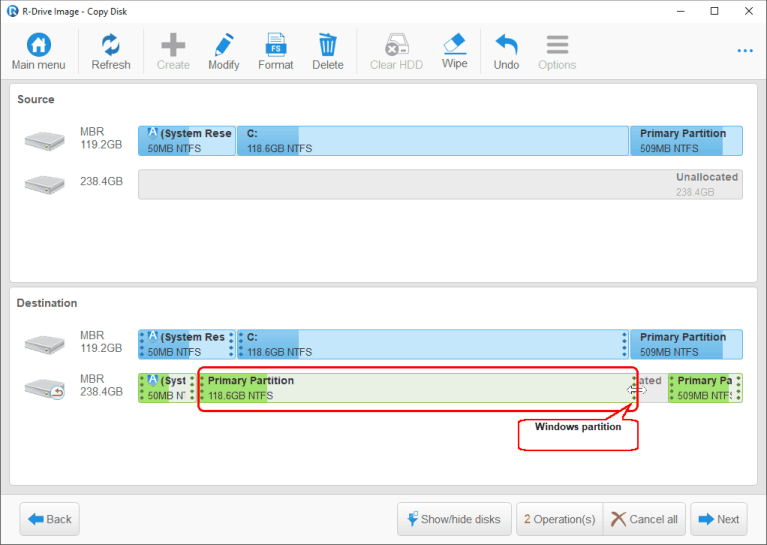
7. Click the right edge of the Windows partition, hold the mouse button, and extend the partition up to the recovery partition.
Click image to enlarge
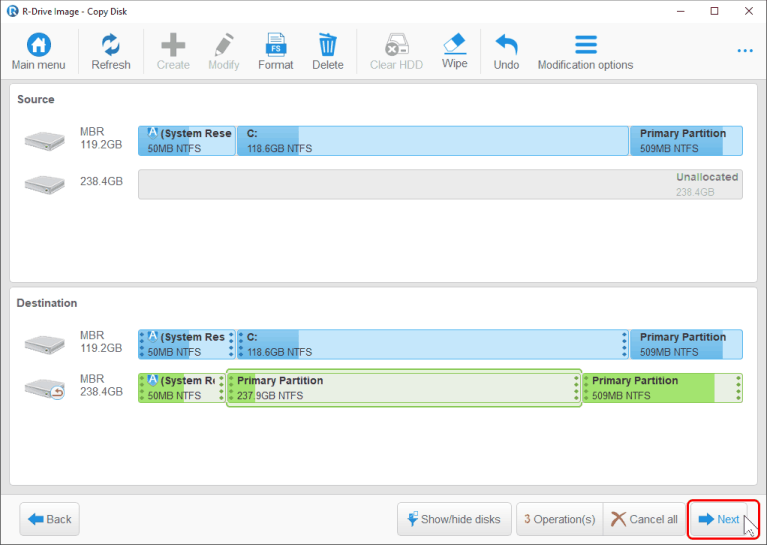
8. Verify that the final layout is correct and click the Next button.
Click image to enlarge
There may appear to be some small free space after the recovery partition. This is not an error. R-Drive Image may align the partition according to characteristics of the disk.
9. Verify that all information on the "Total operation list" panel is correct and click the Start button.
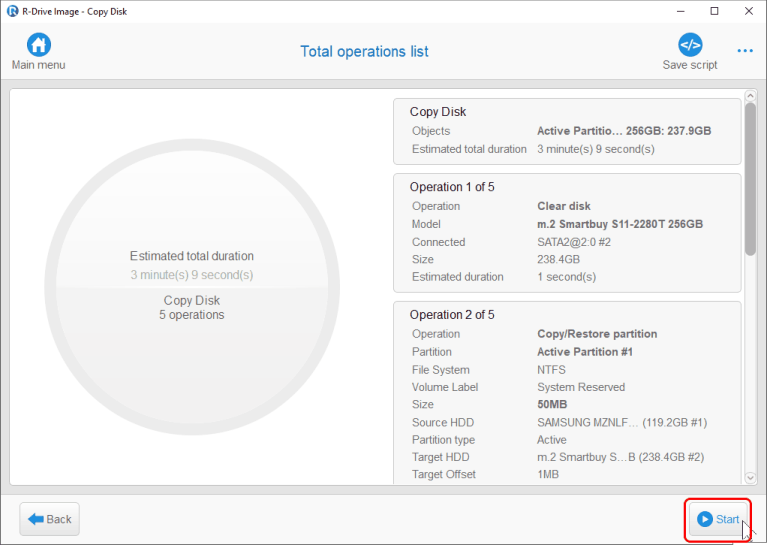
Click image to enlarge
* R-Drive Image will start copying the data from the old disk to the new one while displaying the progress.
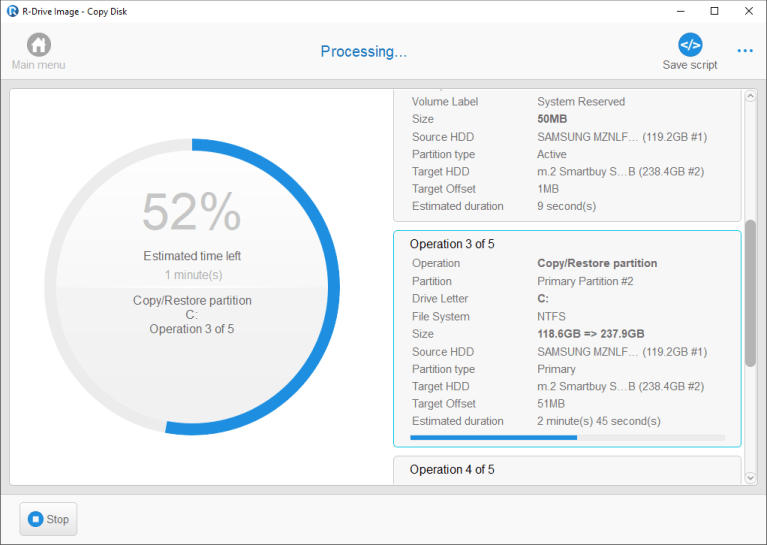
Click image to enlarge
* When this process is over, R-Drive Image will show the "Disk copied successfully" message.
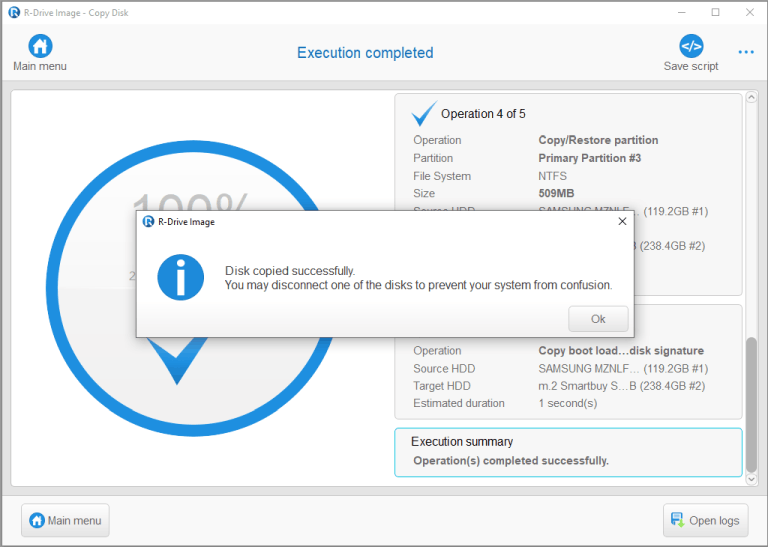
Click image to enlarge
10. Turn off your computer and replace the old disk with the new one. Then turn your computer on and wait for Windows to start.
You may want to go to Disk Management to verify that the new system disk occupies the entirety of the new SSD device - except for the startup and recovery partitions, of course.
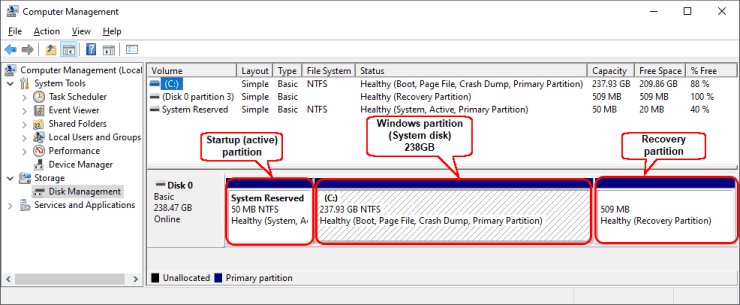
Click image to enlarge
And that's all. Now you have the entire Windows system, your programs, and files moved to the new SSD device.
- R-Studio Technician: activation using a USB stick
- Data Recovery Guide
- Why R-Studio?
- R-Studio for Forensic and Data Recovery Business
- R-STUDIO Review on TopTenReviews
- File Recovery Specifics for SSD devices
- How to recover data from NVMe devices
- Predicting Success of Common Data Recovery Cases
- Recovery of Overwritten Data
- Emergency File Recovery Using R-Studio Emergency
- RAID Recovery Presentation
- R-Studio: Data recovery from a non-functional computer
- File Recovery from a Computer that Won't Boot
- Clone Disks Before File Recovery
- HD Video Recovery from SD cards
- File Recovery from an Unbootable Mac Computer
- The best way to recover files from a Mac system disk
- Data Recovery from an Encrypted Linux Disk after a System Crash
- Data Recovery from Apple Disk Images (.DMG files)
- File Recovery after Re-installing Windows
- R-Studio: Data Recovery over Network
- How To Use R-Studio Corporate Package
- Data Recovery from a Re-Formatted NTFS Disk
- Data Recovery from an ReFS disk
- Data Recovery from a Re-Formatted exFAT/FAT Disk
- Data Recovery from an Erased HFS Disk
- Data Recovery from an Erased APFS Disk
- Data Recovery from a Re-Formatted Ext2/3/4FS Disk
- Data Recovery from an XFS Disk
- Data Recovery from a Simple NAS
- How to connect virtual RAID and LVM/LDM volumes to the operating system
- Specifics of File Recovery After a Quick Format
- Data Recovery After Partition Manager Crash
- File Recovery vs. File Repair
- Data Recovery from Virtual Machines
- How to Recover Files from a Remote Computer Using R-Studio Standalone License and Its Network Capabilities in Demo Mode
- How to Connect Disks to a Computer
- Emergency Data Recovery over Network
- Data Recovery over the Internet
- Creating a Custom Known File Type for R-Studio
- Finding RAID parameters
- Recovering Partitions on a Damaged Disk
- NAT and Firewall Traversal for Remote Data Recovery
- Data Recovery from an External Disk with a Damaged File System
- File Recovery Basics
- Default Parameters of Software Stripe Sets (RAID 0) in Mac OS X
- Data Recovery from Virtual Hard Disk (VHD/VHDX) Files
- Data Recovery from Various File Container Formats and Encrypted Disks
- Automatic RAID Parameter Detection
- IntelligentScan Data Recovery Technology
- Multi-pass imaging in R-Studio
- Runtime Imaging in R-Studio
- Linear Imaging vs Runtime Imaging vs Multi-Pass Imaging
- USB Stabilizer Tech for unstable USB devices
- Joint work of R-Studio and PC-3000 UDMA hardware
- Joint work of R-Studio and HDDSuperClone
- R-Studio T80+ - A Professional Data Recovery and Forensic Solution for Small Business and Individuals Just for 1 USD/day
- Backup Articles
- R-Drive Image Standalone and Corporate license transferring
- Fixing Windows update error 0x80070643 with R-Drive Image
- Backup with Confidence
- R-Drive Image as a free powerful partition manager
- Computer Recovery and System Restore
- Disk Cloning and Mass System Deployment
- Accessing Individual Files or Folders on a Backed Up Disk Image
- R-Drive Image startup / bootable version
- File Backup for Personal Computers and Laptops of Home and Self-Employed Users
- Creating a Data Consistent, Space Efficient Data Backup Plan for a Small Business Server
- How to Move the Already Installed Windows from an Old HDD to a New SSD Device and Create a Hybrid Data Storage System
- How to Move an Installed Windows to a Larger Disk
- How to Move a BitLocker-Encrypted System Disk to a New Storage Device
- How to backup and restore disks on Linux and Mac computers using R-Drive Image
- R-Drive Image and Virtual Machines
- Undelete Articles
- Get Deleted Files Back
- Free Recovery from SD and Memory cards
- R-Undelete: Video Recovery
- Recovery from an External Device with a Damaged File System
- File recovery from a non-functional computer
- Free File Recovery from an Android Phone Memory Card
- Free Photo and Video File Recovery Tutorial
- Easy file recovery in three steps
Rating: 4.6 / 5
However, what I wanted to suggest is that you create a Home version of your software that may have slightly ...
https://www.drive-image.com/DriveImage_Help/restorefromanimage.htm
For example, there is no ` Restore from an Image` on the GUI. Instead there is `Restore Image`. And there is no `Image File Selection` on the GUI. Instead there is `Select image file`. And so on... My suggestion is to open the app, go through a file restore, write down the steps exactly as done, and then ...