- Contents
- Index
- R-Drive Image
- Disk Actions
- Advanced File Filtering
- RAIDs, and Various Disk and Volume Managers
- Startup Version
- Scheduled Actions, Command Line Operations, and Scripting
-
Technical Information
- Updates
- Cloud Services
- FTP/FTPS Servers
- Network Drives
- Image Replications
- Logging
- Creating Consistent Point-in-Time Backups
- Support for Various Disk Partitioning Schemes and File Systems
- Supported Virtual Disk and Disk Image Formats
- Disk Wiping Algorithms
- Supported CD and DVD Recorders
- List of Hardware Devices Supported in the Startup Mode
- R-Drive Image OEM kit
© 2025 R-Tools Technology Inc.
All rights reserved.
Create an Image
Note: You may read about Support for Various Disk Partition Schemes and File Systems to learn more about possible options for your specific case.
You may create images of entire objects or backup only selected files during this action. Images from files can also be created by selecting Create an Image from Files on the Action Selection panel.
Creating images of entire objects
To create an image:
| 1 | Click Create image on the Action Selection panel |
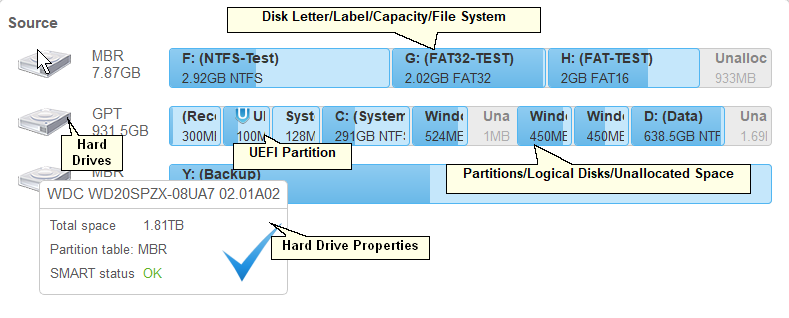
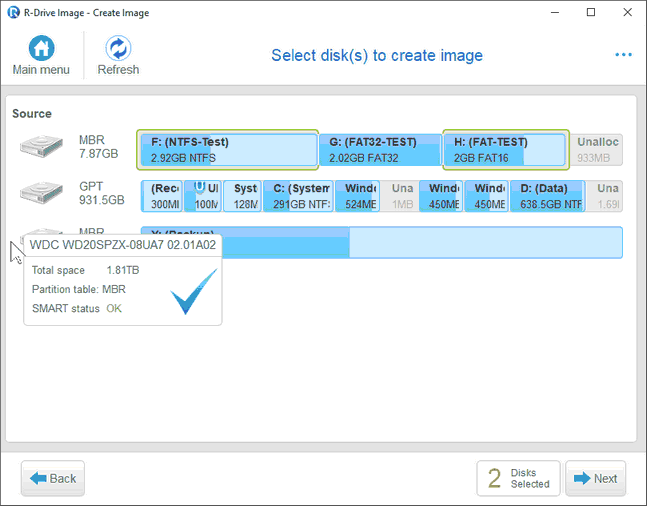
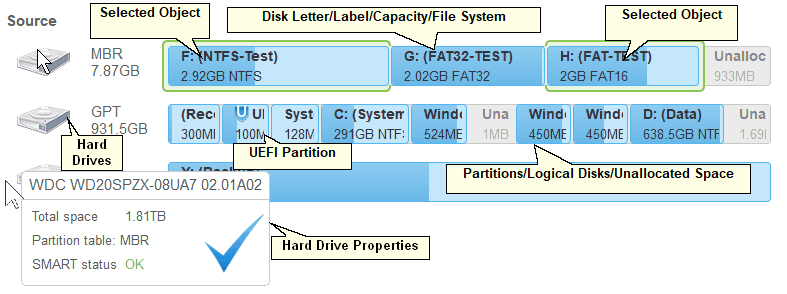
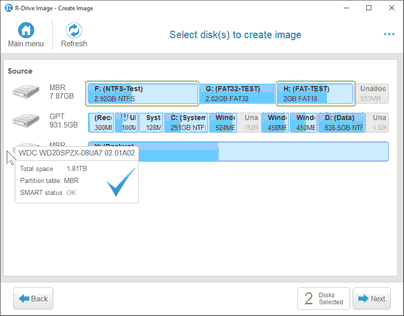
R-Drive Image will start analyzing the computer disk configuration, the Progress... message showing the progress. Then the Select disk(s) to create image panel will show the configuration.
 More information...
|
Disk Configuration
|
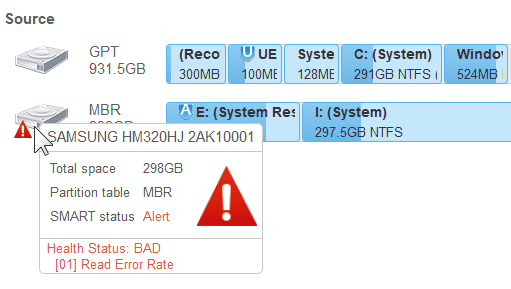
![]() S.M.A.R.T. warning for a hard drive
S.M.A.R.T. warning for a hard drive
|
If a hard drive has S.M.A.R.T. warnings, a color mark will appear on its left-top corner. Dragging the cursor over the drive will show a tooltip explaining that warning.
Warnings will also appear in confirming e-mails for scheduled actions . * ===================[S.M.A.R.T.]=================== ! SAMSUNG HM320HJ 2AK10001(298GB #2): Health Status: BAD [01] Read Error Rate ! ===================[S.M.A.R.T.]=================== S.M.A.R.T. (Self-Monitoring, Analysis and Reporting Technology) is a technology widely-used in hard drives and solid-state devices that monitors their reliability conditions to predict possible hardware failures. |
| 2 | Select the objects you want to backup on the Select disk(s) to create image panel and click the Next button |
Click the controls to learn their functions or go to the respective help pages
 Keyboard Navigation
|
You may use the keyboard to navigate through and select items and objects on the panels. If there are several objects that can be selected, a dashed frame will appear around the object that is in the current focus. |
|
|
Space |
Select/Deselect. |
|
Keyboard arrows |
Right / Left / Up / Down |
|
Alt+S / Alt+D |
Switch between the Source / Destination panels. |
|
Tab/Shift-Tab |
Forward / Backward |
 More information...
|
Selected Objects
|
You may select all objects on a hard drive by clicking the hard drive icon .. It will show the marked hard drive .
Use the Refresh button if your computer disk configuration has been changed (when you connect a USB disk, for example).
You may select the backup type for each partition. You may store in the image either the exact Sector by backup copy of the object, Backup useful information only , or Backup selected files ...Right-click the object and select the required backup type on the shortcut menu .
| 3 | Select the place on the Choose destination of new image panel to which the image files will be written, specify the file name, and click the Next button |
You may select any place including connected network drives, Supported CD and DVD Recorders , or any other devices with removable storage. Several cloud services are also supported. You may also map network drives directly from the program.
Images can be replicated , that is, their copies may be saved to one or other different locations.
You may also choose what image format will be created. (Only in the Corporate , Technician , and Commercial licenses ).
 Image file format
|
RDR |
Default. A proprietary image format. Data in the image can be compressed and password protected. |
|
VHD and VHDX |
A virtual disk format mainly used in the Windows built-in virtual machine. |
|
VMDK |
A common virtual disk format for virtual machines. Only the Corporate , Technician , and Commercial licenses support this format. |
|
VDI |
A common VDI for the VirtualBox virtual machine. Only the Corporate , Technician , and Commercial licenses support this format. |
|
You may read more about virtual disk formats in the help page Supported Virtual Disk and Disk Image Formats . |
|
|
Differentially |
Appended changes will be those between the saved full image and the current state. If there is no full image, it will be created instead. When restoring data, you will need the full image and ONLY the differential file created at the instant to which you want to restore data. |
|
Incrementally |
Appended changes will be those between the last saved changes and the current state. If there is no full image, it will be created instead. When restoring data, you will need the full image and ALL files (both incremental and differential ones) created to the instant to which you want to restore data. |
|
Minimum file sizes: If you need to keep only the latest backup instant, you may use the Append changes differentially to the existing image option and delete all previous differential files. If you need to keep all instances, you may use the Append changes incrementally to the existing image option to keep overall file sizes smaller. Data safety: If any of the differential file is damaged, data will be lost only for that backup instant. If any of the incremental file is damaged, data will be lost for all subsequent backup instances starting from the damaged file until the next full of differential backup. |
|
|
Full |
All data in the image file will be replaced with the current one. |
| Click the Options button to specify additional options and parameters, if necessary. |
• Image Options panel
 Image options
|
Image compression ratio |
You may compress the data in the image to save space. Please note that the smaller size you select the more time will be spent to create the image file and vise versa. |
|
Volume size for multi-volume image |
You may set this option to Automatic and let Windows decide how to split the image file. This mostly depends on the file system on the destination disk. You may also either explicitly specify the split size, or choose a preset for various devices with removable storage. Select Fixed size for that. For the RDR format, a new partial file of the image will be started when the previous file reaches the specified file size. For the VMDK format, a new partial file of the image will be started when the specified data volume of the source object has been processed. Files in the VHD/VHDX and VDI formats cannot be split. You may read more about virtual disk formats in the help page Supported Virtual Disk and Disk Image Formats . |
|
Estimated size |
Shows the estimated size of the image file. An actual image size depends on how much empty space is on the selected partition and what file types are there . |
|
Password protection |
You may protect your image file with a password. Note: If you leave the Encrypt image option clear this feature will provide a relatively moderate protection against conventional unauthorized access. If this option is selected, R-Drive Image will encrypt the image using the AES-XTS algorithm. Note: Only files in the RDR format can be password protected and encrypted. |
|
Image description |
You may attach a text description to the image for annotation. Maximum length of the description is 255 characters. |
|
Validate image when completed |
Select this option if your want R-Drive Image to check the newly created file image for its consistency. This may be useful for storing image files with critical data. Please note that this operation requires additional time. |
|
Shutdown after completion |
There are three options for tasks started by the Windows scheduler or as a script: Do not shutdown : The default option. Your computer will not be shut down On success : Your computer will be shut down only if the task completes successfully Always : Your computer will be shut down regardless of the task result. If the task is started from R-Drive Image itself, your computer will be shut down only when the task completes successfully. |
• Notifications Options panel
 Notifications options
|
Execute on You may specify the applications of the *.com , *.exe , and *.pif types, and their parameters delimited by a space. Mail Notification If a personal firewall is installed on your computer, you should allow the r-driveimagecl.exe application to get access to the e-mail server. Test mail account Click this button to test whether you entered the correct mail settings. |
• Backup Options panel
 Backup Options
|
Snapshot provider |
A snapshot provider is a service R-Drive Image uses to read the disk content while creating its image. R-Drive Image uses the snapshot providers in the order specified on the tab. If it fails to use the first one selected, it tries to use the second one, and so on. |
|
Windows Volume Snapshot Service |
If this check box is selected, R-Drive Image will try to use the Windows native snapshot provider. This snapshot provider is able to notify system applications that a snapshot is being taken. If this option is selected, pagefile.sys and hibernate.sys files are excluded from the image of the system disk . |
|
R-TT Volume Snapshot Service |
If this check box is selected, R-Drive Image will try to use R-TT snapshot provider. This snapshot provider is not able to notify system applications that a snapshot is being taken. |
|
Notify system applications |
If this check box is selected, the snapshot provider, if it supports this feature, notifies system applications that a snapshot is being taken. |
|
Limit I/O rate |
Specifies the rate limits for reading/writing data from/to disks |
|
Limit read |
The rate limit for reading from the source disk |
|
Limit write |
The rate limit for writing to the destination disk |
|
Process priority |
These options specify how much computer resources R-Drive Image will consume during a backup process. |
|
Backup Process Priority |
Specifies the priority of the backup process. Similar to that specified in Windows Task Manager. |
|
Use CPU cores |
Specifies how many processor cores R-Drive Image will use for the backup process. |
|
Ignore disk read errors (bad sectors) |
If this check box is selected, R-Drive Image will ignore possible read errors when it tries to read data from bad sectors. R-Drive Image works with disks with bad sectors in the following way: It reads a certain part of disk (predefined by Windows) and • If read errors are ignored, the entire part with bad sectors will be filled with zeros. • If read errors are not ignored, R-Drive Image reads that part sector by sector and shows a warning message for every bad sector with two options: skip the sector or try to read it again. In this case only the bad sectors will be filled with zeros, but all that requires manual actions and extremely slows the imaging process. Please note that R-Drive Image is developed for the work with normally functioning disks. If you need to image a malfunctioning disk, use R-Studio , a data recovery utility. It has more controls for imaging, and can create R-Drive Image -compatible images even in its demo mode, that is, without registering. |
|
Backup AUX applications |
R-Drive Image is able to make applications run before and after all backup operations. Please note that those application should return a 0 exit code. Leave these fields blank if in doubt. |
|
Before |
An application R-Drive Image starts before the backup operations starts. If you need to start several applications, you may use a command file. Example: "cmd.exe /c example.bat" |
|
After |
An application R-Drive Image starts after the backup operations completes. If you need to start several applications, you may use a command file. Example: "cmd.exe /c example.bat" |
|
Snapshot AUX applications |
R-Drive Image is able to make applications run before and after taking the snapshot of one or several volumes. Please note that those application should return a 0 exit code. Leave these fields blank if in doubt. |
|
Before |
An application R-Drive Image starts before it takes the snapshot of one or several volumes. If you need to start several application, you may use a command file. Example: "cmd.exe /c example.bat" |
|
After |
An application R-Drive Image starts after it takes the snapshot of one or several volumes. If you need to start several application, you may use a command file. Example: "cmd.exe /c example.bat" |
See Creating consistent point-in-time backups for more details.
.
| 4 | Verify that the information on the Processing panel is correct and click the Start button |
You may also create a script for this action. Click the Script to Clipboard button and paste the script to any text-processing utility.
| > | R-Drive Image will start creating the image file(s) |
The Progress bar will show the progress of the current operation and overall process. When the image is created, the Image created successfully. message will appear. You may cancel the current operation by clicking the Cancel button. The Operation canceled by user message will appear.
If there is not enough space on the destination place, the Not enough space message will appear. You may select another place for the rest of the image file or cancel the operation
When the operation is over, you may see the results of the operation by clicking the Open logs button .
 Writing images on CD-R/RW discs and other devices with removable storage
|
If you select a CD/DVD drive to write the image file, you will see the Media Options panel You may create a system recovery disc(s) for your system if you select the Include R-Drive Image bootable version option on this panel. You may start your system up using such CD/DVD disc and recover the data using the R-Drive Image startup version . This startup version is created using the default options (the Linux version, no Cloud/FTP services, etc). Then select appropriate CD/DVD Media Options . Leave Use ISO caching selected unless you have problems with data recording on a disc. When you click the Start button, R-Drive Image will open the CD-R/RW drive tray and the Insert a blank CD-R/RW disc... message will appear. Insert a blank CD-R/RW disc and click the OK button. Each time R-Drive Image fills the disc, the Insert the next blank CD-R/RW disc... message will appear. Insert the next blank CD-R/RW disc and click the OK button. If you mistakenly insert a non-empty CD-R/RW disc, the CD-R/RW disc is not empty... message will appear. Change the disc to another empty CD-R/RW disc and click the OK button. |
|
|
Disk/file structure for CD-R/RW discs and other devices with removable storage If you specify the filename.rdr file name for the image file, R-Drive Image will create the following disk/file structure: |
|
|
Disc |
File name |
|
The first disk |
filename1.rdr |
|
The second disk |
filename2.rdr |
|
The third disk |
filename3.rdr |
|
... |
... |
|
It is recommended that you mark the disk accordingly. You will start restoring the data from the last disk. Go to the Restore Data from an Image topic for more details. |
|
 Bad Sectors
|
When R-Drive Image encounters a bad sector, the IO Error message will appear. You may either cancel the current action or fill the bad sectors with zeros. IO Error Options
|
Backup only selected files from the Select disk(s) to create image panel
You may also copy those files to a specified folder .
You may create images from individual files only from partitions with file systems supported by your Windows system (FAT, NTFS, ReFS by default).They may be other file systems if your Windows has installed drivers for them.
| 1 | Click Create image on the Action Selection panel. |
R-Drive Image will start analyzing the computer disk configuration, the Progress... message showing the progress. Then the Select disk(s) to create image panel will show the configuration.
| 2 | Right-click the objects files on which you want to backup on the Select disk(s) to create image panel and select Backup selected files only on the shortcut menu . |
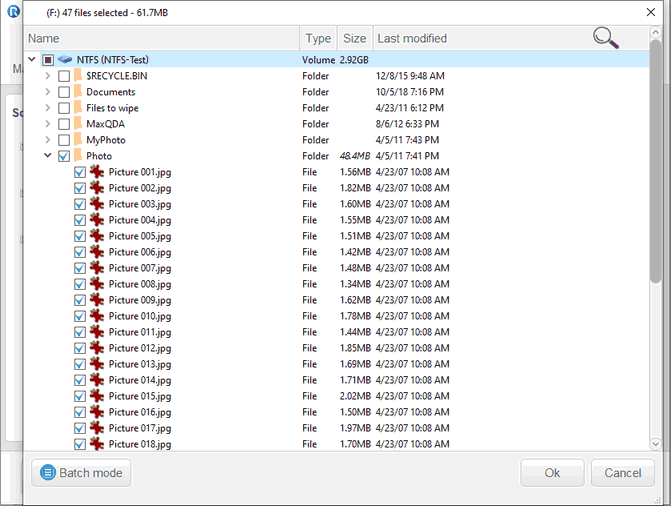
| 3 | Select files on the Files Selected panel and select the files you want to backup and click the OK button |
Click the controls to go to the respective help pages.
You may search for individual files , use filters , or the Batch mode if you want to include all files of several patterns. Such patterns may include multiple file names, masks, and paths.
| And click the Next button on the Select disk(s) to create image panel |
| 4 | Select the place on the Choose destination of new image panel to which the image files will be written, specify the file name, and click the Next button |
You may select any place including connected network drives, supported CD and DVD Recorders , or any other devices with removable storage.
| Click the Options button to specify additional options and parameters, if necessary. |
See Creating consistent point-in-time backups for more details.
| 5 | Verify that the information on the Processing panel is correct and click the Start button |
You may also create a script for this action. Click the Script to Clipboard button and paste the script to any text-processing utility.
| > | R-Drive Image will start creating the image file(s) |
The Progress bar will show the progress of the current operation and overall process. When the image is created, the Image created successfully. message will appear.
When the operation is over, you may see the results of the operation by clicking the Open logs button .
The Disk Actions chapter explains basic disk actions.
The Startup Version chapter explains how to perform disk actions using the R-Drive Image Startup Version .
The Technical Information chapter gives technical information on Supported CD and DVD Recorders and List of Hardware Devices Supported in the Startup Mode and another useful technical information.
Follow this link to obtain R-Drive Image Contact Information and Technical Support
- R-Studio Technician: activation using a USB stick
- Data Recovery Guide
- Why R-Studio?
- R-Studio for Forensic and Data Recovery Business
- R-STUDIO Review on TopTenReviews
- File Recovery Specifics for SSD devices
- How to recover data from NVMe devices
- Predicting Success of Common Data Recovery Cases
- Recovery of Overwritten Data
- Emergency File Recovery Using R-Studio Emergency
- RAID Recovery Presentation
- R-Studio: Data recovery from a non-functional computer
- File Recovery from a Computer that Won't Boot
- Clone Disks Before File Recovery
- HD Video Recovery from SD cards
- File Recovery from an Unbootable Mac Computer
- The best way to recover files from a Mac system disk
- Data Recovery from an Encrypted Linux Disk after a System Crash
- Data Recovery from Apple Disk Images (.DMG files)
- File Recovery after Re-installing Windows
- R-Studio: Data Recovery over Network
- How To Use R-Studio Corporate Package
- Data Recovery from a Re-Formatted NTFS Disk
- Data Recovery from an ReFS disk
- Data Recovery from a Re-Formatted exFAT/FAT Disk
- Data Recovery from an Erased HFS Disk
- Data Recovery from an Erased APFS Disk
- Data Recovery from a Re-Formatted Ext2/3/4FS Disk
- Data Recovery from an XFS Disk
- Data Recovery from a Simple NAS
- How to connect virtual RAID and LVM/LDM volumes to the operating system
- Specifics of File Recovery After a Quick Format
- Data Recovery After Partition Manager Crash
- File Recovery vs. File Repair
- Data Recovery from Virtual Machines
- How to Recover Files from a Remote Computer Using R-Studio Standalone License and Its Network Capabilities in Demo Mode
- How to Connect Disks to a Computer
- Emergency Data Recovery over Network
- Data Recovery over the Internet
- Creating a Custom Known File Type for R-Studio
- Finding RAID parameters
- Recovering Partitions on a Damaged Disk
- NAT and Firewall Traversal for Remote Data Recovery
- Data Recovery from an External Disk with a Damaged File System
- File Recovery Basics
- Default Parameters of Software Stripe Sets (RAID 0) in Mac OS X
- Data Recovery from Virtual Hard Disk (VHD/VHDX) Files
- Data Recovery from Various File Container Formats and Encrypted Disks
- Automatic RAID Parameter Detection
- IntelligentScan Data Recovery Technology
- Multi-pass imaging in R-Studio
- Runtime Imaging in R-Studio
- Linear Imaging vs Runtime Imaging vs Multi-Pass Imaging
- USB Stabilizer Tech for unstable USB devices
- Joint work of R-Studio and PC-3000 UDMA hardware
- Joint work of R-Studio and HDDSuperClone
- R-Studio T80+ - A Professional Data Recovery and Forensic Solution for Small Business and Individuals Just for 1 USD/day
- Backup Articles
- R-Drive Image Standalone and Corporate license transferring
- Fixing Windows update error 0x80070643 with R-Drive Image
- Backup with Confidence
- R-Drive Image as a free powerful partition manager
- Computer Recovery and System Restore
- Disk Cloning and Mass System Deployment
- Accessing Individual Files or Folders on a Backed Up Disk Image
- R-Drive Image startup / bootable version
- File Backup for Personal Computers and Laptops of Home and Self-Employed Users
- Creating a Data Consistent, Space Efficient Data Backup Plan for a Small Business Server
- How to Move the Already Installed Windows from an Old HDD to a New SSD Device and Create a Hybrid Data Storage System
- How to Move an Installed Windows to a Larger Disk
- How to Move a BitLocker-Encrypted System Disk to a New Storage Device
- How to backup and restore disks on Linux and Mac computers using R-Drive Image
- R-Drive Image and Virtual Machines
- Undelete Articles
- Get Deleted Files Back
- Free Recovery from SD and Memory cards
- R-Undelete: Video Recovery
- Recovery from an External Device with a Damaged File System
- File recovery from a non-functional computer
- Free File Recovery from an Android Phone Memory Card
- Free Photo and Video File Recovery Tutorial
- Easy file recovery in three steps

