- Contents
- Index
- . -
- A -
- B -
Backup Options
|
|
Ignore disk read errors (bad sectors)
|
|
|
|
|
|
|
|
|
|
Windows Volume Snapshot Service
|
BitLocker
BitLocker System Drive Encryption
- C -
configure startup media troubleshooting options
Contact information and technical support
Context menu
Create a script from an existing task
Create a script from R-Drive Image
Create Partition Parameters
Creating consistent point-in-time bakups
Custom rotation schemes options
Maximum size of all image files
- D -
Dialog boxes
- E -
- F -
File systems
Format partition options
- G -
Grandfather-Father-Son schemes options
Maximum size of all image files
- H -
HDD Copy Method
Copy all partitions onto original places
Expand/Shrink partition to whole disk
- I -
Image file format
Image Options
Volume size for multi-volume image
Image Options options
Compare file contents even for matching files
Remove files in the destination that have no matching files in the source
Shutdown computer when completed
Imaging Options
- K -
- L -
Linux Logical Volume Manager Volumes
List of Hardware Devices Supported in the Startup Mode
Load Computer into Startup Mode
- M -
Mail Notification Options
Media Options
Include R-Drive Image bootable version
Message
Messages
Choose drive(s) to umount them
Error: Another partitioner is active
Image selected is larger than destination
Insert a blank CD-R/RW disk...
Insert the next blank CD-R/RW disk...
Insert the next blank floppy disk...
ISO-image created successfully
|
Startup disks created successfully
Virtual disk(s) mounted successfully
You have selected several partitions...
Mount
Drive letter for the selected partition
Mount an image as a virtual logical disk
- N -
Notifications options
- O -
OEM Client Media Options
Automatically reboot on successful restore
Client will search image on all disks
Perform restoration without confirmation
- P -
Panels
|
Choose destination of new image
Choose image to check integrity
Choose image to mount drive(s) from
Mail Notification/Aux Applications
Removable Media Device Selection
Removable Storage Device Selection
Select disk(s) to create image
Partition layouts
Partition Manager
- R -
RAIDs, and Various Disk and Volume Managers
Restore Options
Drive letter for the selected partition
File system for the selected partitions
- S -
Scheduled actions, command line operations, and scripting
Scheduler and unattended actions
Script commands and parameters
Scripting and command line operations
Simple rotation scheme options
Maximum size of all image files
Create an image using the startup disks
Restore data to a system or another locked disk
Support for Various non-MBR/GPT Partition Layouts
Supported CD and DVD recorders
- T -
Task execution schedule options
Run missed task as soon as possible
Wake the computer to run this task
Tower-of-Hanoi schemes options
- U -
- V -
- W -
Windiows explorer shortcut menu
Windows Software Spanned Volumes
Windows Storage Spaces
Wiping algorithms
Create an Image
Note: You may read about Support for Various Disk Partition Schemes and File Systems to learn more about possible options for your specific case.
It is recommended that you print out this topic and have the hardcopy on hand while you are performing this action .
Note: This help page describes the operation of the TUI startup version. Go to the Create an Image help page for the GUI version and to the network drives help If necessary.
If there is a non-IDE disk controller in your system, or you plan to use network disks or external hardware devices , first check the list of supported hardware .
If you plan to use any external device, turn it on before starting the system.
If the motherboard in your computer supports the Serial ATA (SATA) devices, but IDE disks are also present, only the SATA devices should be set to the Enhanced Mode in BIOS.
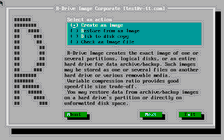
| 2 | Select Create an Image on the Select an action and press the N key |
Use the arrow keys to switch between the options.
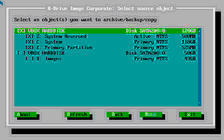
R-Drive Image will start analyzing the computer disk configuration, the Progress... message showing the progress. Then the R-Drive Image: Select an object you want to archive/backup/copy panel will show the configuration.
|
H |
Hard drive |
|
P |
Primary partition |
|
L |
Logical disk |
|
U |
Unallocated space |
| 3 | Select an object which image you want to create on the Select source object panel and press the N key |
Use the arrow keys to switch between the objects and the SPACEBAR to select the object.
R-Drive Image startup retains disk letters is it's used on the same computer where it's been created.
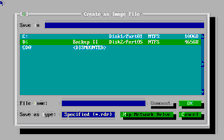
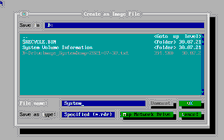
| 4 | Select the place on the Create an Image panel to which the image files will be written, specify the file name, and press the O key |
|
R/O |
Read-only disk. You cannot create images on such disks |
Use the Tab key to switch between the control areas.
External USB drives with the NTFS file system : the startup version of R-Drive Image can save image files on such disks if they are properly disconnected in a Windows system using the Safely Remove Hardware icon in the system tray or while shutting Windows down.
You may also connect network drives.
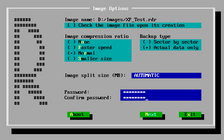
| 5 | Specify image options on the Image Options panel and click the Next button |
You may specify image options on this panel.
 Image options
|
Options |
|
|
Image name: |
Shows the file name for the image. You cannot change the file name on this panel. |
|
Check the image file immediately upon its creation |
Select this option if your want R-Drive Image to check the newly created file image for its consistency. This may be useful for storing image files with critical data. Please note that this operation requires additional time. |
|
Image compression ratio |
You may compress the data in the image to save space. Please note that the smaller size you select the more time will be spent to create the image file and vise versa. |
|
Backup type |
You may store in the image either the exact Sector by backup copy of the object or Backup useful information only , that is, you do not have to store empty space of the object in image files. See Support for Various Disk Partition Schemes and File Systems for the list of supported file systems. |
|
Estimated size |
Shows the estimated size of the image file. An actual image size depends on how much empty space is on the selected partition and what file types are there . |
|
Image split size |
You may set this option to Automatic and let Windows decide how to split the image file. This mostly depends on the file system on the destination disk. You may also either explicitly specify the split size, or choose a preset for various devices with removable storage. Select Fixed size for that. |
|
Password |
You may protect your image file with a password. Note: If you leave the Encrypt image option clear this feature will provide a relatively moderate protection against conventional unauthorized access. If this option is selected, R-Drive Image will encrypt the image using the AES-XTS algorithm. |
|
Image description |
You may attach a text description to the image for annotation. Maximum length of the description is 255 characters. |
| 6 | Verify that the information on the Confirm operations panel is correct and click the N key |
| > | R-Drive Image will start creating the image file |
The Progress window will show the progress of the current operation and overall process. If you selected a read-only disk as the target, you will see the File is read-only. Press OK to retry . message.
The Disk Actions chapter explains basic disk actions.
The Startup Version chapter explains how to perform disk actions using the R-Drive Image Startup Version .
The Technical Information chapter gives technical information on Supported CD and DVD Recorders and List of Hardware Devices Supported in the Startup Mode and another useful technical information.
Follow this link to obtain R-Drive Image Contact Information and Technical Support
- R-Studio Technician: activation using a USB stick
- Data Recovery Guide
- Why R-Studio?
- R-Studio for Forensic and Data Recovery Business
- R-STUDIO Review on TopTenReviews
- File Recovery Specifics for SSD devices
- How to recover data from NVMe devices
- Predicting Success of Common Data Recovery Cases
- Recovery of Overwritten Data
- Emergency File Recovery Using R-Studio Emergency
- RAID Recovery Presentation
- R-Studio: Data recovery from a non-functional computer
- File Recovery from a Computer that Won't Boot
- Clone Disks Before File Recovery
- HD Video Recovery from SD cards
- File Recovery from an Unbootable Mac Computer
- The best way to recover files from a Mac system disk
- Data Recovery from an Encrypted Linux Disk after a System Crash
- Data Recovery from Apple Disk Images (.DMG files)
- File Recovery after Re-installing Windows
- R-Studio: Data Recovery over Network
- How To Use R-Studio Corporate Package
- Data Recovery from a Re-Formatted NTFS Disk
- Data Recovery from an ReFS disk
- Data Recovery from a Re-Formatted exFAT/FAT Disk
- Data Recovery from an Erased HFS Disk
- Data Recovery from an Erased APFS Disk
- Data Recovery from a Re-Formatted Ext2/3/4FS Disk
- Data Recovery from an XFS Disk
- Data Recovery from a Simple NAS
- How to connect virtual RAID and LVM/LDM volumes to the operating system
- Specifics of File Recovery After a Quick Format
- Data Recovery After Partition Manager Crash
- File Recovery vs. File Repair
- Data Recovery from Virtual Machines
- How to Recover Files from a Remote Computer Using R-Studio Standalone License and Its Network Capabilities in Demo Mode
- How to Connect Disks to a Computer
- Emergency Data Recovery over Network
- Data Recovery over the Internet
- Creating a Custom Known File Type for R-Studio
- Finding RAID parameters
- Recovering Partitions on a Damaged Disk
- NAT and Firewall Traversal for Remote Data Recovery
- Data Recovery from an External Disk with a Damaged File System
- File Recovery Basics
- Default Parameters of Software Stripe Sets (RAID 0) in Mac OS X
- Data Recovery from Virtual Hard Disk (VHD/VHDX) Files
- Data Recovery from Various File Container Formats and Encrypted Disks
- Automatic RAID Parameter Detection
- IntelligentScan Data Recovery Technology
- Multi-pass imaging in R-Studio
- Runtime Imaging in R-Studio
- Linear Imaging vs Runtime Imaging vs Multi-Pass Imaging
- USB Stabilizer Tech for unstable USB devices
- Joint work of R-Studio and PC-3000 UDMA hardware
- Joint work of R-Studio and HDDSuperClone
- R-Studio T80+ - A Professional Data Recovery and Forensic Solution for Small Business and Individuals Just for 1 USD/day
- Backup Articles
- R-Drive Image Standalone and Corporate license transferring
- Fixing Windows update error 0x80070643 with R-Drive Image
- Backup with Confidence
- R-Drive Image as a free powerful partition manager
- Computer Recovery and System Restore
- Disk Cloning and Mass System Deployment
- Accessing Individual Files or Folders on a Backed Up Disk Image
- R-Drive Image startup / bootable version
- File Backup for Personal Computers and Laptops of Home and Self-Employed Users
- Creating a Data Consistent, Space Efficient Data Backup Plan for a Small Business Server
- How to Move the Already Installed Windows from an Old HDD to a New SSD Device and Create a Hybrid Data Storage System
- How to Move an Installed Windows to a Larger Disk
- How to Move a BitLocker-Encrypted System Disk to a New Storage Device
- How to backup and restore disks on Linux and Mac computers using R-Drive Image
- R-Drive Image and Virtual Machines
- Undelete Articles
- Get Deleted Files Back
- Free Recovery from SD and Memory cards
- R-Undelete: Video Recovery
- Recovery from an External Device with a Damaged File System
- File recovery from a non-functional computer
- Free File Recovery from an Android Phone Memory Card
- Free Photo and Video File Recovery Tutorial
- Easy file recovery in three steps

