- PRODUCTSFREEWAREFOR COMMERCIAL USEFOR PERSONAL AND BUSINESS USEBackup and System Restore:PC Privacy and Security:
- BUY ONLINE
- DISTRIBUTION
-
Disk Cloning and Mass System Deployment


Disk cloning can save IT companies, computer manufacturers and system distributors hours of billable time both on the front end and back end of mass system deployment. Expanding a division or upgrading systems for an entire department can mean dozens, even hundreds of new machines that need to be loaded with the appropriate software and configured to work on your company's network. Making sure that all of your company's computers have identical base configurations is important for system-wide security updates, compatibility and speedy tech support down the road. Your technicians can painstakingly set up each and every machine one by one with the exact same settings. Or you can configure just one machine and replicate the settings and data on to the other computers. This is disk cloning in a nutshell, and that's one of the things that R-Drive Image does best.
With R-Drive Image, you can quickly copy data from one hard drive (the source disk) to one or more other computers (target disks). R-Drive Image has a number of unique features that makes batch system deployment and large scale computer set up a breeze.
R-Drive Image's key features include:
- Easy-to-use wizard interface that provides step-by-step instructions for cloning disks to meet your specific needs.
- Powerful scripting that can be used to automate the cloning process. No coding required; scripts can be generated via the wizard interface.
- Support for non-MBR (master boot record) disk layouts.
You may read more about R-Drive Image features in the article Backup Software. Backup with Confidence.
R-Drive Image is released with a number of licensing options that are designed to make disk cloning economical for operations of all scopes and sizes:
- R-Drive Image non-commercial licenses (Standalone, Corporate, Technician) - For cloning computers within the licensee organization
- R-Drive Image Commercial - For IT service providers, original equipment manufacturers (OEMs) and system integrators. It allows the licensees to perform commercial cloning for their customers
- R-Drive Image Commercial License + OEM Kit - in addition to the Commercial options, it allows distributors and technicians to include R-Drive Image System Recovery OEM for end-user system recovery.
R-Drive Image's flexible licensing options makes it one of the most cost-effective disk cloning solutions on the market. See the R-Drive Image Licensing and Volume Licensing pages for more details.
Disk cloning: Copy a Disk to a Disk
Disk-to-disk cloning is simple, straightforward and doesn't require any additional disk space on the source machine. Because of this, copying a disk to a disk is recommended for small computer batches.
To clone the disk:
1. Connect the source disk and the destination disks to a computer with an installed copy of R-Drive Image. Start the machine.
2. Run R-Drive Image and select Copy a Disk to a Disk on the Action Selection panel.
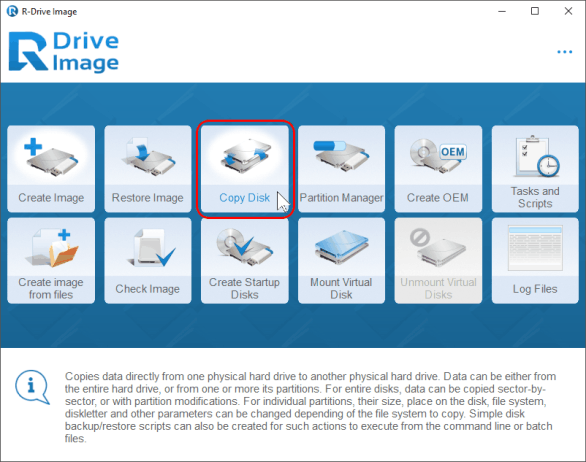
Click image to enlarge
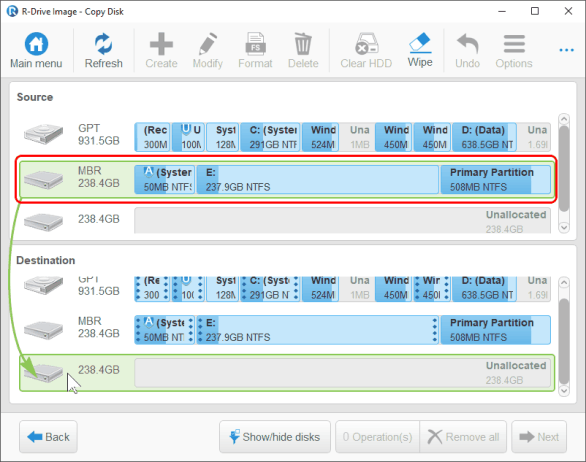
3. The next screen will be the Object Selection panel. First, select the source disk from the first list by clicking its icon.
Click image to enlarge
Note: Disregard the drive letter on the source disk. Windows will automatically assign the correct drive letter when starting the cloned disk. For example, the cloned drive will still be assigned C:\ (or whichever is the primary drive letter) on the target machine, even if the drive letter of the source disk is G:\.
4. Next, drug the source disk in the second list. Click Next to continue.
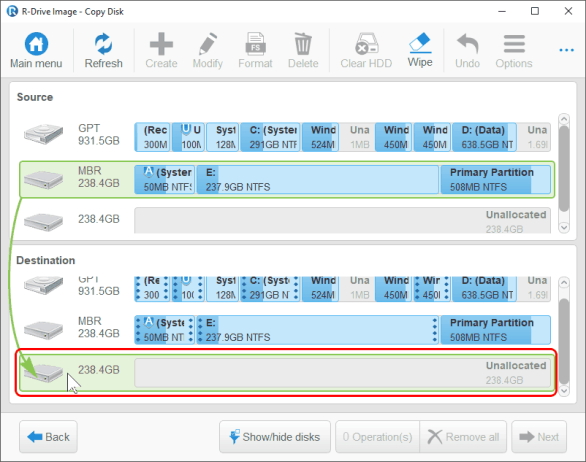
Click image to enlarge
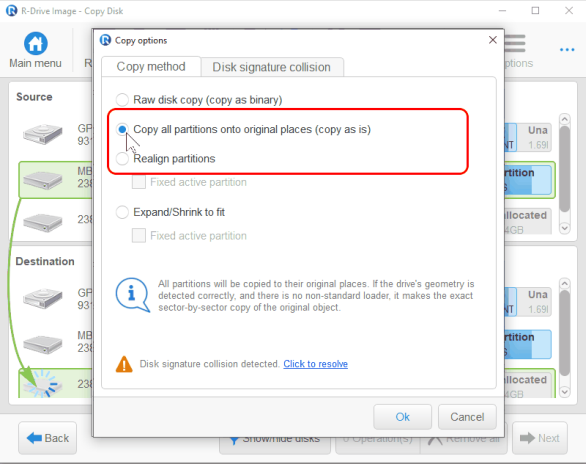
5. In the Restore/Copy Parameters panel, you'll have four different options to choose from under "Copying mode." Choose "Raw disk copy" if you'd like to create an exact copy of the entire content of the source disk on the destination disk, including the empty space. This mode is slower, but it creates an exact sector-by-sector copy of the original disk, regardless of partitioning method. Select "Copy all partitions onto original places" if you want to copy only those parts of partitions where files and other data reside. This is fast, but the empty space will be different on the target disk.
If previously cloned disks failed to boot due to non-standard boot loaders or other issues, try raw disk copy.
Click image to enlarge
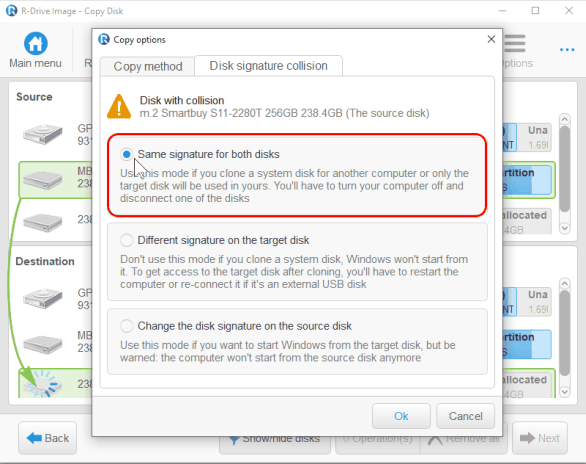
Note that the warning about disk signature collision may appear. Leave/select this option as "Save signature for both disks".
Click image to enlarge
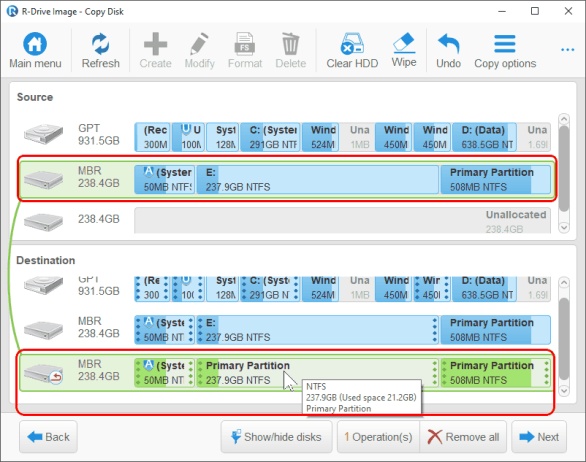
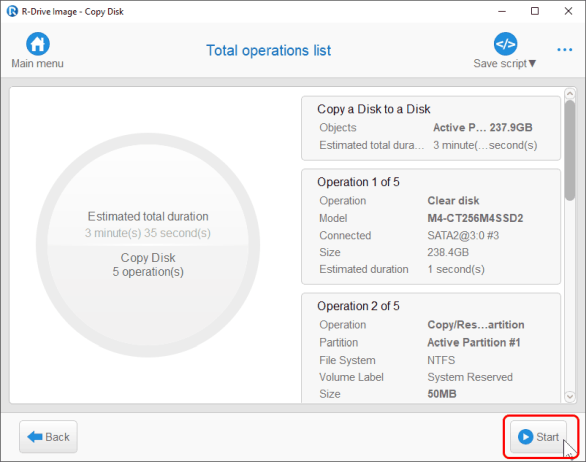
6. Verify that the copy parameters are correct on the Restore/Copy Parameters and Total operation list panels. If so, click Start.
Click image to enlarge
Click image to enlarge
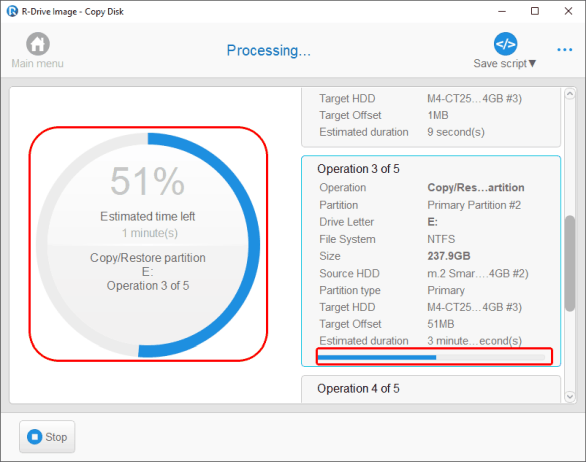
After clicking Start, R-Drive Image begins cloning the disks. You can see the progress of each process in the top bar and the progress of the entire procedure on the lower bar.
Click image to enlarge
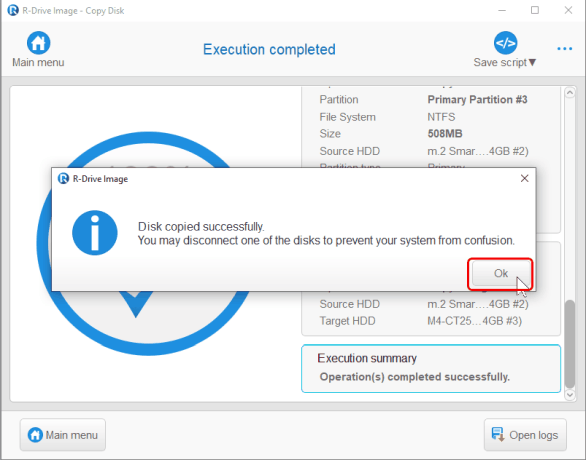
When the disk cloning is completed, R-Drive Image will notify you that the disk was copied successfully and you can now safely disconnect the drive.
Click image to enlarge
You can now disconnect the target disk and connect the next disk to continue cloning. You may need to power your computer down to disconnect the completed target disk and to connect a new one.
Automating the disk cloning process with scripts
If you'd like to repeat a disk cloning job without going through all the above steps each time, you can create a script based on the configuration that you set up in the wizard. This script can be used to launch R-Drive Image and have it automatically clone a disk based on the parameters you've previously selected. You need only to change the target disk.
(You may read more about the powerful R-Drive Image scripting language in R-Drive Image on-line help.)
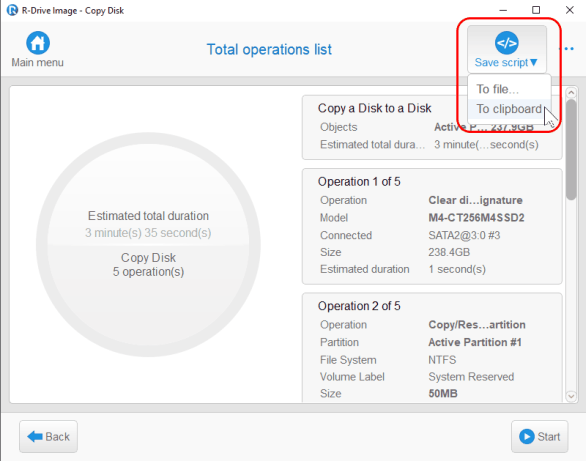
1. From the Total operation list panel in step 6, instead of clicking Start after reviewing your configuration, click To clipboard. This will automatically save the script to your Windows clipboard.
Click image to enlarge
2. Open Windows Notepad and paste the script into a blank plain text document by pressing CTRL-V or clicking Edit and choosing Paste. The script should be a string of commands and parameters, similar to this one:
3. Insert "r-driveimagecl" directly in front of the text on the same line. It should look like this:
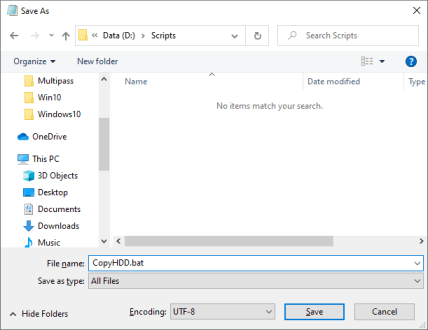
4. Save the text file with the extension .bat. Do so by clicking File and choosing Save as... In the Save As dialog box, click the drop-down menu next to "Save as type" and choose "All files." Give your script a filename ending with .bat, such as "rdriveclonejob1.bat" or "copy.bat."
Click image to enlarge
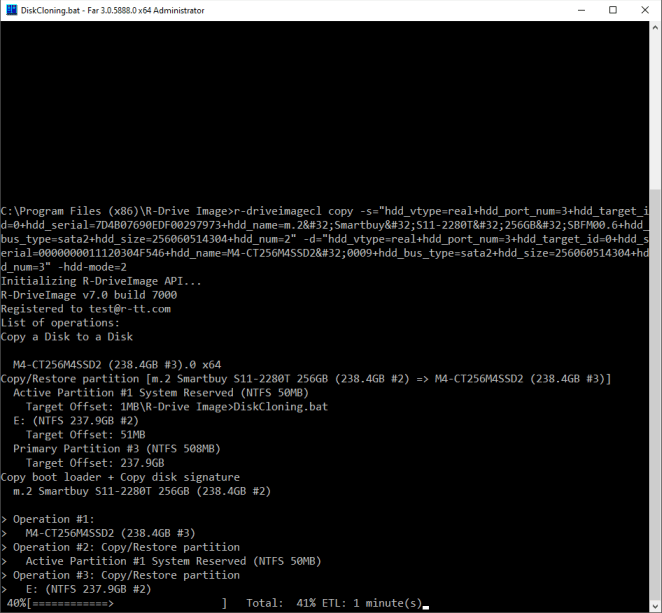
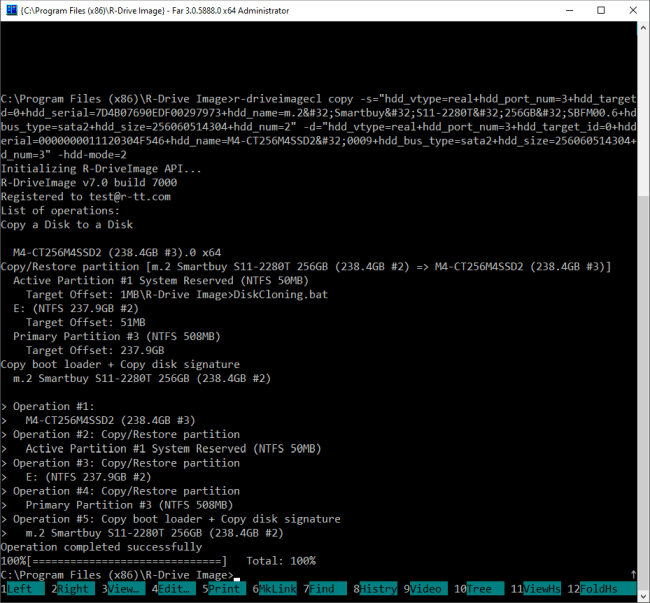
4. You can run the script by typing it's filename from the command line or right-clicking and choosing "Run" from Windows explorer.
R-Drive Image starts cloning the disk, showing its progress in the Command Prompt window.
Click image to enlarge
When the disk cloning is completed, R-Drive Image will notify you that the operating was completed successfully.
Click image to enlarge
Disk cloning from a disk image
R-Drive Image can also copy a source disk and save it as an image. This image can then be used to clone the original source disk or perform a system recovery. (The process of system recovery is described in the article Computer Recovery and System Restore.)
Disk cloning from a disk image is recommend for large computer batches or multiple deployments, as the disk image can be used to clone additional disks even if the source machine has already been delivered.
Disk cloning from a disk image is a two part procedure:
- Creating an image from the source disk.
- Copying the data from the image to the target disk(s).
Because a disk image is an exact replica of the data from the source disk, it may require a large amount of free disk space for storage.
Creating an Image from the Source Disk
1. From the Action Selection panel, choose Create Image.
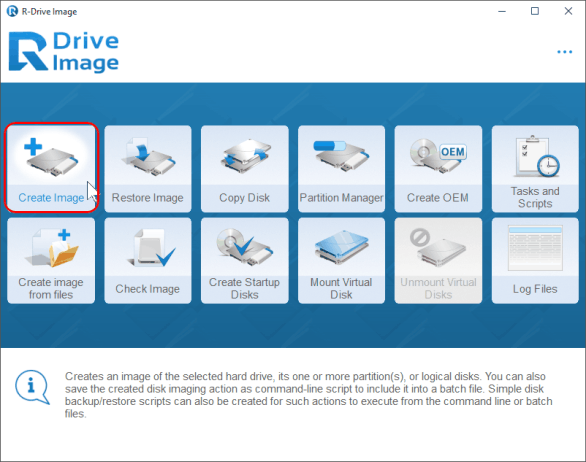
Click image to enlarge
2. From the Select disk(s) to create image panel, select the source disk by clicking its icon. Click the Next button.
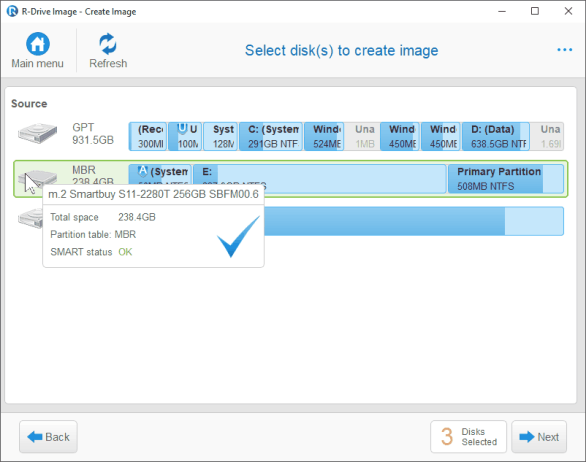
Click image to enlarge
Note: Again, disregard the drive letter of the source disk - Windows will assign an appropriate drive letter when mapping the cloned disk.
3. In the next window, you'll be asked to choose a destination and file name for your disk image. Choose a folder on a drive that has enough free space to accommodate the contents of the source disk and click Next.
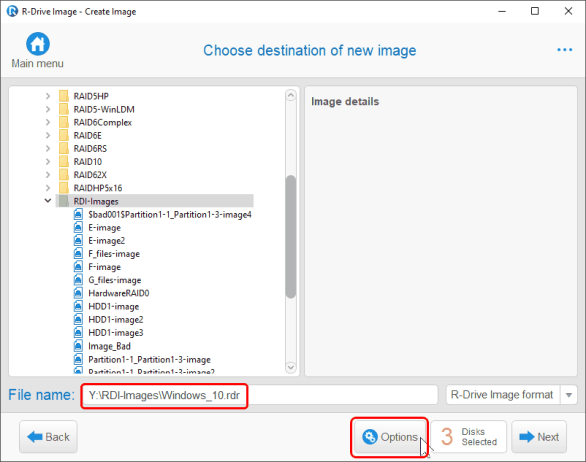
Click image to enlarge
Tip: Images can be stored on the local disks of the computer used to for the disk cloning, or on a network server. Storing images on a network server makes them accessible for all computers on the network, but data transfer is slower.
4. Specify the image options on the Image Options panel and click OK. See below for an explanation of image options.
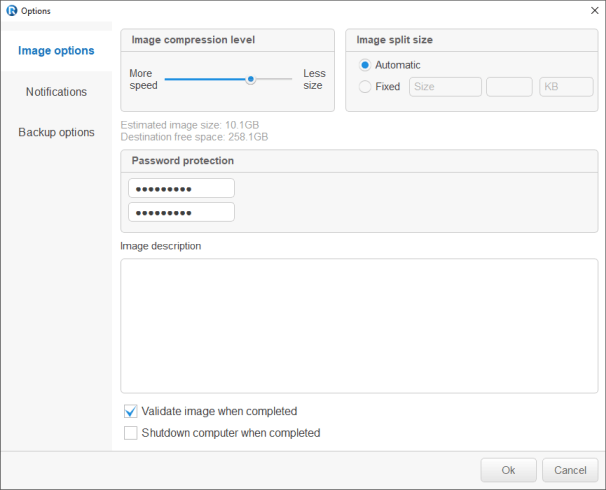
Click image to enlarge
Under "image compression ratio", slide the bar to the left for faster processing speed and slide to the right for smaller size. Check the box just above this section to verify the disk image immediately after creation.
The remaining parameters can be safely left alone. Advanced users can refer to the R-Drive Image on-line help for more information on them.
5. The options on the Backup Options panel can also be left with their default settings. Simply leave them as they are and click next. Advanced users can refer to the R-Drive Image on-line help for more information on these settings.
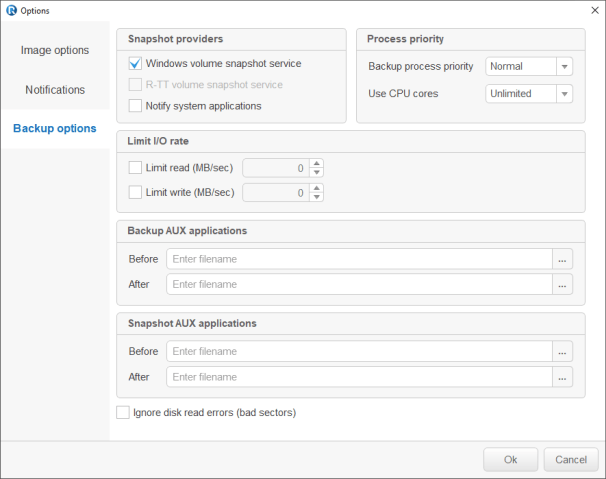
Click image to enlarge
6. Verify that the image creation parameters are correct on the Total operations list panel and click Start.
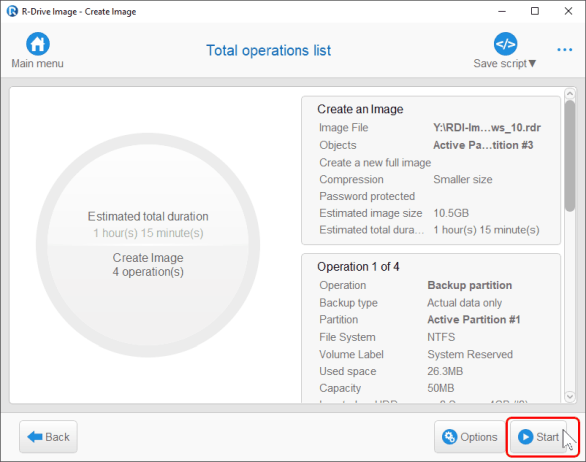
Click image to enlarge
R-Drive Image starts creating the image.
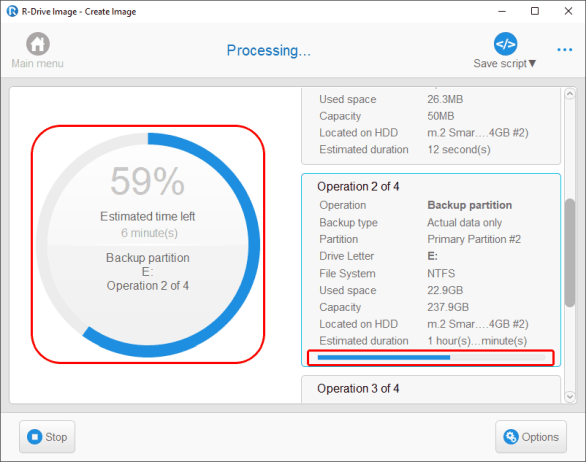
Click image to enlarge
When the image file is created, R-Drive Image notifies you that the image was created successfully.
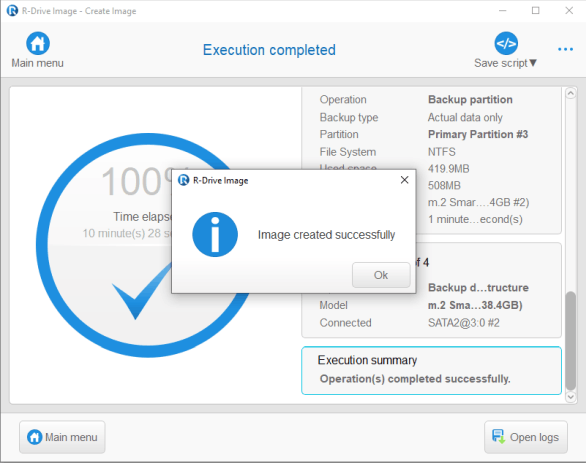
Click image to enlarge
Your disk image is now completed and ready to clone. If you wish, you can disconnect the source drive (as long as you have the disk image saved on another local or network drive).
Copying Data from an Image to Target Disk(s)
1. Select Restore Image on the Action Selection panel

Click image to enlarge
2. In the next window, select the image file that you created in the above steps. Click Next to continue.
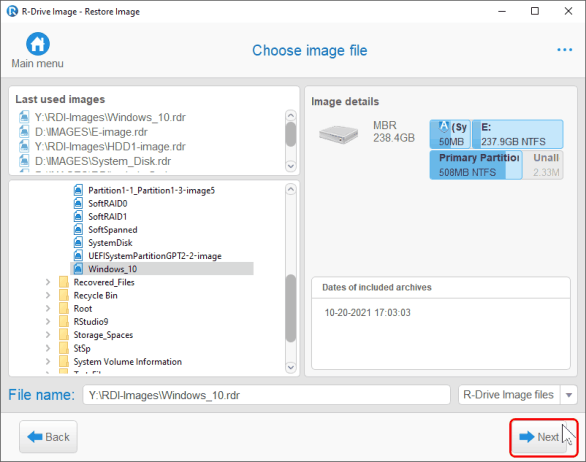
Click image to enlarge
3. From the Image Object Selection panel, choose the source disk from within the image file.
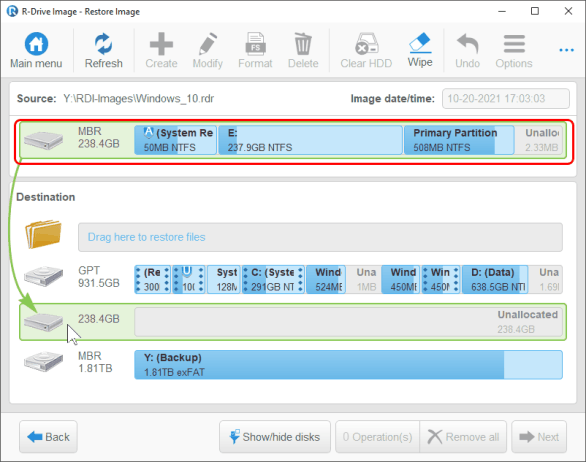
Click image to enlarge
4. Drug the source disk to the target one on the Image Object Selection panel and click Next.
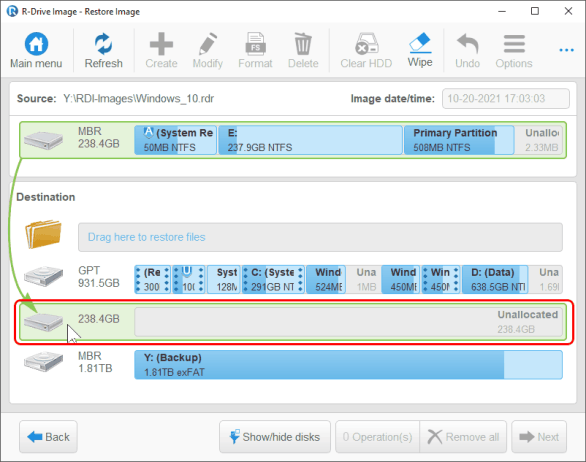
Click image to enlarge
5. Select "Copy all partition onto original places" on the Copy options panel and click Next.
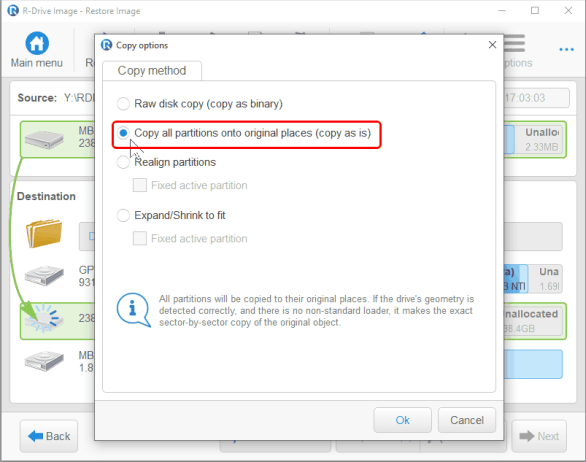
Click image to enlarge
6. Verify that the image creation parameters are correct on the Total operation list panel and click Next.
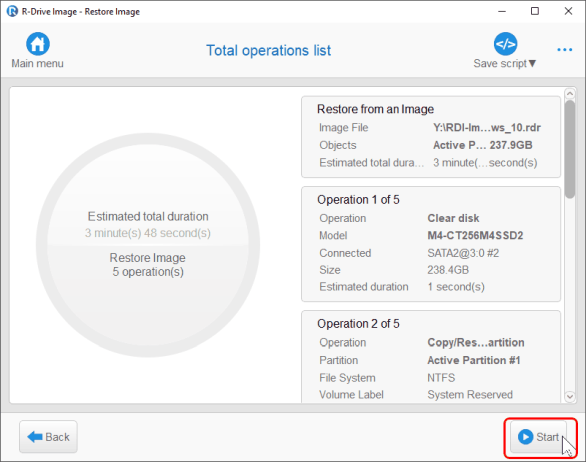
Click image to enlarge
Recall that you can also create a script from this window.
R-Drive Image starts copying data from the image onto the target disk.
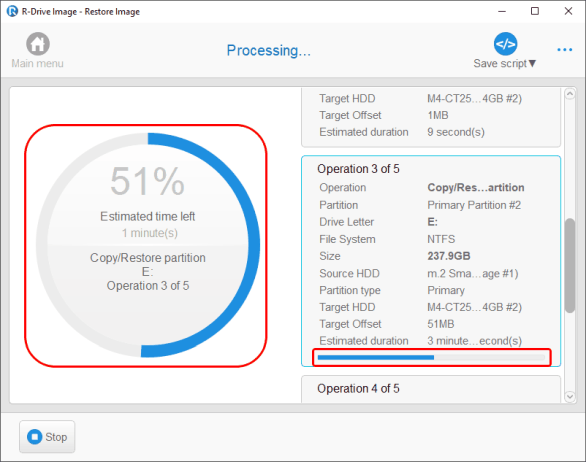
Click image to enlarge
When the disk cloning is completed, R-Drive Image will notify you that the image was restored or created successfully.
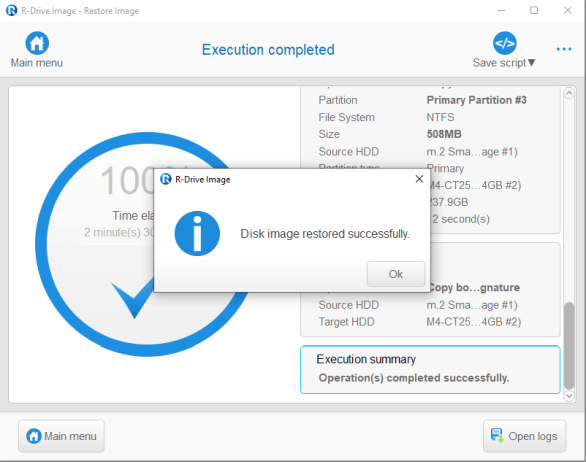
Click image to enlarge
Once the disk image has been copied successfully, you can disconnect your target disk and connect the next one. You may need to eject the disk and/or power down your machine before disconnecting your drive.
Conclusion
R-Drive Image allows you to take the arduous task of setting up a computer, installing applications, configuring drivers and establishing user credentials and accomplish it with just a few mouse clicks. This not only saves your company time and money, it also ensures that all of your computers have all of the required settings, updates and base configurations, which makes it easier to integrate them into new systems and troubleshoot hardware and software issues. In itself, R-Drive Image's core functionality vastly simplifies mass deployment of new computer systems or software upgrades for existing machines. But R-Drive's powerful advanced scripting feature makes repeating this task even easier, reducing the entire process of cloning a disk into a one-click operation. With the ability to clone a source disk onto another target disk or restore a disk from an image, R-Drive Image allows you speed and flexibility for remote and on-site system maintenance and deployment. Try it now by downloading a 15-day trial version for free. If you find R-Drive Image valuable, you can purchase a license that suits your operation's needs and budget.
You may read more about R-Drive Image online:
Online Help
Downloadable manual
Discussion forum
- Data Recovery Guide
- Why R-Studio?
- R-Studio for Forensic and Data Recovery Business
- R-STUDIO Review on TopTenReviews
- File Recovery Specifics for SSD devices
- How to recover data from NVMe devices
- Predicting Success of Common Data Recovery Cases
- Recovery of Overwritten Data
- Emergency File Recovery Using R-Studio Emergency
- RAID Recovery Presentation
- R-Studio: Data recovery from a non-functional computer
- File Recovery from a Computer that Won't Boot
- Clone Disks Before File Recovery
- HD Video Recovery from SD cards
- File Recovery from an Unbootable Mac Computer
- The best way to recover files from a Mac system disk
- Data Recovery from an Encrypted Linux Disk after a System Crash
- Data Recovery from Apple Disk Images (.DMG files)
- File Recovery after Re-installing Windows
- R-Studio: Data Recovery over Network
- How To Use R-Studio Corporate Package
- Data Recovery from a Re-Formatted NTFS Disk
- Data Recovery from an ReFS disk
- Data Recovery from a Re-Formatted exFAT/FAT Disk
- Data Recovery from an Erased HFS Disk
- Data Recovery from an Erased APFS Disk
- Data Recovery from a Re-Formatted Ext2/3/4FS Disk
- Data Recovery from an XFS Disk
- Data Recovery from a Simple NAS
- How to connect virtual RAID and LVM/LDM volumes to the operating system
- Specifics of File Recovery After a Quick Format
- Data Recovery After Partition Manager Crash
- File Recovery vs. File Repair
- Data Recovery from Virtual Machines
- How to Connect Disks to a Computer
- Emergency Data Recovery over Network
- Data Recovery over the Internet
- Creating a Custom Known File Type for R-Studio
- Finding RAID parameters
- Recovering Partitions on a Damaged Disk
- NAT and Firewall Traversal for Remote Data Recovery
- Data Recovery from an External Disk with a Damaged File System
- File Recovery Basics
- Default Parameters of Software Stripe Sets (RAID 0) in Mac OS X
- Data Recovery from Virtual Hard Disk (VHD/VHDX) Files
- Data Recovery from Various File Container Formats and Encrypted Disks
- Automatic RAID Parameter Detection
- IntelligentScan Data Recovery Technology
- Multi-pass imaging in R-Studio
- Runtime Imaging in R-Studio
- Linear Imaging vs Runtime Imaging vs Multi-Pass Imaging
- USB Stabilizer Tech for unstable USB devices
- Joint work of R-Studio and PC-3000 UDMA hardware
- Joint work of R-Studio and HDDSuperClone
- R-Studio T80+ - A Professional Data Recovery and Forensic Solution for Small Business and Individuals Just for 1 USD/day
- Backup Articles
- R-Drive Image Standalone and Corporate license transferring
- Backup with Confidence
- R-Drive Image as a free powerful partition manager
- Computer Recovery and System Restore
- Disk Cloning and Mass System Deployment
- Accessing Individual Files or Folders on a Backed Up Disk Image
- Creating a Data Consistent, Space Efficient Data Backup Plan for a Small Business Server
- How to Move the Already Installed Windows from an Old HDD to a New SSD Device and Create a Hybrid Data Storage System
- How to Move an Installed Windows to a Larger Disk
- How to Move a BitLocker-Encrypted System Disk to a New Storage Device
- How to backup and restore disks on Linux and Mac computers using R-Drive Image
- Undelete Articles
- Get Deleted Files Back
- Free Recovery from SD and Memory cards
- R-Undelete: Video Recovery
- Recovery from an External Device with a Damaged File System
- File recovery from a non-functional computer
- Free File Recovery from an Android Phone Memory Card
- Free Photo and Video File Recovery Tutorial
- Easy file recovery in three steps
Rating: 4.6 / 5
Thanks